The Celestial Vault
(The Old VSO Page)
(last worked on: February 14th, 2025)
(You're at: https://57296.neocities.org/old-vso.html
) (Also: see this (old) update.)
Fast Find >> Page-1,
Page-2,
Lunar
apparitions,
VSOing, AAVSO,
Old
barn door tracker,
New barn door tracker, photometry,
Astrophotography,
Magnitude,
Why, Photo
options,
Canon-6s, Big
ideas, Old camera finder wire, Modern
camera finder,

(This page consists of obsolete sections expurgated from
my "Page #2" --which might still be of interest --to amateur astronomers
who've been living under rocks for 20 years. Disregard what looks like
"present tense" here.)
* Looking back, --using my Minolta
SLR film camera seemed so simple: focus, shutter, aperture, film speed
--and those settings would stay where you put them. Minolta's 1974 manual
(a worthy printed page hardback) covering all of their SRT series
SLR cameras, lenses, accessories and associated products spans 191 pages.
The Canon T5i DSLR's manual --alone-- runs 380 PDF pages --!
The Dogson & Photography:
When Dogson-1 was still a Dobson, I started out by
using an old mechanical single lens reflex camera (the venerable Minolta
SRT-101), which was mounted on a stout chunk of wood and aluminum angle
stock --for squaring onto the eyepiece and doing prime focus, non-tracked
photography --mostly of the Moon. It also accommodated our two Sony digital
cameras (a fine old Mavica and the excellent DSC-P71 illustrated here),
all in "afocal" mode.
This rig could image via prime focus (which looked
sharp), afocal coupling, or by way of eyepiece projection
(pretty fuzzy). My telescope was still a Dobson (and
those chains were for dynamic vibration damping).
I (intermittently) used that Minolta by itself for
20 years to make tripod astrographs with pushed T-Max 400 speed film.
It turned an effective 41mm of glass to the sky. Its excellent f/1.4 x
58mm lens held 20 micron star images down to magnitude 8 with only a 10
second exposure. Later I used a Minolta 135mm x f/2.8 lens (but mostly
at f/4 = 34mm of glass). By comparison, a Canon T5 DSLR's 55mm x f/5.6
(full zoom) comes-with lens has an effective aperture of 9.82mm (5.14mm
at f/3.5 x 18mm minimum zoom). The optional 18mm to 135mm zoom (f/3.5 to
f/5.6) tops out at an effective 24mm of glass to the sky. (These lenses
have as many as 13 lens elements and 22 air-glass surfaces for the light
to struggle through --uf-dah!)
The old Sony Mavica camera has worked with telescopes
for others, but not for me.
Next I tried using our old Sony Mavica, afocally coupling
it to a 25mm Plössl eyepiece --via a star diagonal, such that the
camera wouldn't be hanging out so far. However, this didn't work
for me at all, perhaps because the nodal point of that big lens was too
far back from the exit pupil of the eyepiece.

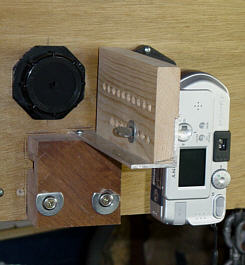
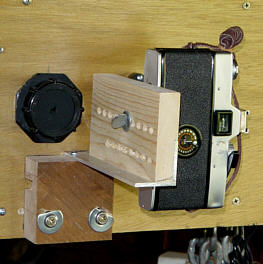
That knob connects to a long piece of threaded rod
stock through
a universal joint --and moves the primary cell sled
to focus the camera.
I tried it again with a more recent Sony camera: the
DSC-P71. This is a typical looking digital hand camera with a good set
of menu options, from which I selected: center auto focusing, spot exposure
metering, and max pixels (3.1 mp) for Lunar photography. At first
I connected its video output to an affordable "Coby" brand DVD player that
has its own battery power and a built-in LCD screen to make sure the focus
was within a range that the camera's AF could grab, but Lunar auto-focusing
turned out to be no problem at all.
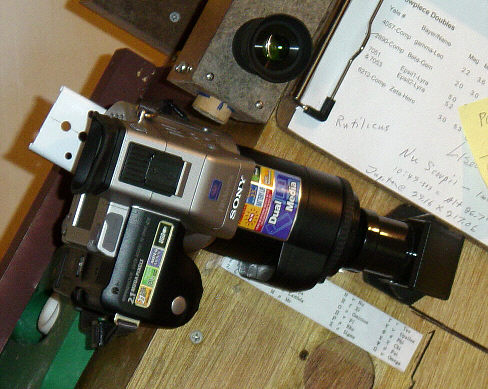
This camera worked pretty well with my scope, especially
since I was able to slide the mirror and cell back and forth in order to
optimize the camera's proximity to a 25mm Plössl eyepiece (which seemed
a good match to the Sony camera's lens at 3x zoom). It probably helps
that this was an f/10 scope. Exposures ran about 1/125 of a second
and the camera usually reported itself to be at f/3.2.
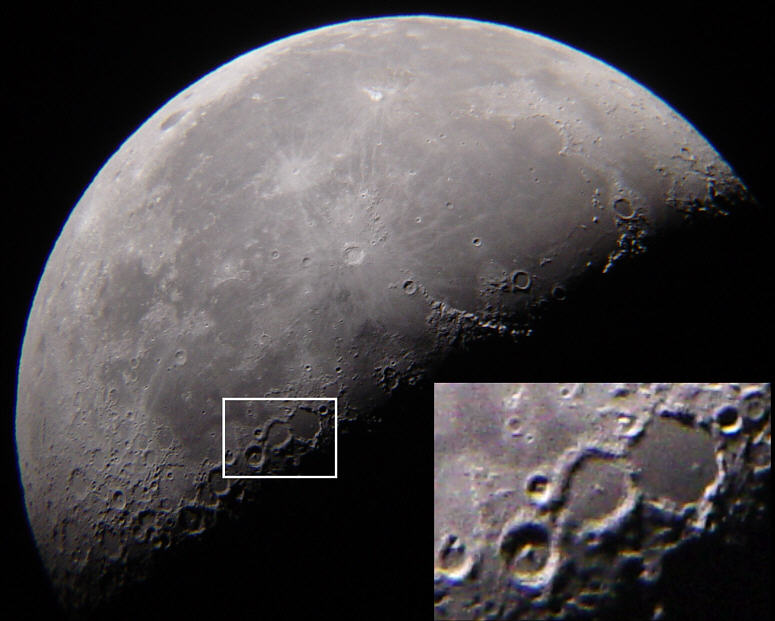
I once got down to 2 arc-second resolution, but not
this time.
I also attempted to shoot through a 10mm Plössl,
but that worked poorly.
I still didn't feel "in control" of the process and
I lost a number of frames when the focus or alignment slipped. As
a result, I broke down and bought a proper "T Mount" and Minolta adapter
for my old SLR --which were affordable through www.surplusshed.com.
Going back to old fashioned methods. I long
ago found it made a big difference
to lock up the SLR reflex mirror before shooting,
and this continued to be the case with my Dobson/Dogson.
(The Moon is bright enough for fast, non-tracked exposures.)
This arrangement felt satisfyingly righteous: astrophotography
"as God intended" --but --dang: the results compared poorly to what I could
image using our little Sony digital hand camera.
My conclusion from these efforts is that, despite having
some luck with my results, despite that photography is so important to
the doing, the documenting and the analysis of real astronomy --photography
through a telescope is a pain in the butt --no matter how it's done. I
can't imagine trying to manage all the claptrap that modern CCD astrophotography
entails, or even the economy route of using some type of web cam or video
head, cables, monitor, and recording equipment --then spending hours processing
and editing the results.
Photometry:
Magnitude --and "Poisson distribution"
* Although I was aware that CCD/photo receptors have
long been getting down to tallying individual photons (say: with the venerable
old GE-931 photomultiplier tube), until reading nitty-gritty stuff about
photometry in the Sidgwick handbook recently, it didn't "click" in my head
that the totals of such counts affected the certainty about a star's magnitude
--in the same way that I error bracket my Geiger counter totals.
For 5+ years I've been logging gamma photons --as "background"
radiation (alleged gamma radiation --another story). It arrives in ample
amounts, but since a Geiger-Mueller tube only fires on about 2% of them,
the mean sea level counts-per-minute is in the range of 10cpm to 35cpm
--depending on the size of one's G-M tube. At higher altitudes and over
more radioactive soils, the count averages can be higher.
* What one reports about logged counts can only be
stated with some plus or minus degree of certainty, depending on how high
the count rate and for how long it was counted. No doubt you're all familiar
with this statistical stuff --so essential to running tests and experiments.
If (say) the long term average was 10cpm, and one logged
any given total count over a period of 100 minutes, then that count has
a high probability of varying by the square root of 1000 = +/-31.6 --for
a 10 +/-0.3cpm average, but a low probability of varying by (say) 10 +/-1.0
cpm.
* When it gets down to counting arriving light photons,
it's the same thing: you might only have enough photons to confidently
state a star's magnitude to one place beyond the decimal point.
* Visual variable star observers are encouraged to
work well above their minimum magnitude, in order to achieve valid results.
* When the logged evidence for a distant star's planet
gets presented in terms of magnitude variations of only a percent or two,
it must take a lot of collected light to stay above the statistical noise
level.
* I won't be doing any such delicate photometry here,
but I'm looking forward to recalibrating our Canon A590 camera and having
at the area around Polaris --my northern meridian being much darker than
my southern. That, and maybe 4 more of my old "observation areas" (checking
for AAVSO targets) --well spaced through the seasons, areas in the sky
which pass over or near my zenith.
I've re-read the section in Sidgwick's Amateur Astronomer's
Handbook on photometry, the many considerations, descriptions of lovely,
old fashioned instruments and approaches to gauging star magnitudes visually
--and I have trouble featuring myself using any of them. (IMO: Sidgwick's
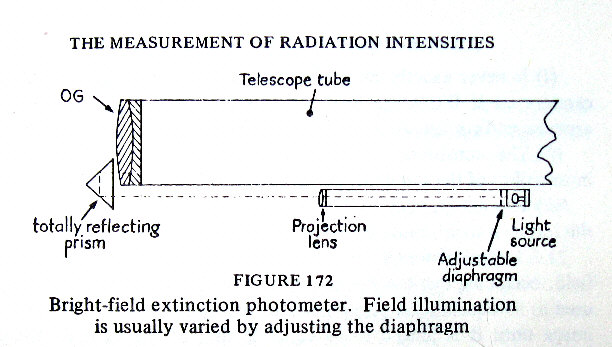
Handbook is an essential resource.) On pages 366 and 367 is a description
and illustration of the "bright field extinction" approach to stellar photometry,
which was in use through the turn of the last century --before astrophotography
swept up this kind of work.
 This works, yielding a nicely illuminated field, and it's
easier to build now by using a white light LED, the light output of which
is proportional to electrical current (so use a regulated source voltage
and a logarithmic (ie: "audio") taper potentiometer. The compactness of
an LED lets you place it and a small lens in (say) a felt tip marker cap
(simply mounted in front of the objective, dispensing with the prism).
This works, yielding a nicely illuminated field, and it's
easier to build now by using a white light LED, the light output of which
is proportional to electrical current (so use a regulated source voltage
and a logarithmic (ie: "audio") taper potentiometer. The compactness of
an LED lets you place it and a small lens in (say) a felt tip marker cap
(simply mounted in front of the objective, dispensing with the prism).
Trouble is: the illuminated field exit pupil is very
small, so I ended up looking at all the blood veins, vitreous floaters
and other defects in my eye.
I tried to use a large, diffusely illuminated, mat
white field --reflected into the objective with a pane of glass, but (of
course) starlight bounced around in the glass, multiplying brighter stars.
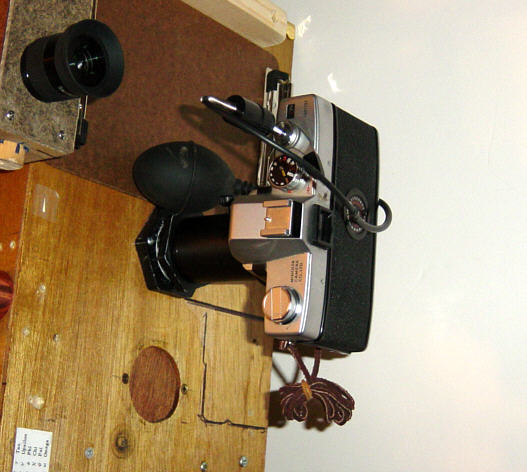
** However: by simply placing an LED
close to the objective --diffused by a 7/16 inch disc of paper, I got an
apparently nice bright field of illumination:
A diffused, bright field, photometer rig (with Post-a-Note
temporary
calibration, and an earlier calibration card in the
foreground).
* The bright field was way too bright (IMO), even for
extinguishing a 4th magnitude star.
* Despite my previous experience --finding that a lensed
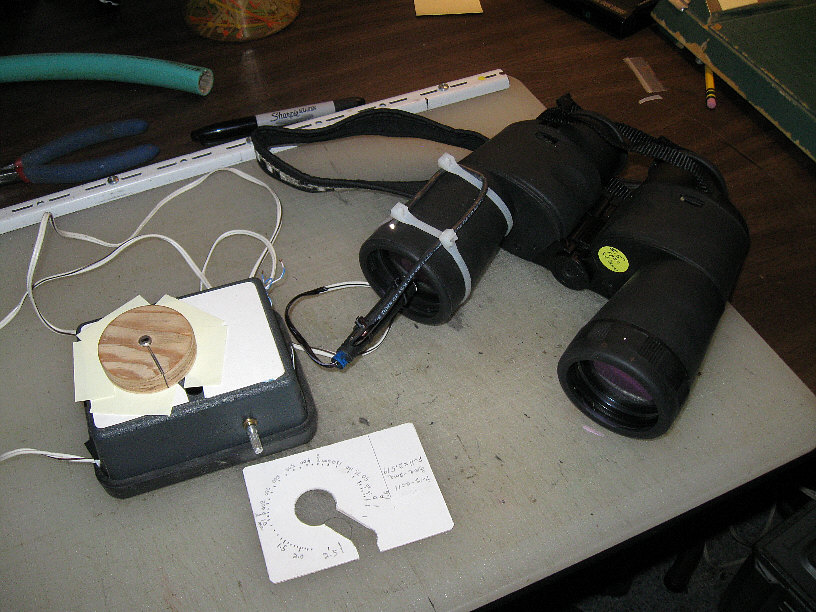
arrangement (equivalent to "Figure 172") produced a disturbingly small
exit pupil, I rebuilt another version of the above with a 37mm focal length
lens which collimated a (0.35mm) pinhole source --for about a projected
1/2 degree field. My initial field test showed promise (repeatable values
when extinguishing stars), but at too bright a range, so I added R3, which
ended up being a fixed 100,000 ohm resistor. R2 is an audio (logarithmic)
rate potentiometer and is under the big wooden knob. (Take care which two
of the pot's 3 tabs you use.)
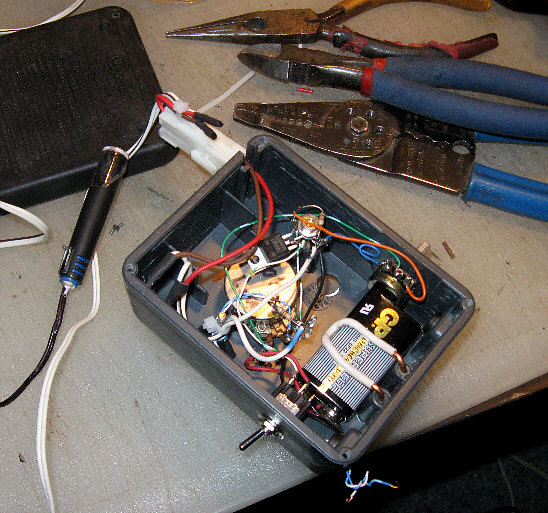
That pair of blue/white wires is the DVM (digital
volt meter) connection.
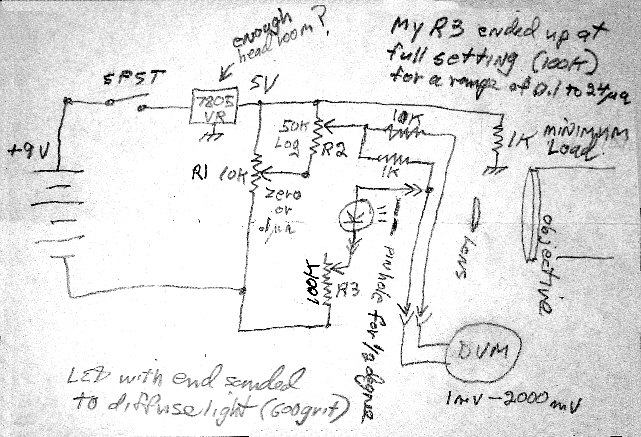
The initial calibration (using the DVM) was in 2.51x
multiples of the LED current,
on the assumption that the (white) LED's light output
is proportional. However, that might
turn out not to be the case. In any event, calibration
should be based on actual relative star
magnitudes, plus quarter or fifth mag incremental
marks. The idea isn't to achieve absolute stellar
calibration (impossible), but to compare your targeted
star to the known brightness of a nearby reference star.
Given the magnitude reach of binoculars, the likely
subjective nature of this method, the inherent physiological problems of
using binoculars --and in comparison to what can be done with rather simple
(stacked?) photography, I decided to take another look at my Barn
door tracker.
Happy star trails!
Apparitions
On The Moon
The following are more like seeing
or imagining images amongst billowing clouds in the daytime sky --than
"discoveries", but memorable, nonetheless.
"The Ankh On The Moon"--to
judge by my fruitless Google searches, has yet to be noted in a published
fashion, although thousands of observers must have been momentarily gripped
by its appearance. Watch for it just off the rim of crater Plato when the
Moon is waning --between 50% and 44%. You might have to wait a few months
(or even 19 years) to catch this phase with the Moon obligingly high in
the night sky.
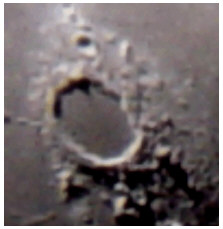
December 31, 2007 at 14:00 hours UTC
(Look at about "2:30 o'clock".)
Although this feature has been drawn as being raised,
per the honorable work: "Lunar Astronaughtical Charts" by Christian Legrand
(posted at: http://www.lpi.usra.edu),
a very good anaglyphic stereogram of crater Plato at http://www.flickr.com/photos/ltvt/498705238/
shows part of the ankh and it's a depression --plus a scattering of craters.
Several other photos turned up on the Internet which
clearly show the ankh --per:
* A beautiful photo by "Bob P.", found at: http://www.pbase.com/bob_p/image/73765230/medium,
* --and at zimmer.csufresno.edu/~fringwal/moon-gallery.html.
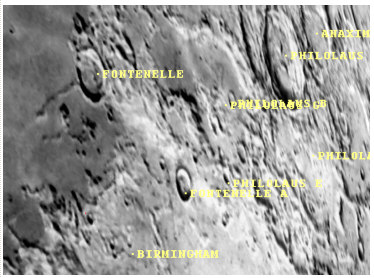
"Daniels' Square" --which I laughingly so named (finding
out later that it's "Philolaus-D") --because I at first took it to be my
sensational recovery of the long lost "Mädler's Square" --and thanks
to all who kindly indulged me.
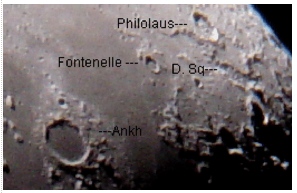
12/31/2007 @ 13:52 hours UTC - 7.2 degrees libration
at a limb angle of 317 degrees.
In this light, any vestiges of Mädler's Square
attached to crater Fontenelle aren't visible. The crater with a pronounced
square is "Philolaus" (and please see my links to Lazzarotti's imaging
below) --so named by Mädler(?) Given the size difference, I doubted
that a serious selenographer would mistake Philolaus (moved forward by
libration against the Moon's outline) --for Fontenelle, but then I ran
across an additional clue. Per page 242 of the 1876 reference "The Moon",
by Edmund Nieson and Edmund Nevill, there'd previously been some confusion
concerning the name and/or location of Crater Philolaus.
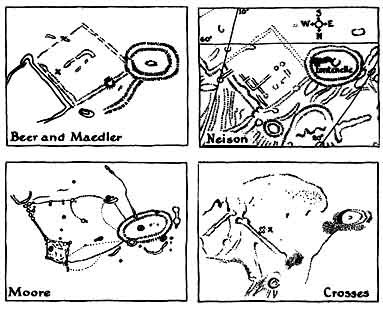
Here are early drawings of Mädler's Square (thanks
to Scientific American's "The Amateur Astronomer" on CD), which at one
point was unofficially designated as "Bartlett's Square", for the amateur
astronomer who pronounced it to be "missing" --somehow absorbed into the
Moon:
--and how it looks via photo-maps in the (wunnerful)
"Virtual Moon Atlas" program:
--in which we can make out two wall-like sides of what
wants to be a square --anchored on crater Fontenelle.
Where I initially went wrong was in not appreciating
how significantly the Moon shifts between its "libration" extremes, and
being quite surprised that there could be two very similar (looking)
features so close together.
Wildly different views, due to libration shift:
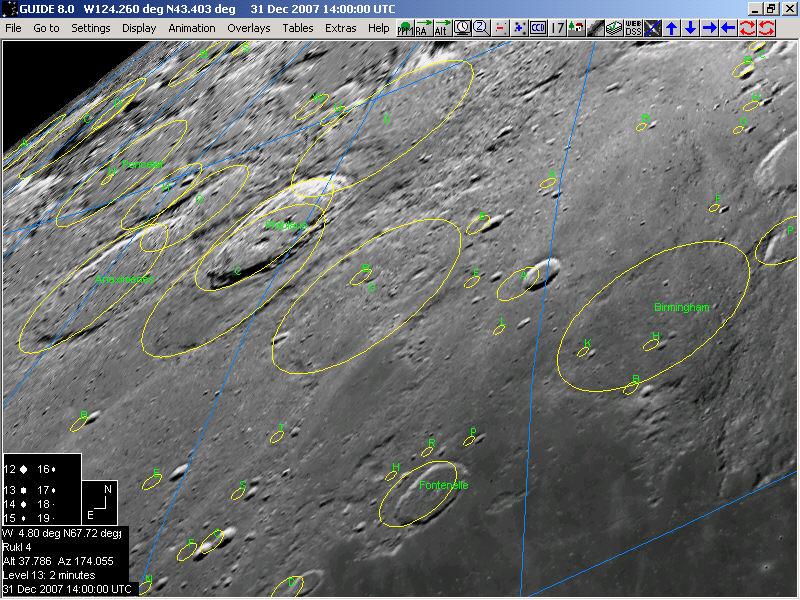
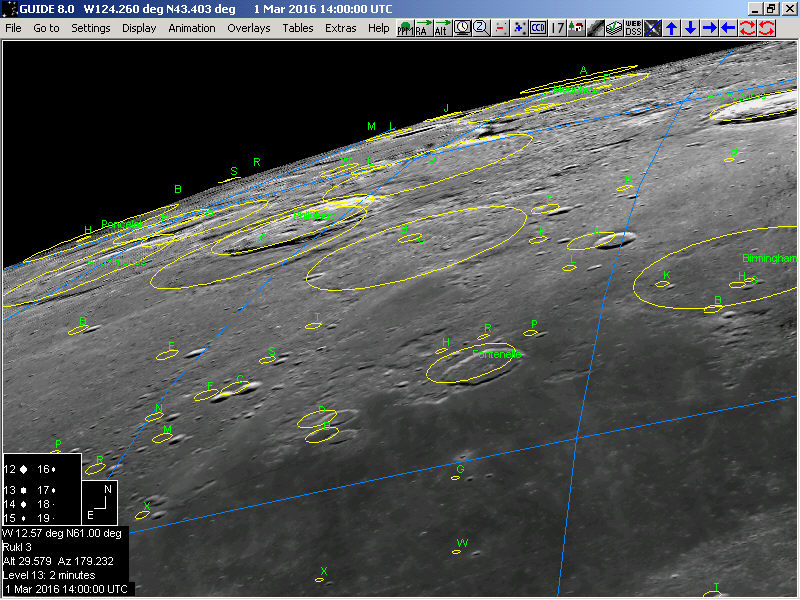
The libration difference between December 31st, 2007
and March 1st, 2016 --as displayed by Guide-8 (click to enlarge each)
See also (Cloudy Nights contributor) "Dan Luna's"
anaglyphic
rendering of a pair of images of Crater Fontenelle that he matched
up between the USAF Lunar Atlas and the Consolidated Lunar Atlas (from
a 2007 discussion at:
> http://www.cloudynights.com/topic/119125-3d-moon-photos/#
You'll need a pair of anaglyphic (3D) glasses with
red and cyan filters over your eyes --and red is left.
3/16/2016 update: Unfortunately
--and like my sighting of the "ankh", "Daniels' Square" is just a trick
of perspective, lighting and soft resolution --as you can see by Paolo
Lazzarotti's amazingly sharp selenography (looks like 0.2 to 0.3 arc-second
details, everything a 16 inch primary can deliver):
> http://www.lazzarotti-hires.com/?lan=english
--when seen more
obliquely and with more resolution, "Daniels' Square" starts to look
like the description provided in the "Virtual Moon Atlas" program: a vaguely
elliptical "ejecta" debris field, labeled "Philolaus D". Notice those "line
pair test" striations --goodness!
See also Lazzarotti's capture of crater Plato:
> http://www.lazzarotti-hires.com/images/moonsection.png
* Mr. Lazzarotti designs, tests and markets the telescope
he's using: the largest of his "Gladius" series in 250mm, 315mm and 400mm
apertures. See the product line-up at:
> http://www.alpineastro.com/
* update: I advanced Project Pluto's Guide-9.1 sky
program ahead by exactly 19 years (the "Metonic period"), but the resulting
Lunar visualization and data didn't look at all like that of December 31st,
2007. I take it that 19 years simply places the Moon in the same star field.
Variable Star Observing
(Partially updated: 9/16/2017 --but it's mostly 2010
film days stuff, so see my newer approaches.)
I was discouraged by the complexities of CCD imaging
and a felt lack of personal control over what's going on, so I forged ahead
with film, then turned to simple digital hand cameras and manual digital
graphics.
Working with color and panchromatic films, I purchased
a Hoya X1 green filter, which is comparable to Wratten or Tiffen numbers
13, 58, and "Green 2" --but with good optical coatings on both sides.
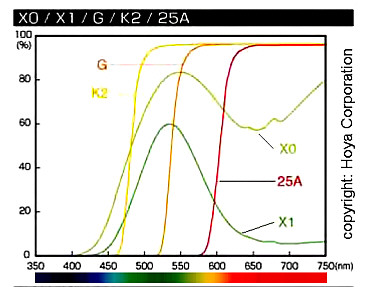
The X1's transmission curve appears to be very similar
in shape to that of a "Johnson V" filter. I see about as much difference
between two contending Johnson Vs in the next graph. (That "Galaxy Camera"
item is a recent analysis of whatever (no longer known) brand the Bradford
Robotic Telescope's camera had installed years ago.
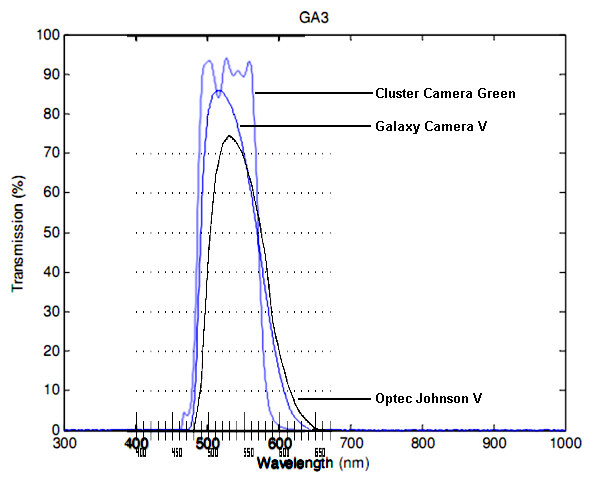
I've superimposed the curves: from Optec, a recent
analysis of BRT's "V" filter and a tricolor green filter.
An X1 should have cost me two magnitudes of light,
but somehow I only seem to have lost one mag. The results from using Fuji
800 ISO C-41 color print film (scanned to gray scale) were encouraging,
so maybe there's no need of fast black & white film with home processing.
(I' kept enough gear to do that from my darkrooms of the past.)
The main filtering problem is in keeping blue stars
in line (on the luminance curves), but unfiltered red (often variable)
stars also seem out of place. (Later on I started using a "barn door" tracking
device, which permitted of longer exposures.)
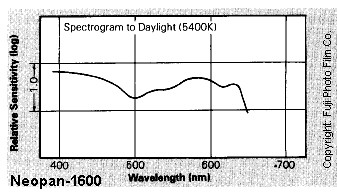
For those who prefer to use black and white film,
Fuji
Neopan 1600 (imagine it clipped at about 450 nm by the X1 filter) looks
pretty good. It has an actual ISO/ASA of about 1000 --a tad faster than
the 800 speed color I'm using, and much faster than the (pushed) TMax-400
I used for 20 years. To look at that spectral plunge on the right, it seems
a good antidote to how the Hoya X1 filter trails off into the infrared.
Unfortunately, the dimmest light which would be expected to register with
a 10 second exposure, takes a 50% hit (a 1 stop reciprocity failure loss),
so the true speed becomes 400 or 500. This is also true of fast color films.
After casting about on the Internet for other's experiences
with Neopan 1600, it seemed that the best approach was to develop it in
Kodak's "Xtol" --diluted 1 to 1 at most (so as not to over-dilute the developer's
grain solvent). Last I checked, you could still order it from Freestyle
darkroom supplies over the Internet. You'll also need some fixer (Kodak
Rapid Fix), Photo-Flo solution, Heico Permawash, a Patterson System 4 tank,
a sleeved change bag --and more advice.
There seems to be a prejudice against color film and
color sensors in the astronomy community --and for cause. While CCDs masked
for color imaging can probably be made to work by making sure there's a
good pixel count for each star (always a good idea), there's probably not
much to be done about a ragged cross-over color response in a C-41 or an
E-6 emulsion.
I also had a concern that, by using a fairly sharp
green filter, I'd be engaging far fewer silver-dye couplers in a color
emulsion. When I digitally filtered Fujicolor-800 speed film in the past
for just the green channel, what was left looked pretty ragged. However,
my results looked good in that respect as well.
Color film is a lot easier to get and process, so I
gave it good try. (Presumably, I was dealing with the nice transfer curves
below, not those lumpy looking "dye sensitivity" curves, eh?)
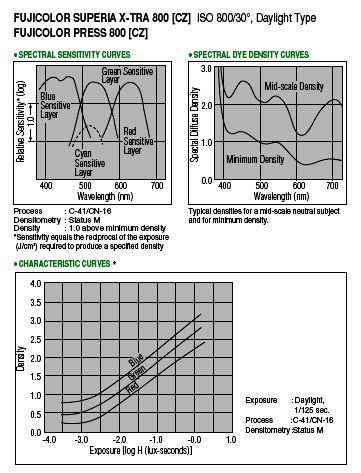
(copyright 2005, Fuji Photo Film Co., LTD.)
That offset between the transfer curves is about a
heavy yellow mask that's associated with color negative films, which is
in turn due to how the dye-coupled emulsions have to be layered up. It
seems to all "come out in the wash" when scanned (or printed) as
C-41 film (although I used a gray scale output from our CanoScan 8400F,
and one might choose its 16 bit FITS output).
No doubt that masking/color bias costs color negative
films some dynamic range, and that monochrome/black and white films could
do better. Unfortunately Kodak and others have discontinued engineering
them, leaving Fuji (it seems to me) with the strongest entries: Neopan
100, 400, and 1600 (which is actually 800 to 1000 ISO, and loses speed
quickly due to reciprocity failure). So I was betting that Fuji 800 color
film, when clobbered with an X1 Hoya filter, would yield results that one
can live with. (I've long since stopped pursuing film imaging, of course.)
* I also took another hard look at how I processed
those scanned images. I have a graphics program: "Picture Window Pro-3.5"
with amazing features which compensate for light fall off due to the camera's
lens and atmospheric density at lower elevations. It also handles 16 bit
per channel images, both as TIFFs and FITS. The light fall-off feature
in PWP-5 is automated but (for me) it didn't work.
> http://dl-c.com/content/view/47/74/
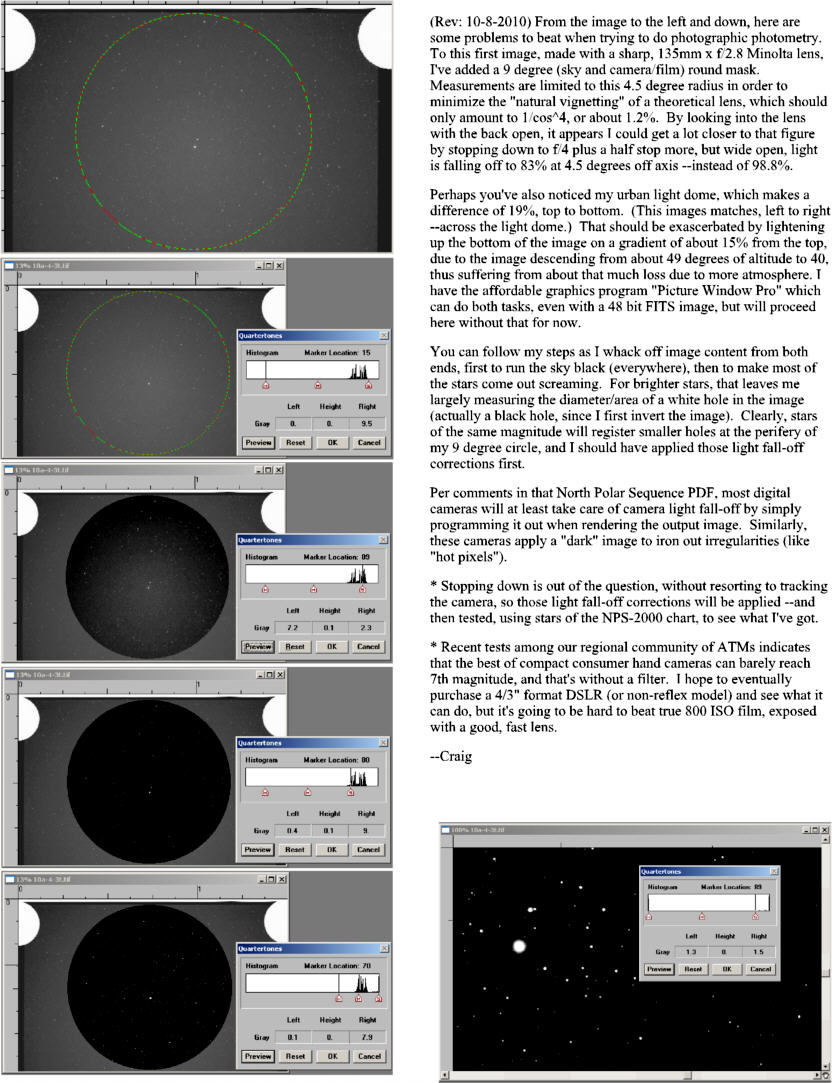
Here's a (click to enlarge) pictorial description of
how I go about nursing more stars out of my photography (and still do,
after stacking digital originals):
** Since my prime "observation area"
is in a 9 degree circle around Polaris (which has some neglected variable
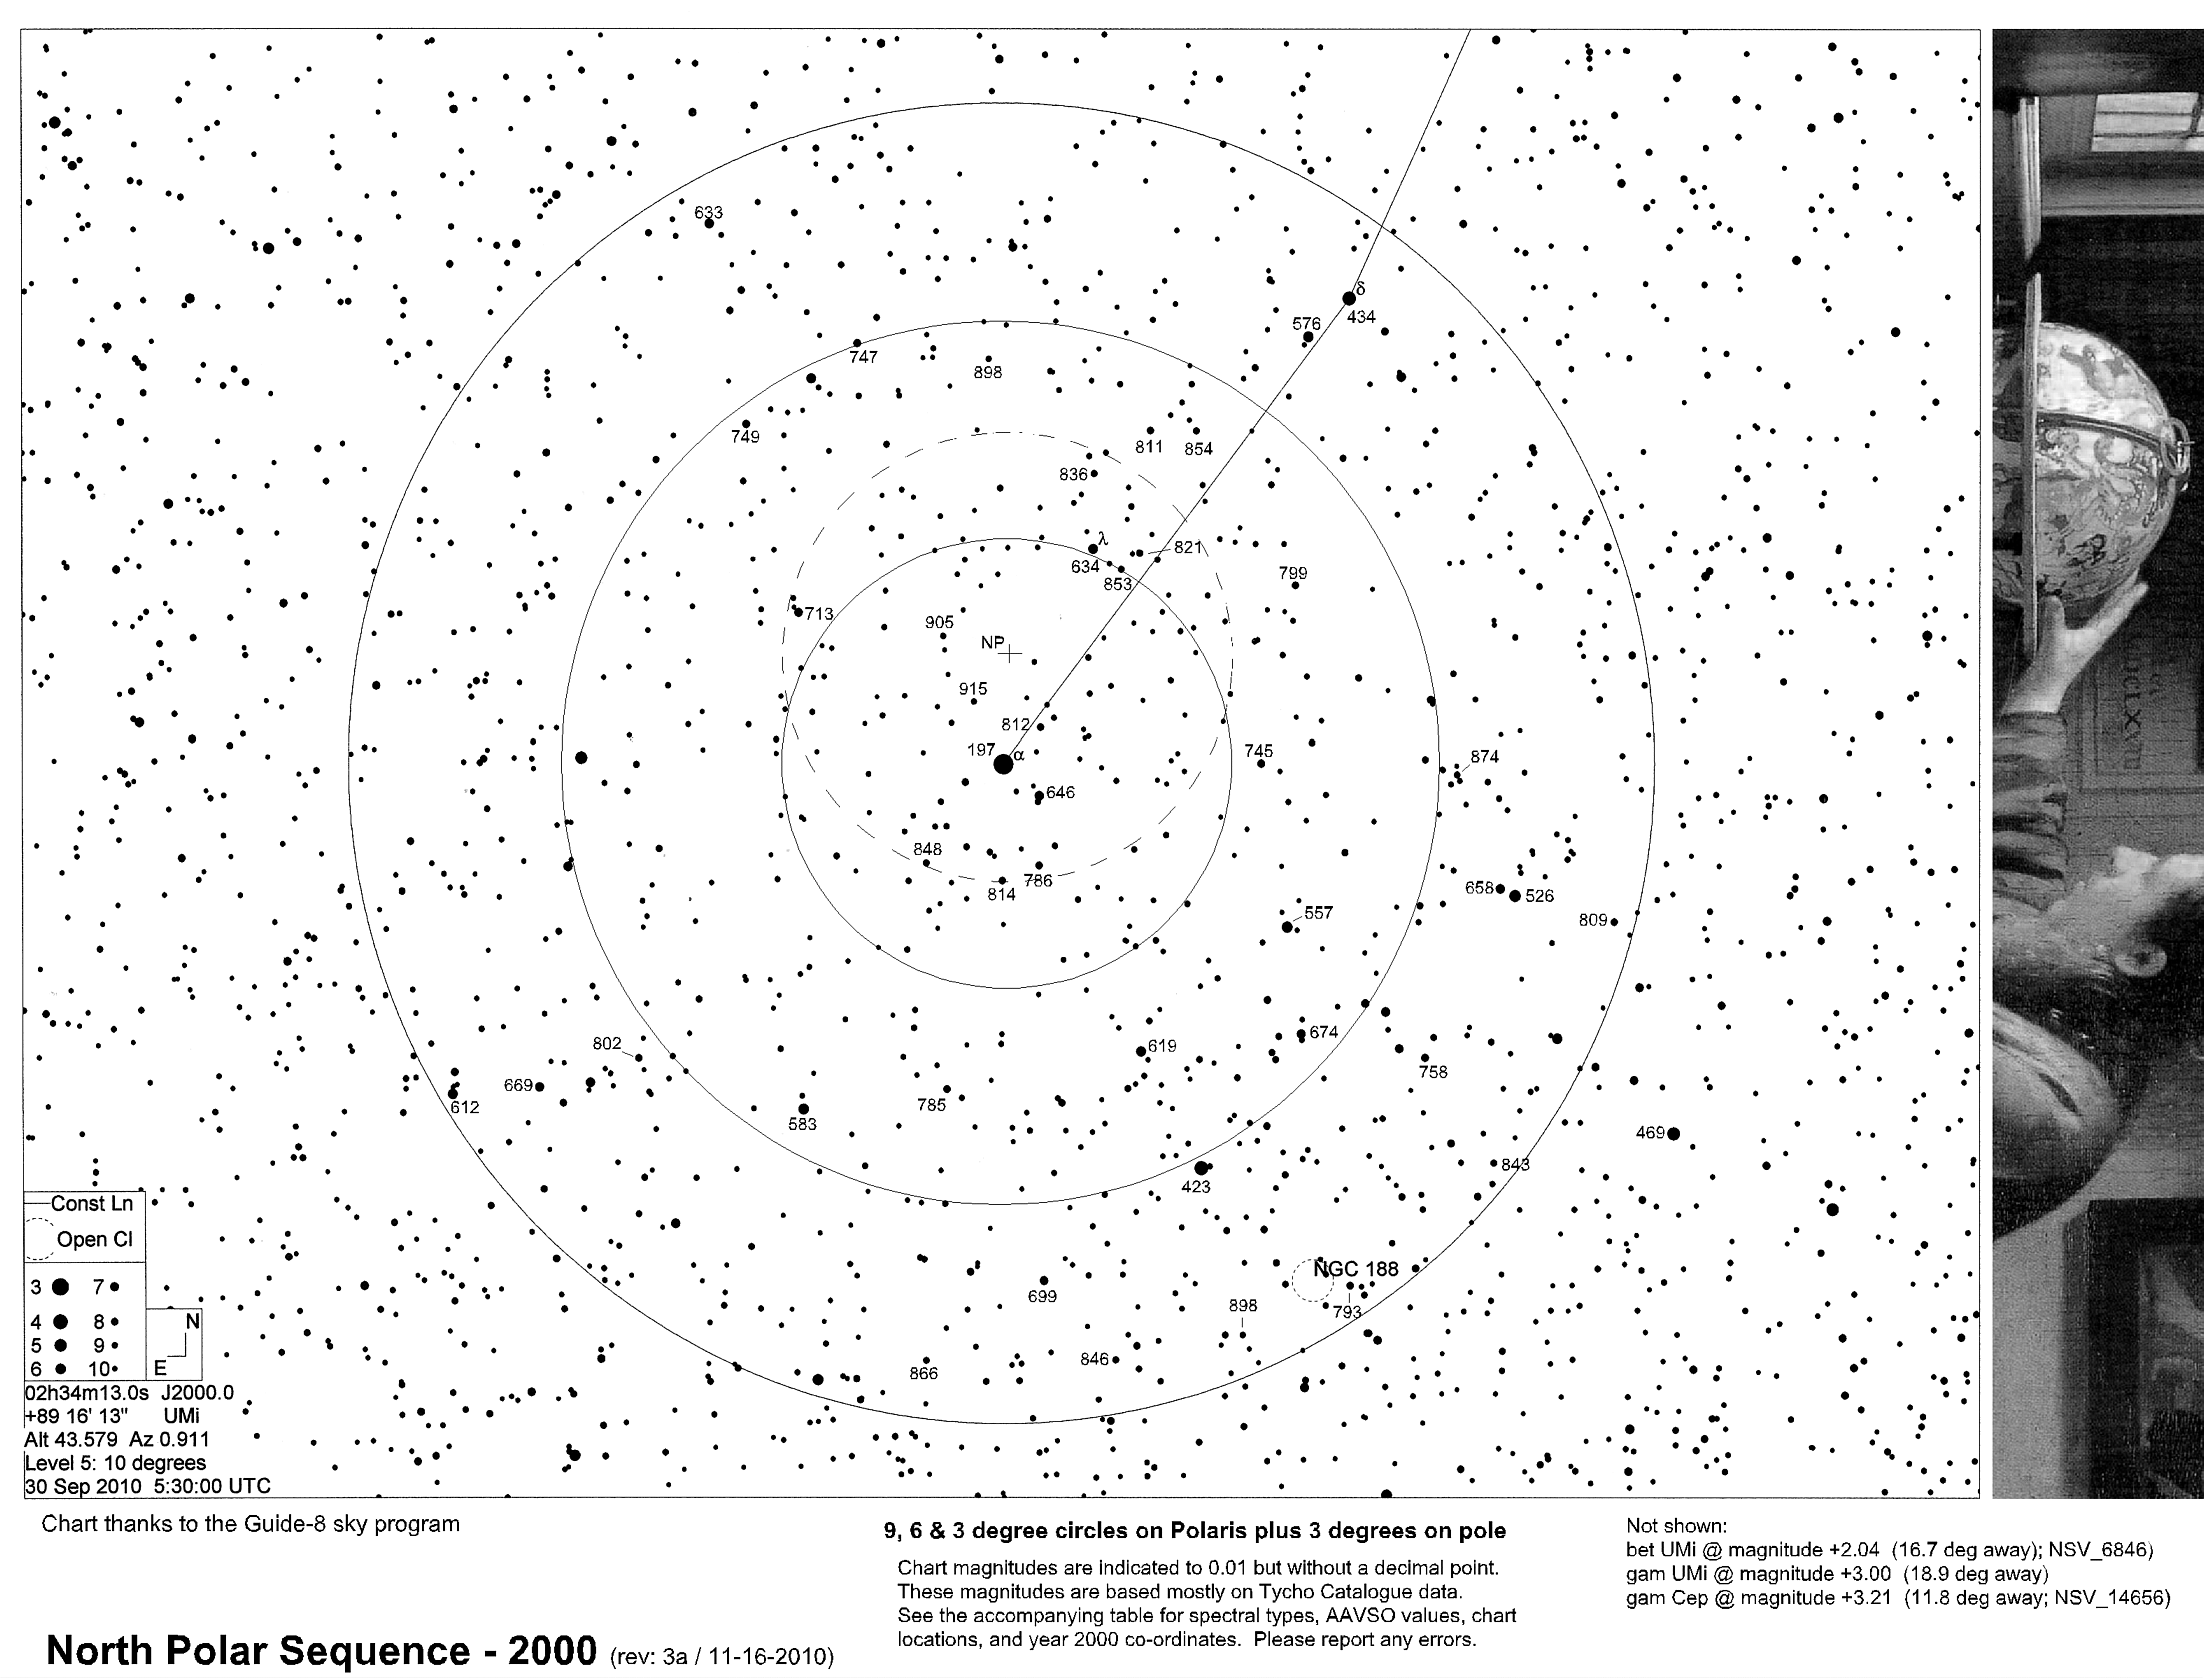
stars), I made up a year 2000 version of the "North Polar Sequence":
(and as a PDF)
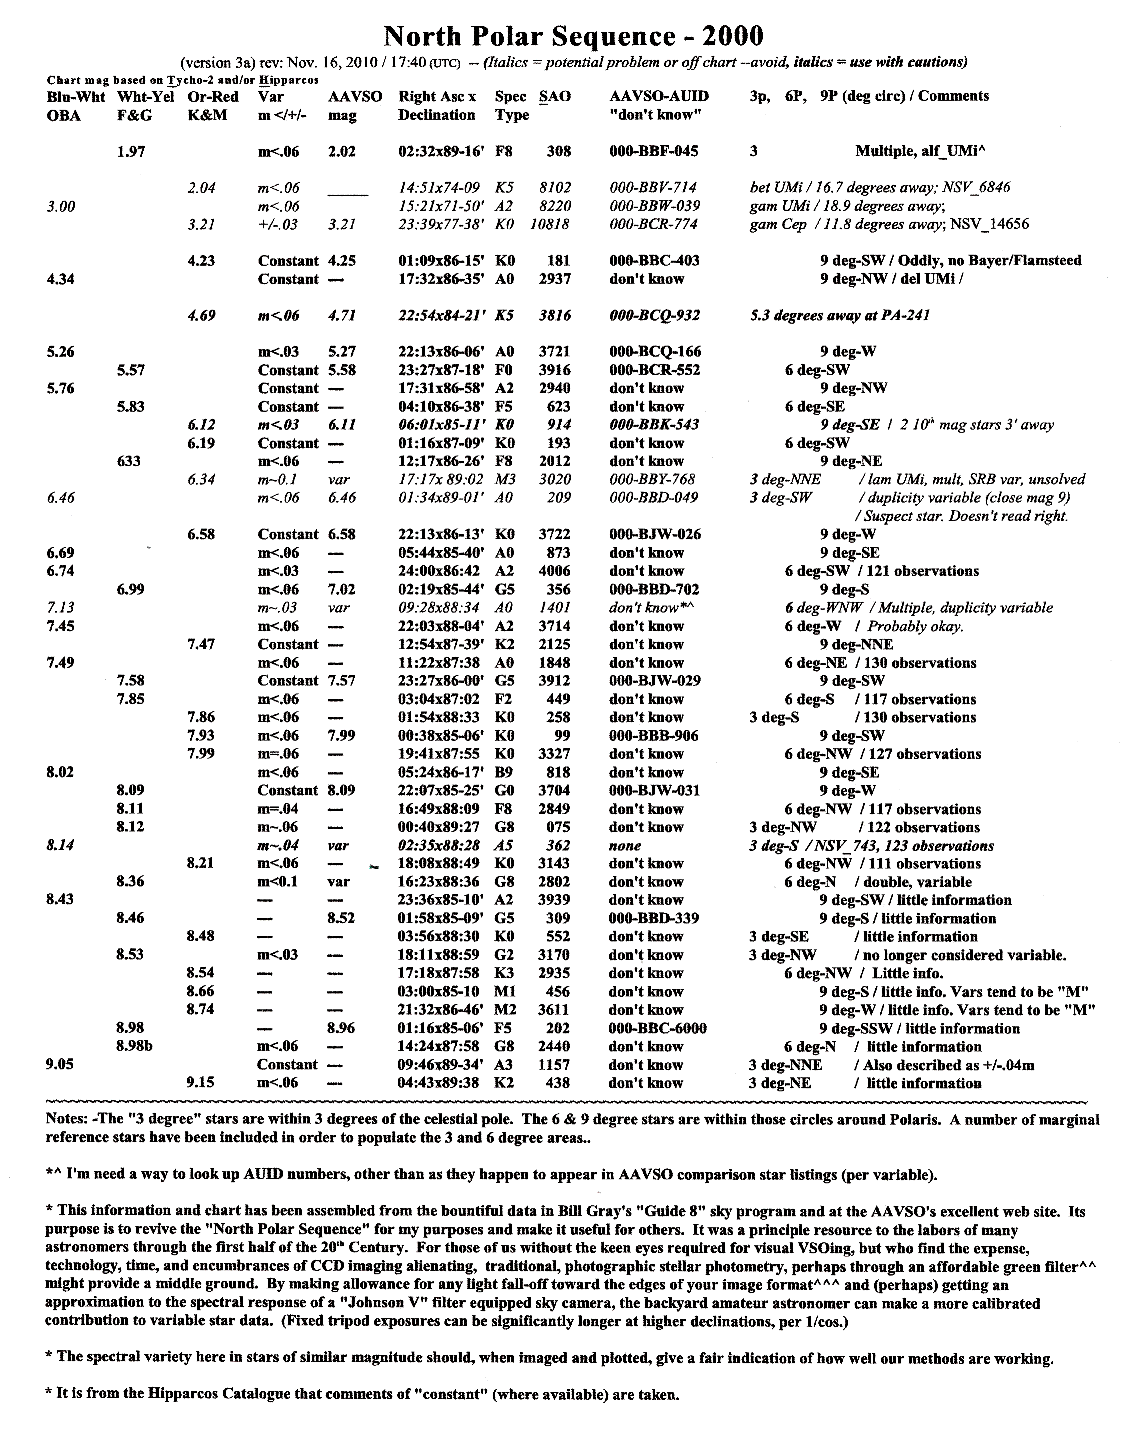
 --along with a sky chart.
* As of 11/21/2010, I was
satisfied with the cross-spectral consistency by using my fake "Johnson
V" (Hoya-X1) filter, but between the light loss of that filter and wanting
to use the f/4 setting of my Minolta 135mm lens, I had to build a "barn
door tracker" for exposures reaching to 2 minutes.
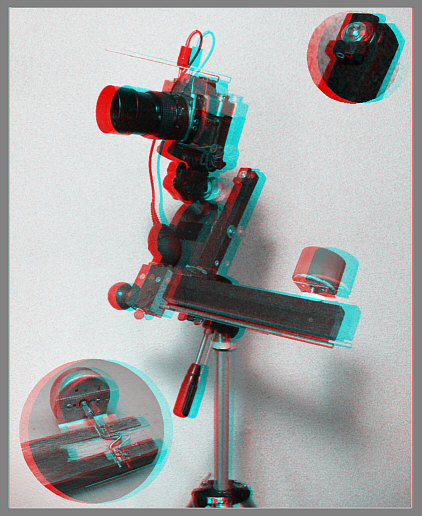
Many years ago, I built this heavy duty tracker:
 --which was originally placed on a tree stump. At some
point (looks like my work) it acquired a poorly anchored 1/4-20 T-nut (that
the tripod attaches to), the tripod head extension on top, and that very
nice universal joint replacement (foreground --must be Dr. Ted Touw's fine
work), for my solid brass plug shaft adapter under the motor. This tracker
is obviously too heavy for most tripods and while the motor/gear reduction
can be moved a bit, I don't see/remember a good way to to adjust the rate.
--which was originally placed on a tree stump. At some
point (looks like my work) it acquired a poorly anchored 1/4-20 T-nut (that
the tripod attaches to), the tripod head extension on top, and that very
nice universal joint replacement (foreground --must be Dr. Ted Touw's fine
work), for my solid brass plug shaft adapter under the motor. This tracker
is obviously too heavy for most tripods and while the motor/gear reduction
can be moved a bit, I don't see/remember a good way to to adjust the rate.
So I built a lightweight tracker--which
was too light (obviously) for my old 35mm SLR and its honking 135mm telephoto
lens --even with that lead ball counterweight.
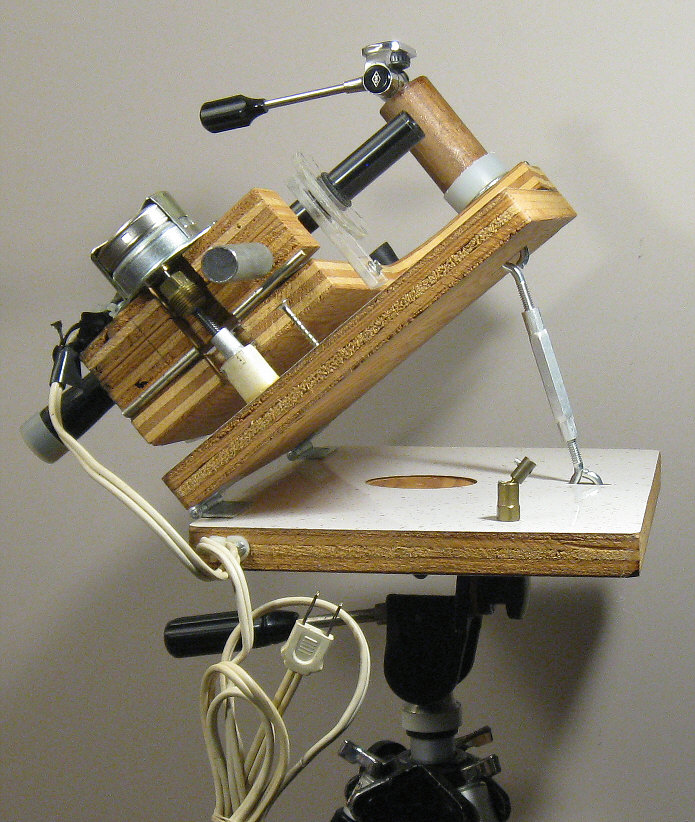
Barn Door Tracker
(use red-cyan 3D glasses, red is left)
This tracker has an "arm pit" drive that's good for
about 3 minutes. The (made in Tunisia) motor was taken from an older "Lux"
brand wind up kitchen timer. The current version of this timer can be purchased
almost anywhere (including Amazon.com)
but it's now made in China, so good luck on getting the same thing with
a nice metal shaft. The Lux timer's a bit spendy, so maybe something cheaper
would work as well. Features and issues:
~ The humble escapement of this timer will slow down
under load, so I added that sliding counterbalance. It weighs a pound.
With that heavy old SLR film camera and its 135mm x f/2.8 lens, it ranges
from barely enough (extended) to a little too much, so I keep a couple
rubber bands handy as "helpers" (and to keep the works from flipping over
in transit). For 95% of my aim points, however, first balancing the weight
on that crank arm to zero, then sliding the counterweight in 1.5" (for
about 40 grams of pressure --when aimed at the celestial pole) --works
fine.
~ That old camera tripod is a honey and can almost
handle the load, but you'll either want to use a lighter
camera or get a heavier tripod --if you're buying a new one.
~ The second head under the camera was cut off of a
typical $18 department store tripod and shows some strain. Again, use something
heavier, go to a lighter camera, or cobble
something up that will do the job.
~ To make the camera turn at sidereal rate, the lower
arm is made of 2 pieces. The outer end, with the motor and arm, slides
in and out against a short length of aluminum angle stock. It's secured
at the right length by tightening a screw.
Curiously, this design has a bonus in that the effective
length of the crank arm initially lengthens as it lifts against a glass
slide on the underside of the upper arm, which (at first) compensates for
the cosine loss of its up-angle.
 I've got the lower arm length set so that the tracker
gains slightly (less than 2 seconds of time) during the first minute, holds
steady for the second minute, then loses about what it gained during the
3rd minute.
I've got the lower arm length set so that the tracker
gains slightly (less than 2 seconds of time) during the first minute, holds
steady for the second minute, then loses about what it gained during the
3rd minute.
~ Should one want to expose longer than 3 minutes,
you'd build a more traditional barn door tracker that uses a tangential,
chord, or curved screw drive and some sort of a variable speed motor --such
as this honey:
> http://www.garyseronik.com/?q=node/52
--by Gary Seronik. Note that he uses a variable voltage
regulator to the motor, which is far better than just a rheostat in series.
Supplied with a "stiff" (meaning your power supply has a low source impedance),
constant voltage, DC motors do their damnedest to run at a constant speed.
If the regulator/controller isn't on the barn door itself, then use heavier
lamp cord to run the power up and a stout automotive jack-and-plug. Possibly,
this arrangement is immune to various loading presented by the camera's
angling. If not, consider a counterweight arrangement, such that the motor
always labors under about the same load.
* Seronik points out that while a double or compound
arm barn door drive design seems an attractive solution, it's pointless
unless you can figure out a polar alignment routine to achieve correspondingly
high accuracy.
* For solid photometric results, I've found it best
to stay 1 or 2 magnitudes from the limit of what I can capture on film
or sensors, which happens to be consistent with general AAVSO advice about
staying 2 magnitudes this side of what can be reached visually with a given
telescope or binoculars.)
* Reciprocity failure sets in hard for fast films as
exposure times increase, along with color "cross-over" problems. Hypering
techniques are helpful, but only for longer exposures than I care to deal
with --for which tracking and guiding become much more critical --which
makes astrographs a lot less fun. It might be saner to get a good DSLR
or a real astro CCD camera --but that leads to all sorts of expense and
complexities. So --I endeavored to make modest exposures (60 to 180 seconds)
work, using a simple tracking device. (Later I went to 15
second exposures.)
Here are yet a few more
thoughts about barn door trackers.
~ The white wire pointer in the camera's hot shoe is
a real eye hazard, which got replaced
with a shorter version of that Polaris "glow finder".
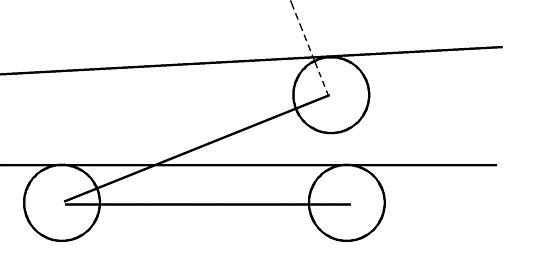
~ The Polaris finder's "pupil splitter" lens "jumps"
and projects that little 3/4 degree circle of glow film (per the above
stereo photo) into the sky, where Polaris gets placed on it --according
to the lay of the following chart:
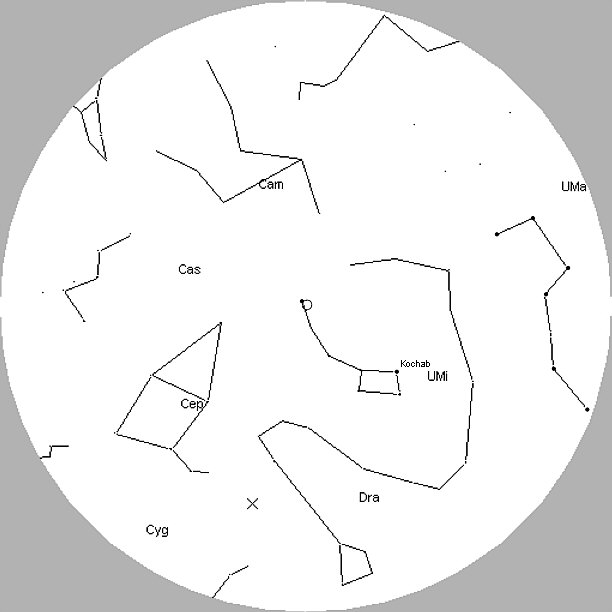
Chart for locating the celestial pole
--which you turn to roughly match the night sky. The
true celestial pole is in the middle of that little circle, on an imaginary
line connecting Kochab and Polaris --so here we see Polaris located at
about "10:30", which is where you place Polaris on the projected circle.
Earlier writ:
In 2009 I became a member of the
AAVSO,
a group that's as uniformly gracious and patient with novice members (like
myself) as they are professionally qualified in astronomy. While variable
star observing can be as abstract and technical as one might please, and
the AAVSO encourages us to take the plunge into CCD imaging with high precision
computer analysis, there's plenty of room for members who follow and plot
the excursions of slower changing stars visually --perhaps with a pair
of binoculars. Through membership, there's a fine opportunity to become
a part of the sky science community and to contribute valuable data, which
has often become the basis for significant advances in our understanding
of the Cosmos.
* In July of 2010 the AAVSO posted a new web site to
more smoothly interface with your exploration, interests, and participation.
You still need to register in order to participate (and be assigned your
official observer's initials).
* I rather "backed" into the AAVSO (as in: "ass backwards"
:-)) --having selected a number of personal "Observation Areas" 20 years
ago --to learn, to follow through the seasons, and to simply photograph.
Or let's say: to "astrograph", which sounds like more than it is: tripod
mounted sky snapshots with a good camera, a good lens and fast film. I
had the idea of harvesting all that astrophotography by filing belated
reports on the known variable stars in my Observation Areas, perhaps discovering
one or two new ones along the way.
The AAVSO accommodates such observations, which fall
under the category of "Visual/Photographic" --with "unknown filtering",
since it's hard to characterize the color/spectral response of any given
lens and film, unless one uses professional class cameras and CCD sensors
(use to be film emulsions and at least a (green) "Johnson V" filter). Should
my data be used, it would all be offset/calibrated against imaging of the
same stars done with recognized equipment.
While potentially better than eye-balling variables
against nearby reference stars in real time (and I stand in awe of AAVSO
members who do so well with that), one can easily fool him/herself as to
the precision of the results. A given film emulsion or camera CCD sensor
might have an unusual response to (say) the near infrared content of a
particular star's light --something that a proper filter (with IR blocking)
would largely eliminate.
* So serious VSOing is done with a good quality, astro-dedicated
CCD or DSLR camera, the images of which are stored as "RAW" or 16 bits/channel
"FITS" format files with great tonal (light intensity) depth. Programs
are available (like Bisque's "The Sky" or the free programs "IRIS" and
"FitsView") which, by calibrating against reference stars in the field
and standard imaging of that part of the sky, can spit out magnitude values
to 3 places beyond the decimal point: truly honorable data with deep space
reach on dim stars. This work can be done on a shoe string budget or (with
less uncertainty but at least as much personal study and dedication) through
outlays of thousands of dollars.
Visit the AAVSO's
web pages and download the free PDF version of their excellent handbook.
It provides a balanced impression of how this work can be done visually
--which is a lot less crazy-making than photographic and digital approaches.
* I'm blessed/cursed by a preoccupation with details
and inconsistencies, sometimes at the expense of missing the larger picture.
Also, when what I see doesn't seem to "add up" (often due to my own ignorance,
errors, and bad assumptions), there's nothing for it but to run the issue
to ground. Thus: the following (very optional reading).
* My approach to VSOing is unusual for several reasons.
> Over a period of 10 years (about
20 years ago) I spent serious money and invested myself into the study
and use of several top drawer digital graphics programs by Micrografx.
At the time Micrografx programs were better than Adobe's PhotoShop or any
of several other contenders. Despite having just as heavily invested in
a number of newer/other graphics programs over the years (Adobe, Coral,
Aldus, and newer Micrografx/Coral versions), they turned out to be inferior
for much of the graphics scut work that I continued to do (like manually
masking intensive "StereoSynthesis" and 2D retouch work). The newer programs
also had such encumbrances as non-optional "layers", "objects" and other
bells and whistles which made simple, repetitive procedures frustratingly
complicated. The result is that I've basically refused to give up these
programs and the limitations of 8 bits per channel (ie: "24 bit color")
that they support.
> I admit to having some resistance
to learning new astro-graphics programs as well, but part of that is the
inscrutability of the tutorial/help information which comes with them.
IRIS has a lot of French or bad English translation and I often got the
impression that what I was reading applied to another version of the program.
* I can make FitsView work and parts
of IRIS, but I don't trust what's happening. The greatest doubt concerns
the application of sampling masks, within which there's often more than
one star --perhaps unseen in the display.
When I do my own (8 bit graphics) masking I examine
the result, paring away any obvious stellar interlopers --or rejecting
the image sample/star if too close to distinguish.
* Another doubt is based on the
sky program's assumption that the imaged variables and the reference stars
are good. Yes: you're delivered precision results, but are they valid?
I gather that the results are not supposed to be valid if the CCD sensors
(or film emulsion) was saturated (ie: reached the limit of its ability
to record more brightness). When I probe my own star images, that is too
often the case (even if the light hasn't typically spilled out in spikes).
(I suspect the process works well enough anyway, but for reasons beyond
my understanding or control.)
By comparison, my humble work is based on the real
world softness of focus and halation which make bright star images spread
out. I arbitrarily cut the Guassian edges of stars to black sky at a point
which seems to give the best magnitude reach, cleanest definition and minimum
sky glow mud. The reference stars (AAVSO's term: "comparison stars") in
the frame get treated the same and each film frame (or downloaded digital
image) is separately calibrated.
It is both the spread and the density of the stellar
images which I sample (with one of a set of 6 pixel, 12pixel and a 24 pixel
square masks) and measure the averaged brightness within the masked area.
It appears from my manually plotted results that, as the dominant factor
of spread for brighter stars yields to the factor of density change for
dimmer stars, the brightness curve changes from a fairly straight line
with good magnitude delineation to a less precise upwards curve (and see
the illustration).
The downloads here are from requested imaging done
by the publicly accessible Bradford University group which runs the Bradford
Robotic Telescope (BRT) project. See
and:
www.telescope.org
Using their downloaded JAVA application, I've preprocessed
their FITS images, then saved them to my computer as a low compression
24 bit JPEGs --which got turned into TIFF images for further 24/8 bit processing.
Hopefully, the BRT has installed a calibrated "V" filter
on their 4.3 degree field "Cluster Camera" by now, such that good photometry
can be performed. I was selecting the available tri-color green filter
(AAVSO designation: "TG"), which at least blocked infrared.
The values across the bottom are the 256 (255 plus
zero) shades of brightness in the 8 bit (3 x 8 = "24 bits" for RGB color,
but I convert that to 8 bit gray scale) --imaging that standard digital
formats afford us. I stopped at 70 on the left because brighter stars are
way over-spilling the 12 or 24 pixel square mask at that point, round masks
scale down poorly, and most of my work is with dimmer stars.
* Using this method and the BRT camera, some of the
AAVSO comparison stars I plot end up being outliers on an otherwise common
curve. There's really nothing I can say or challenge about this until I
get to image through a certified "V" filter, but for now I harbor serious
doubts about the integrity of either the assigned magnitude values or my
own work. I hesitate to submit any more observations to the AAVSO until
I can resolve the problem.
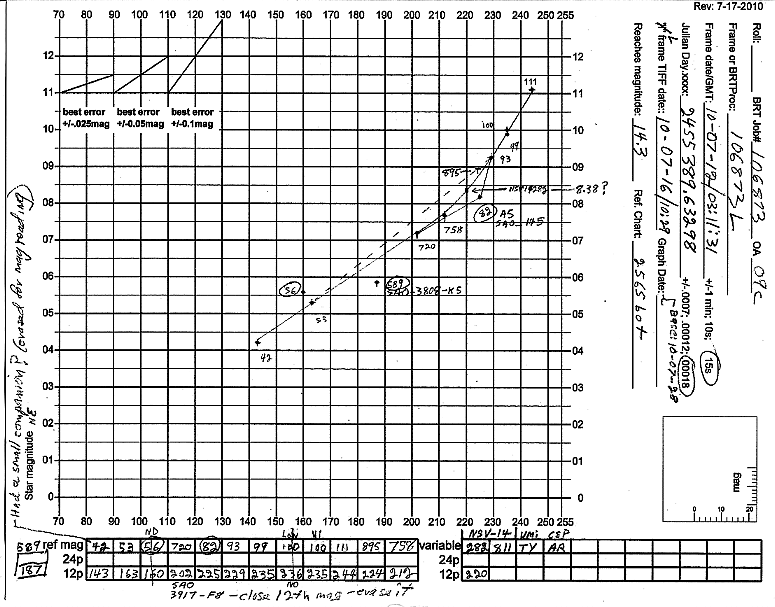
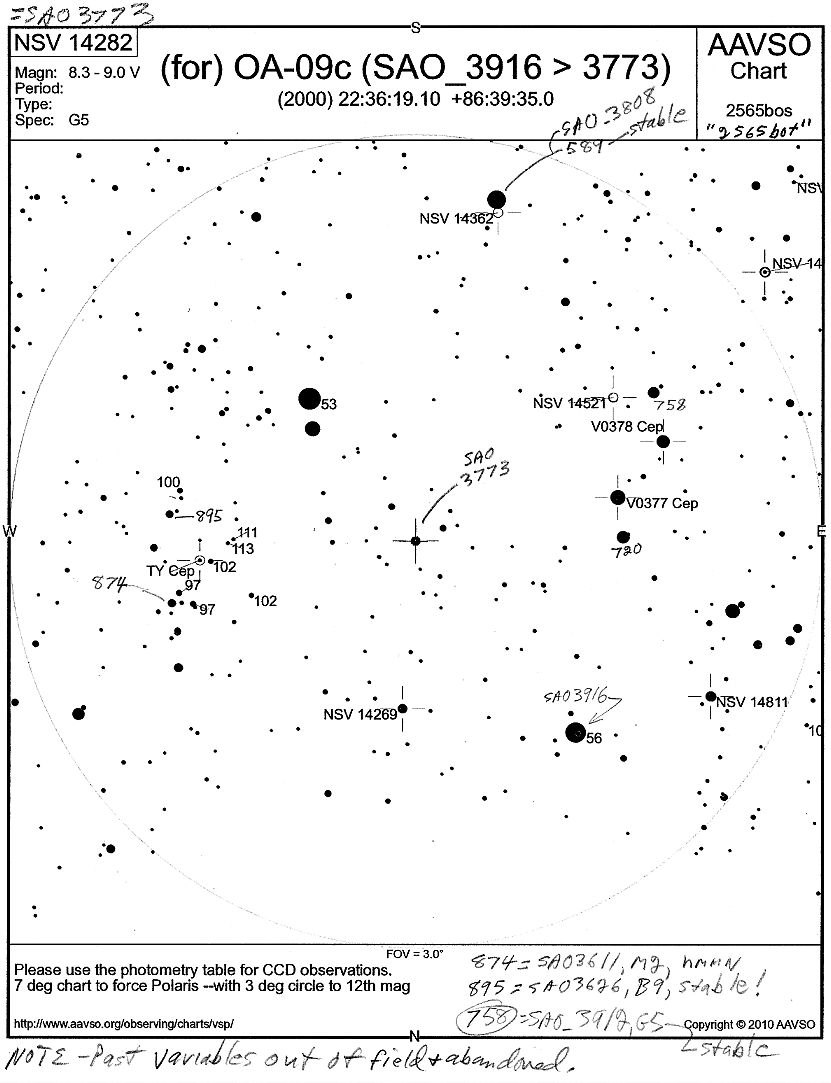
You can see that both the "82" (8.2 magnitude) and
the "56" reference stars that the AAVSO advises are off the common curve.
By manually drawing a "reasonable" transition curve between points 720
(a 7.2 mag star I picked out using the Guide-8 sky program), 758, and the
AAVSO's "93", I get a reasonable value for the variable "NSV_14282". But
hand fitting "reasonable curves" doesn't seem very scientific.
Simply adopting standard practice --like using the
photometry tools of an astronomy graphics program like "The Sky", which
assumes these reference stars to be good --also seems unscientific.
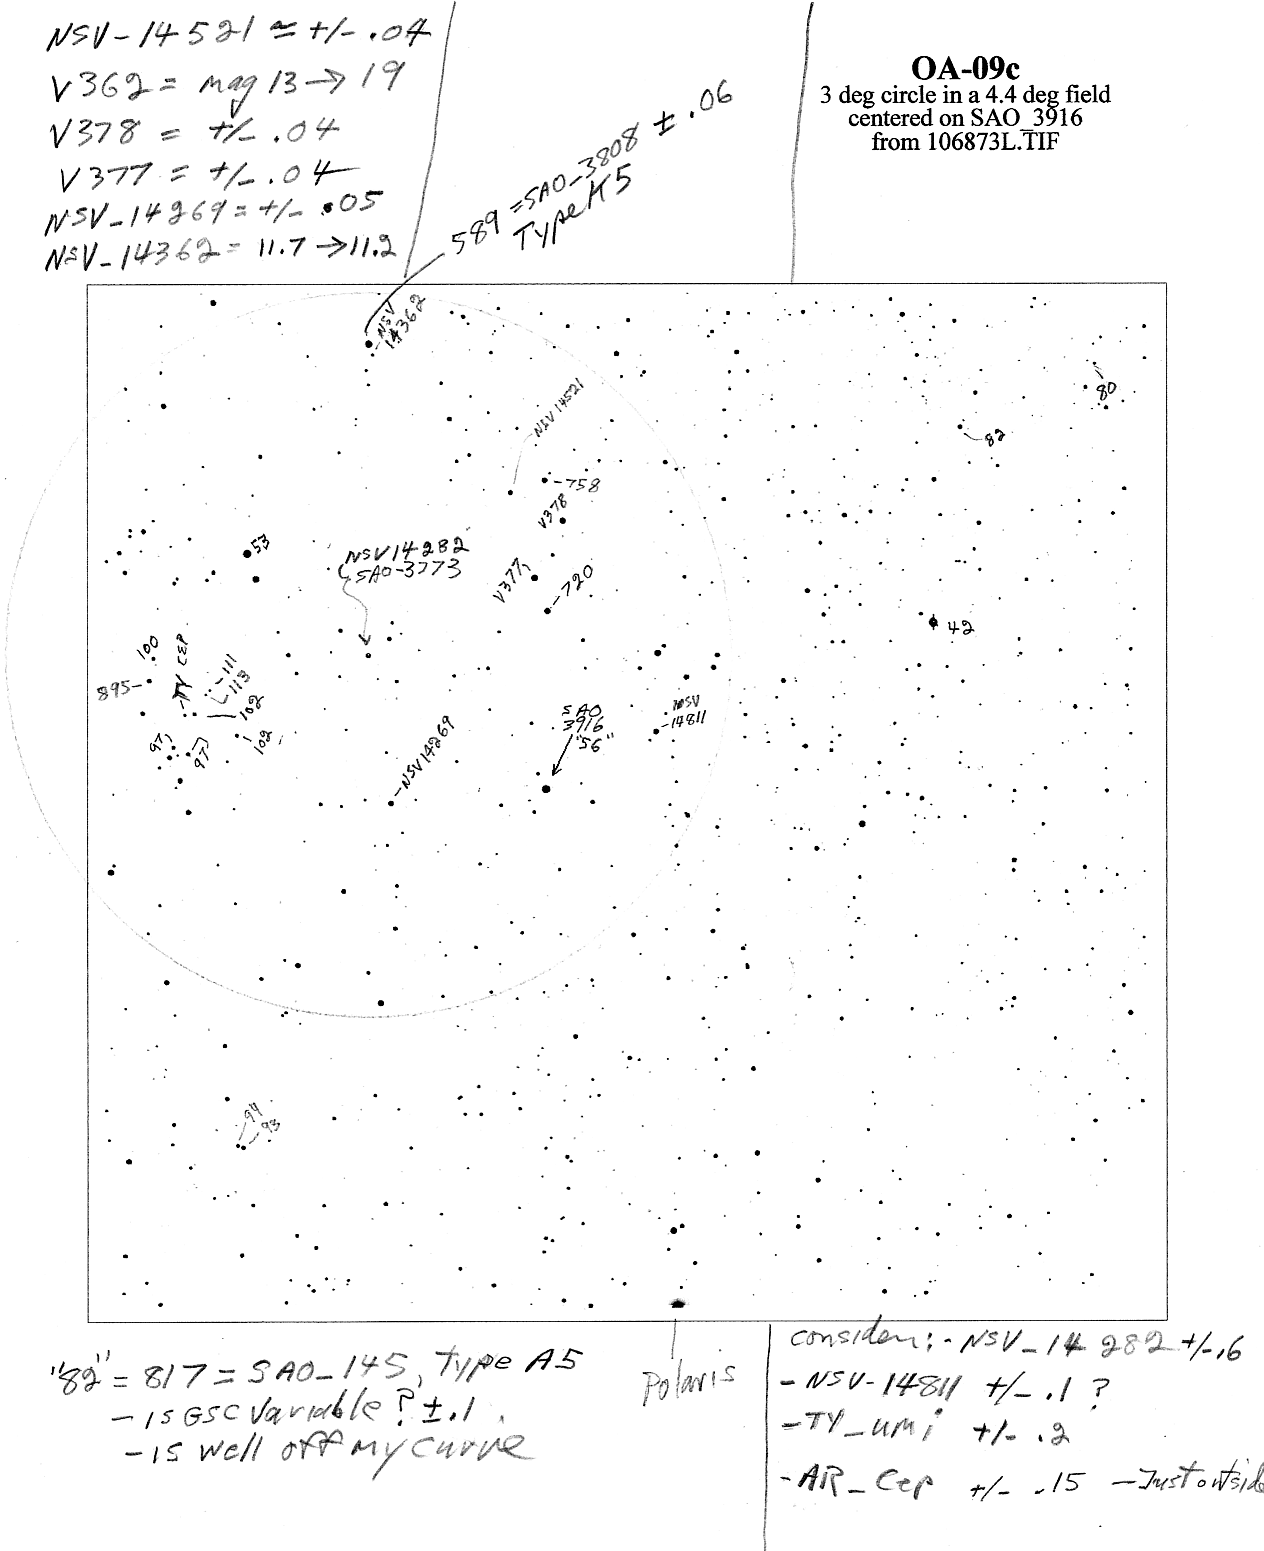
Here's the corresponding downloaded custom chart that the AAVSO generates
upon request:
--and my print-out plus notes of the imaging I got
from BRT:
(partially rev: 5/3/2016) VSOing
--starting over again:
* I've begun anew to bolt down a consistent
procedure for processing images from my Canon A590 hand camera, with the
objective of preserving some tonality and better photometric resolution
for dimmer stars. Bright stars will still tend to be "holes in the emulsion"
(white clipped pixels) --which are differentiated more by their diameters.
The steps are similar to those seen above and
still graphics program specific, but more conservative and standardized.
I'll post them here after I stop changing the specifics.
* I'll still be using 3 square masks (6, 12, and 24
pixels), within which the luminosities are averaged, but the logging of
as masked averaged values will be entered as if read with the 24p mask.
Consequently: a 6p mask reading will be divided by 16 (square of the 4x
area difference) and entered as a 3 place value.
* Hopefully, I'll be able to largely coral aberrant
(ie: "off the light curve") reference stars by applying corrections based
on star color/type.
* The weary part of this approach is that each photo
session is necessarily unique, due to such as sky transparency and shooting
altitude. The comparison stars I reference will have to be graphed again
each time I reshoot the same observation area.
* Here's the most recent graph (5/2/2016):
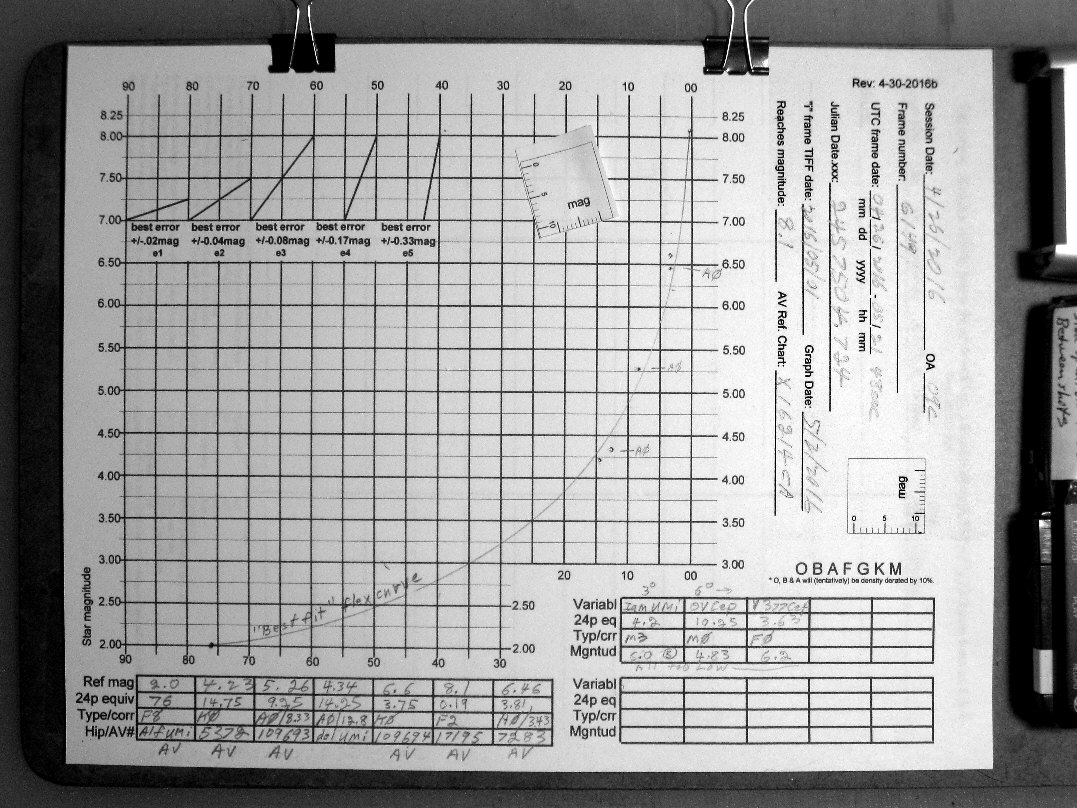 By derating the measured density of white through blue-ish
stars ("O", "B", "A"), the over-all curve looks better --but: the first
3 variables checked rather too low --and there just isn't enough meat on
this curve. I'll try using a bigger and better camera with more glass.
(Click on the image to enlarge it.)
By derating the measured density of white through blue-ish
stars ("O", "B", "A"), the over-all curve looks better --but: the first
3 variables checked rather too low --and there just isn't enough meat on
this curve. I'll try using a bigger and better camera with more glass.
(Click on the image to enlarge it.)
Astrophoto options
Astrophotography --as an attempt
to do actual astronomy and discovery (not at all to denigrate astro-tourism,
Messier challenges/competitions and such) --and as approached by those
of us for whom a $1000 outlay seems a bit much --amounts to an array of
difficult choices. What comes to mind:
* An affordable, perhaps used, Canon
DSLR. (The Canon brand, hardware and comes-with/aftermarket software simply
has too much going for it --to look elsewhere.) A basic DSLR (say: a T5)
has a sale price of about $400. The back display can't be swiveled out,
so you'd have to crane your neck to do the focusing, settings and shooting
at a near-zenith object (a tall, sturdy tripod might help with that) --or:
relay it to a monitor of some sort, like maybe your i-phone (I vaguely
recall that the T6 [or was that Samsung's DSLR?] has a wifi feature) --but
then you'd be juggling all sorts of settings --in the dark, cold and damp.
* Use a very affordable hand camera
(like my Canon A590 "Powershot") afocally at the
eyepiece. I can get good resolution that way on the Moon (under 2 arc-seconds),
but exposure time, photometry and stellar magnitude reach are quite limited.
Except for near-polar objects, non-tracked exposures must be short: maybe
about 1/8th second near the ecliptic/celestial equator.
Assuming a near-perfect afocal coupling at the eyepiece,
the A590 camera goes from its maximum aperture of 4.2mm (full zoom at f/5.5)
to 150mm (146mm actually then minus about 4% obstruction, for an equivalent
143mm in my 6" telescope) --or: a diameter gain of 34x, and a light gathering
gain of 1159x --whereas the ratio of 1/8th to (say) 5 seconds (for a fixed
tripod shot) is 40x --which seems like an over-all potential gain of 29x
--or over 10 magnitudes ---but the field of view is only about a degree.
I used 9 or so degrees out of my tripod shots. At one degree it's very
unlikely to find a suitable comparison star.
To supplement what the AAVSO provides, I made up my
own list of circumpolar comparison stars, using the catalogues accessed
by Guide-8's sky program, but the population of suitable candidates remains
very sparse. Let's try that for the area around the celestial pole.
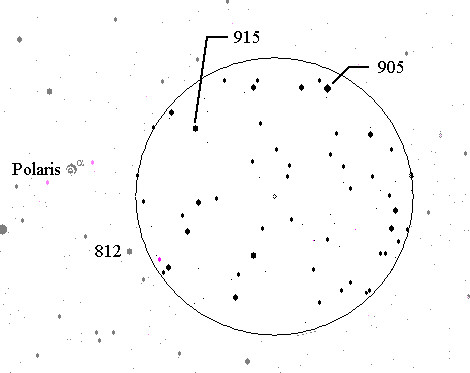
Only 3 decent comparison stars within reach of the
celestial north pole in a one+ degree field
* One might also do afocal
photography through a small refractor with a compact hand camera. Half
of a binocular would be about right --maybe using the other half for a
finder. The field will then be several degrees wide, the potential resolution
several arc seconds, the fixed camera exposure more like 1/2 second, for
a (maybe) total gain of about 10x --or 4 magnitudes.
Good craftsmanship in connecting and squaring-on the
binoculars to the camera, then mounting and balancing the rig to a tall
tripod --would be essential.
The camera would still do its dark subtraction, but
unfortunately, you'd have to do your own "flats" --meaning you'd need to
compensate (with your graphics program) for light fall-off toward the image
edges, due to losses through the binocular and however good your lash-up
with the camera might be. (Assuming you're trying to do photometry.)
June 8th, 2016: --Been thinking
--about photometry.
* For my last photometry/magnitude graph
(from shooting on the night of 4/26/2016), I adopted the quaint old practice
of simply fitting a least kinky, mechanical drawing type "flexible curve"
to the dots. This approach "worked" well enough, but I had to admit to
myself:
~ I'm simply
not getting much star light onto these images. I can't hope to do +/-0.1
magnitude estimation for less than about 5th magnitude stars --and that's
a very low star population, even in my large "observation areas".
~ Setting
up a tripod with my barn door drive (nice as it is), and trying to keep
my camera settings current is a pain in the ass --since the Canon A-590
loses patience with my dawdling and shuts down, plus it forgets my manual
focus setting if I turn the blinding light of the LCD display off.
Hmmnnn: Does it really matter if the stars trail a
bit? On or near the celestial pole, I suppose it does, since some trail
more than others. Still: if I put a mask around the whole egged out image
---hmmnn. Elsewhere in the sky, trailing is more similar within a given
field.
What if I defocused the camera a bit, such that the
trailing is barely noticeable? I'd lose some magnitude, of course. I'd
also depend less on halation and more on the dynamic range of the sensor
pixels --for brighter stars. Moreover: there'd always be more pixels "voting"
per star --a very good thing.
Dispensing with the barn door hassle ("northing" the
contraption and not subsequently upsetting that aim point, resetting a
drive run and restarting the timer motor) --would help a lot. Of course,
both trailing and defocusing should attenuate the magnitude reach of my
imaging, but that's how I use to do it with film. My intuition is that
what results I can get that way would be more consistent.
"Big Ideas" Department:
* I thought about placing a thin disc of photochromic
glass across the field stop of (say) a Plossl ocular, such that bright
stars would mask themselves --allowing a darker over-all field of view
--but: photochromic glass and plastic only darkens about 8-to-one, and
that's for rather thick glass. (Too bad.)
However: a person (not me) who frequently observes
the same patches of sky might trouble to expose B&W film at prime focus,
then develop and trim a disc out of a film frame. (This is for a tracking
telescope, of course.) The idea is to create an over-all darker field for
observing faint nebulosities, mismatched binaries, and to visually notice
a star/object which is out of place or is a new arrival.
.

"Keep Looking Up"
(Depiction of an old-time mariner finding his position
by the stars.)
* The original content on these
pages is unencumbered by copyright.
~~~~~~~~~
