The Celestial Vault
(Page-2: Astrophotography,
Photometry, "Seeing" and such) (Also: see this
update)
(Last worked on: January 27th, 2023)
( You're at: https://57296.neocities.org/page-2.html)
Fast Find >> Page-1,
Lunar
apparitions,
VSOing,
AAVSO,
Old
barn door tracker,
New barn door tracker, Sky
glow, Samsung on BDT, Mirrorless
DSLRs, NPS-2000,
Photometry,
Magnitude,
Stacking,
Histogramming,
Why,
Cameras
compared, Retiring, Wiggles,
APS-C cameras, Canon-T6s,
Old
camera finder wire, Modern camera finder,
Old VSO page, Stereoscopy,
Sky
meter,
How scopes work,
Upsides,
Afocal
photography,
Astrophotography --or not:
* 12/18/2019: The following is long and often repetitive,
but it might point to approaches that you'd like to pick up on. What I've
ended up with is making simple fixed tripod "snap
shots" and the occasional "barn door drive" shot --which
I like to call "astrographs".
* 1/7/2022: When I last perused advice to beginners
at the AAVSO (American Association of Variable Star Observers --nice
people), I saw a gap --'twixt visual observation and DSLR based photographic
methods --namely: the hand camera methods I go on and on about on this
page. Their idea is to go for all the gusto that a DSLR might allow of,
through recording "RAW" format images (over 1000 brightness levels), referencing
"flats", "darks" and other calibrations, and then processing your star
imaging through a specialized computer graphics astronomy program.
That would leave me feeling like a small appendage,
along for the big ride. Also: I gather that darks^, flats^, vignetting,
Gausian fall-off, and geometric distortion correction are built into many
digital hand cameras (^at longer exposures).
The killer argument against using a consumer type hand
camera: it records JPEG format images --which compresses the image information
into the scant 256 levels needed to end up with a smooth looking photo
print of your sweetheart or his/her birthday cake. That doesn't take into
account, however, how magnitude has traditionally been gauged via astrographic
film and plates: image spread. My graphs (below) show a transfer from image
density range (what little there is) to star image spread^, which I measured
using standard, close fitting (digital graphics) masks (getting the average
brightness within a mask's confines), and calibrating against reference
stars. (I use old, general purpose, bit-map graphics programs).
^ It's my impression that star image spread has traditionally
been attributed to halation --in the photographic emulsion of film or plates.
That may well have been the main factor, but I'm suspicious that rapid
image displacements due to air cell turbulence plays a roll --which, along
with clouds/haze, necessitates comparisons to nearby reference stars.

* How might one affordably (time and money) go about
a personal "program" of doing astronomy? I've nothing against "sky
appreciation" and getting your Messier certificate, but I wanted at least
a humbly defined ability to locate stuff ("astrometry"), measure brightness
("photometry"), and be open to the possibility of discovery --using charts,
reference images and my own records of past observations^.
Given my (in)abilities to sketch, remember/recognize
patterns, and orient myself in the sky (which I need to work on), photography
is very appealing --but I've here-to-fore needed more light grabbing power
than what was at hand and a way to do it that's not a pain in the butt.
I had fair magnitude reach and an easier time of it (thanks to those old
manual, mechanical camera settings which stay put!) when I did darkroom
photography and used an SLR film camera, but that really wasn't really
enough light grabbing to work with either.
* What held promise for magnitude
reach was "image stacking". A person might patrol
portions of the sky using a camera, a tripod, normal charting/sky program
resources, organized effort --and little else. I think there's good prospect
in that approach under decent night skies --well inland from where I live
and observe. Here near the Pacific coast, however, the atmosphere is turbulent
--especially for the small cameras I try to use. 23mm of lens aperture
might be tolerable, but I suggest a Canon T6 or T5 with the 55-250mm lens
(44.6mm of aperture at full zoom and wide open).
* After noticing things like a missing star and a star
that looked multiple in my astrographs, I placed an 8mm (diameter) stop
over the objective of a 70mm refractor and watched a bright star while
using a 150 line-pair per inch reticle.
A strip of 150 LP/inch positioning film from a broken
HP printer,
popped into and against the field stop of a 25mm Kellner
ocular.
The star kept randomly staggering around, often with
+/- 8 arc-second excursions. This is a phenomenon that larger apertures
(and/or many more stacked frames) should largely average out --depending
on the image magnification. It must also be a major reason why brighter
stars bloat/spread out on digital sensors and film emulsions. (I use to
think it was just the brightness spread-out of "halation" to contiguous
pixels (or emulsion grains).)
** I sent Jerry Oltion (the Astronomer's Workbench
editor for Sky & Telescope) a piece of this same printer film and he
got right on it --but under a very nice sky with steady seeing (no twinkling
stars). There were no star excursions with an 8mm stop. It's welcome news
that small camera astrography will likely work with a decent night sky.
^ Given my generally horse crap
night sky, my advanced years, the importance of being close to my wife
--for a while I pretty much gave up on the notion of "doing astronomy"
--in favor of just a little "sky appreciation" now and then (and being
a fair weather observer at that :-) --However: a better hand camera
came my way (thanks Chuck!). (No: I haven't hands-on explored the possibilities
of using a spendier digital camera with a significantly larger aperture
--more like that of my old 35mm SLR lenses).
* Another approach would be to lower my image resolution,
such that the stars would wander --pretty much within the confines of a
throughput pixel, but I hate to lose arc-minute resolution which is a bit
better than night adapted eyeball resolution.
* As mentioned above, part of my problem was in the
stacking of fairly high resolution images was that a dim star might move
about and average away with the noise, while a bright star can look like
a close multiple (unless many-many images are stacked).
* Perhaps my eagerness to "see more" through stacking
is simply another version of "aperture fever" --which is a distraction
from studying what I can see --and that's plenty, even if I'm looking
through a pair of toilet paper tubes.
* I'd rather not mess with northing and tracking (while
standing outside in the cold), nor do I want to be subtracting "darks"
and "flats" --which can often be automatic when using an intact digital
"hand camera" or DSLR.
* Also, my methods will be more accessible to others
if I use a rather ordinary camera --perhaps an affordable DSLR (I keep
expecting the prices of "mirrorless" DSLRs to plummet, due to their mechanical
simplicity) --and easily replicated methods.
* Let's be positive.
Most everything/method has an advantage. Where-as pro-class astrography,
reaching down into "DSO" magnitudes, might record brighter objects as spread-out
halation (or: as rendered, and despite the great mag range of CCD sensor
based systems), my humble methods tend more to resolve them (and any nearby
objects) more as points. Where-as long exposures and/or multiple exposures
(stacked) see only the average of an area's luminaries, my short exposures
record more of "what happened when". Whereas what's watched and noticed
in the night sky has a lot to do with fashion, lists and popular literature
(but take note, for "mining" commonly posted photos), patrolling neglected
regions of the night sky might be more rewarding.
* Maintaining my web pages will continue in any event,
answering to new developments/revelations and in hopes of finally getting
most of my pages right --or at least free of glaring errors and repetition.
*
In light of the revelation
that stars are seen to wander when imaged through small (up to 8mm) apertures,
perhaps that was why I saw what I took to be rotation drift in my fixed
tripod polar shots.
So let's consider a typical 2448 x 3264 pixel sensor,
centered on Polaris. What matters is not the zoom or field size, but the
length of the exposure. Let's assume I'm using only a central circular
area of the sensor with a radius of 500 pixels. At 39mm (my Samsung S850's
max zoom focal length), 1000 pixels is a 12240 arc-sec (3.4 degree) field.
1 pixel of motion across a radius arm of 500 pixels
is 0.002 radian, or 412.6 arc/sec --which, at the Earth/sky turning rate
of 15 arc-sec per second of time, would require a 27.5 second exposure.
For
simply monitoring the north celestial pole out to 1.5 degrees, the maximum
15 second exposure of a typical digital hand camera should be free of apparent
rotation.
* Now consider the problem of wandering stars (when
using such small camera apertures under my terrible coastal night sky).
This has been bad enough that dim stars don't record, and bright stars
can appear multiple --when manually stacking just a few frames. Since I
don't want to stand out there in the cold and dark shooting a long run
of photos, the solution might be a larger taking lens. This could be achieved
by afocally coupling to a telescope or (more sanely) by breaking down and
getting a DSLR with an optional long lens (per that Canon item in the below
chart).
* Why Polaris, and why Polaris only? Aside from being
always up (where I live), easy to orient on, and slow moving, I suspect
that the polar vicinity isn't being given much attention these days. (It
use to be watched and referenced a lot.) Although my photometry and astrometry
are pretty rough, I might be able to notice gross changes and visiting
bodies. As my friend Chuck suggests: one patch of sky is as good as another.
Although a more densely populated part of the sky holds more potential
for "happenings", circumpolar changes must be easier to notice, especially
if I become very familiar with the sparsely populated neighborhood up there.
Also: that's the best/darkest part of my backyard sky here.
* My Samsung S850's manual infinity focus will hold
if I set it last --and given the depth-of-field with today's hand cameras,
one doesn't have to toy with this manual setting (but I sure miss the stable
mechanical manual settings of my old film cameras!).
It's just too dang bad that the Bradford
operation shut down. It was a nice learning facility for school students
(world wide!) and a wonderful option for would-be "arm chair astronomers"
like myself. Some such folks were doing serious work. There is that rent-a-scope
operation but, aside from our household not being on-line (the ISP
here charges $55/month just for Internet, so we snag public WiFi by day),
simply requesting images of specified fields with specified filters and
exposures (they then schedule it and run the scopes/cameras) --made excellent
sense.
* In the past, reporting discovery was a rather arcane
process run by the Bureau for Astronomical Telegrams, which has since become
much less formal. However, it might still be best to work through a regional
observatory, one which makes a sincere public outreach effort --for confirmation
and the forwarding of an apparent discovery. Your concerns about credit
and priority might be answered by early disclosure, via "publishing" what
you've found to your own web page/s. That can be a no-cost undertaking
(with tutorial help) thanks to NeoCities.
* A goal of mine is to employ methods and equipment
which could at least be a starting point for others who have limited spare
time and funds. That doesn't mean doing bad astronomy, it probably does
mean humble astronomy, and it certainly means doing honest astronomy.
* Like that perpetual pariah: the "department store
telescope" (--but hey: the several I've owned have all been diffraction
limited) --the worst feature of our night sky efforts (with camera, binoculars,
telescope or direct vision) is usually the shaky way we mount our instruments,
the way we seat ourselves, and the ways we plant our cheap tripods.
Speaking of tripods, how 'bout that 100 year old, common
mechanical item: a single, 1/4 inch x 20 tpi bolt and receiver --which
is often poorly located and seldom tight enough?
* Let's pause and think about what it is one is trying
to do.
If it's VSOing (variable star observing
--the traditional opportunity for amateurs to contribute to the data basis
of serious astronomy), photography through a telescope might not provide
a large enough field of view. A normal point-and-shoot isn't likely to
serve, and a DSLR with a normal lens/zoom setting is more suitable for
"pretty sky photos" than actual "astronomy". A tracked DSLR and a
medium telephoto/zoomed lens, however, could be just right --if you don't
mind the expense, setup effort, and spending some time with your images
afterwards. (I still favor a regular digital graphics program for this
work, but I've tried using stacking programs.)
* Looking back, using my Minolta SLR film camera seemed
so
simple: focus, shutter, aperture, film speed --and those settings would
stay where you put them. Minolta's 1974 manual (a worthy hardback book)
covering
all of their SRT series SLR cameras, lenses, accessories
and associated products spans 191 pages. The Canon T5i DSLR's manual --alone--
runs 380 PDF pages --!-- and my Samsung S850's manual runs 220 pages.
* Then there's "sketching at the eyepiece". I'd need
a good grid reticule, a corresponding grid lined sketch pad, and a way
to read/judge relative star brightness to pull that off. Higher power work
would be impossible without a visually accurate tracking telescope.
* What I need is a field of view that's "astrographically
wide" --more like the 6 to 9 degrees that I used from the center of my
cameras' sky shots. That's quite wide for a telescope, but about right
for binoculars.
* When you think about it, not much of an objective
is needed. Assuming a 6mm pupil in your eye, a typical 135mm telephoto
(f/2.8 ~ 48mm effective diameter) camera lens^, a (max'd out, standard
1.25" barrel)) 32mm focal length Plossl eyepiece with an apparent field
of 50 degrees --then we're talking 4.2x power and an actual field of nearly
12 degrees --close to what the camera lens was designed to cover --and
about what I'd want for including some comparison stars in a VSO field.
Given that 6mm eyeball pupil, however, only 25mm of
the lens' diameter would be used (the camera lens effectively being at
nearly f/5.6 now). There's "room to grow", should your dark adapted iris
be wider --but rather too much (comfortable as a nice, wide, 11+mm telescopic
exit pupil might be). A 25mm (50 degree) eyepiece pencils out to 5.4x,
9.26 degrees of actual field, 32.4mm of effective lens diameter (f/4 now)
--and you still have room to grow --into a nearly 9mm exit pupil. (Or:
maybe you own a 60 degree, 25mm ocular, for an 11 degree field.)
For alt-az manual tracking, it would be necessary to
turn the eyepiece (and its reticule) to keep a selected grid line crossing
two prominent stars --something which would be a constant fuss --so maybe
a visually accurate, table top "Poncet platform" under the 'scope
setup would be in order and worth the trouble.
^ I tried an eyepiece behind an old 135mm telephoto
and the magnitude reach was poor --too many glass surfaces and too much
design compromise, perhaps --but it was a great image. Best I stick to
binoculars --or maybe cobsnobble the optics and eliminate the prisms. (Nah:
I really like a "correct"/erect image.)
Mirrorless DSLRs:
** The photography market is in flux (has been for
a long time). Film and SLRs like my old Minolta are
gone (of course) and even the "point and shoot"/"compact hand cameras"
market is being gobbled up by smart cell phone camera capabilities --perhaps
set up for astrophotography with a downloaded application. It could be
that low end DSLR cameras are also among the walking dead --as changeable
lens "mirrorless DSLRs" and quality APS-C class, fixed lens, hand cameras
replace heavy-on-the-neck, DSLR albatrosses --but not yet (year 2016).
Mirrorless DSLRs have only been around since 2009 and (it seems) the market
for their premium priced novelty value has yet to be tapped out.
It seems obvious, however, that significantly smaller
and lighter weight cameras, without the mirror, the shock inducing mirror
lifting/locking mechanism, the pentaprism, associated manufacturing tolerances
--and perhaps no moving parts in the camera body --will eventually smoke
traditional DSLRs on price, performance and durability. But it's the mirrored
DSLRs (so far) which are at all price competitive.
** I read that mirrorless cameras heat up their sensors
and are hard on batteries --as compared to their regular DSLR counterparts
(if not to smaller hand cameras). It must be that mirrorless cameras are
designed to keep their sensors, displays and other parts cooking and generating
heat --but won't a regular DSLR's sensor rise to a temperature plateau
during long astro exposures anyway?
* Operating a DSLR in "live view" mode (when using
the display instead of the optical viewfinder) has to amount to the same
thing: a cooking sensor, display and the in-between electronics. More-over:
that's the whole point of buying a DSLR with a swivel-out tilting display
--so you can see the view, the focus, exposure and settings --without having
to crane your neck (say: your camera being connected to the focuser of
an oddly oriented telescope, or simply aimed up at the high sky from a
low tripod).
* Meanwhile, and aside from craning your neck to use
the optical view finder, you'd normally trouble to lock up the reflex mirror
in order to prevent vibration.
* Do think on it before buying a camera with a fixed
back display. Even though it might cost you an extra $200 for (say) the
Canon "i" version, can you live with a back display that can't be swung
out and comfortably angled toward your standing or sitting line of sight?
* Regardless the type of camera used, one appealing
fall-back would be to make a "piggy-back" perch atop my scope, such that
a rather ordinary digital camera can be mounted there, reliably aligned
to the telescope. This would at least be a way to know for sure what part
of the sky I was looking at when I logged an observation or something unusual.
One
still needs to trouble with camera adjustments (some of which --maddeningly--
revert to default settings when a manual setup's idle power-on period times
out).
* Best I be doing and focusing upon one or the other,
but should it be observing or photography?
* Howsabout sketching what I see --an appealing option.
(See inspiring examples by Howard
Banich and Mel
Bartels.)
** All-in-all, the most sustainable effort seems to
be the taking of individual, fixed tripod camera frames (plus a couple
backup frames at each setup) --using setups spaced an hour apart. Given
my night sky situation here, I'd be shooting Polaris.
Afocal Astrophotography with
the "Dog-2":
(Which birders call "digiscoping".)
This is moth-to-the-flame, time consuming, crazy-making
stuff.
Judging from past experience
(with an A590 Canon camera and a 25mm Surplus Shed "500 Series" Plossl),
this simple, swing-up camera mount should work fine for Lunar photography
(with spot photometry on, delayed shutter release, and something between
2x to 4x of zoom).
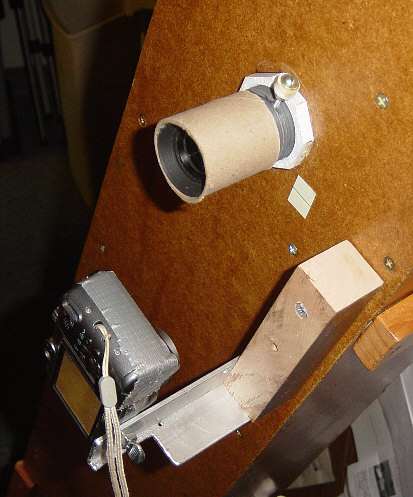
There's a wide fender washer for stand-off and a
bearing surface, 'twixt the swing bar and the OTA.
Ready to shoot
(--after I paint that toilet paper tube flat black.)
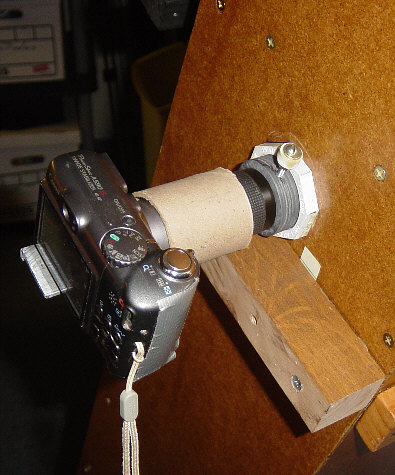
* That swing-up mount is such that I can't crash the
zoom lens into the eyepiece. Also, I've sized and glued in a plastic bumper
such that the swing arm stops when the camera is aligned. We'll call this
the "up-down" alignment --per the photo. (It should have been an adjustable
screw stop, but I got lazy. The fine adjustment was done by adding 1/4
inch Dennison, self-adhesive dots.)
* For the other "left-right" alignment, I physically
squared the camera with the aluminum arm (and therefore with the 'scope),
then adjusted (rat tail filed) the 1/4-20 thumbscrew hole until the camera
(set to widest angle) would display an evenly illuminated circle of light
---
~ --all with the telescope well
collimated and aimed at our brightly illuminated ceiling.
* Preliminary tests on a standard
line pair (Air Force type) target indicate
I've got as good a setup as before (with Dog-1) and can reach 1.63 arc-seconds
of resolution: half the resolution I'm able to see (0.81 arc-sec) and pretty
good, considering I'm only running about one pixel per arc-second when
using a 25mm ocular.
Again: past efforts to use a 10mm ocular/eyepiece turned
out not so good. Also: were I to approach full resolution (difficult, due
to that old "rule of thumb"), then my maximum
exposure times (without tracking) would be halved.
* When shooting at a camera zoom lens setting of 9.9mm,
the camera can manage an f/stop of f/3.5 --which means a physical (or effective^)
aperture of 2.83mm. Meanwhile, the exit pupil of that 25mm eyepiece is
about 2.9mm. That's a good match --if I'm projecting the exit pupil
to the nodal point^ of the camera's lens --where (presumably) the camera's
aperture occurs. If not, I might be restricting a wider cone of light,
ahead or behind the exit pupil.
~ I shot at the A590's native sensor
speed of ISO "80". (The best I could do with Dogson-1 and a similar (3.1
megapixel) Sony hand camera was 2 arc-seconds.)
^ We've come a long way from our old film cameras and
"first principles" photography. I've reviewed
a camera that basically keeps the lens wide open (and it should), throwing
in a neutral density filter instead of stopping down.
There use to be a mark atop good cameras indicating
the film plane --from which one could measure forward to the nodal point
of a lens --perhaps for to pivot a panoram series of shots. It would be
nice to have that line for matching an eyepiece exit pupil location to
a camera lens' nodal point.
(Apologies! his whole page has been a poorly matched
mix of editing vintages --"a work in progress". Hopefully, my on-going
rewrites are doing more to discipline its words-in-a-row, than to increase
its length.)
Afocal and "barn door" driven/tracked astrographs:
I did calculations to anticipate how much exposure
the turning night sky would allow --depending on the camera's zoom lens
setting --or whether it's afocally coupled to my telescope. Since I realize
about 2 arc-second resolution telescopically, the math is easy. Along the
ecliptic (close to zero degrees of declination) the sky is turning at a
rate of 15 arc-seconds per second of time.
A camera's moving "circle of confusion" (which is often
the theoretical diffraction disc limit these days) describes both a 2 arc-sec
circle at the camera's focal plane and in the sky --would immediately depart
the camera sensor's trailing pixels, but would seem to "dwell" across the
initial leading pixels --belatedly reaching new pixels at the end of the
exposure. Imagining this, you can "see" how a dim (dimmest) star's 2 arc-second
resolved image might still look pretty good, even though it underwent (say)
4 arc-seconds of drift. Consequently:
* I anticipated a 1/4 second maximum telescopic exposure
near the ecliptic.
Similarly, my throughput resolution for simple tripod
shots was anticipated to be about 2 arc-minutes, with an expected maximum
exposure time of 8 seconds --maybe 10 seconds. On or near the celestial
pole, however, I expected that the full 15 second exposure capability of
my A590 could be used, and at any zoom or telescopic magnification (reasoning).
However (and again): I could see too much evidence
of star trailing, so I'll be barn dooring it.
Typical small sensor (4.3 x
5.8mm - Canon A590; 5.6mm x 7.5mm Samsung S850)
and APS-C class (14.9 x 22.3mm - Canon T5i or T6)
camera specifications:
Throughout this web page I often refer to the pixels,
microns and diffraction disc sizes of my cameras. Best I set the main ones
down together here for easy reference:
Camera Min
Max Sensor Aperture at
Aperture at Pixels Mn Diff Mx Diff Mn/Mx Rez
Zoom Zoom Pixels Min Zoom
Max Zoom Spaced Disc Disc
per Pixel
Samsung
S850 7.8mm
39mm 2448x3264 f/2.8~2.8mm f/4.5~8.7mm 2.3u
~4 mic ~6 mic 61/12 a-sec
low-rez 7.8mm 39mm
1536x2048 f/2.8~2.8mm f/4.5~8.7mm 3.7u ~4 mic
~6 mic 97/19 a-sec
min-rez 7.8mm 39mm
768x1024 f/2.8~2.8mm f/4.5~8.7mm 7.3u ~4
mic ~6 mic 194/38 a-sec
Canon
A590 5.8mm
23.2mm 2448x3264 f/2.6~2.2mm f/5.5~4.2mm 1.76u
~4 mic ~8 mic 63/16 a-sec
Canon
T5i/T6 18mm 55mm
3456x5184 f/3.5~5.1mm f/5.6~9.8mm 4.31u ~5 mic
~8 mic 49/16 a-sec
option 55mm 250mm
3456x5184 f/4 ~13.7mm f/5.6~44.6mm 4.31u ~5 mic
~8 mic 16/4 a-sec
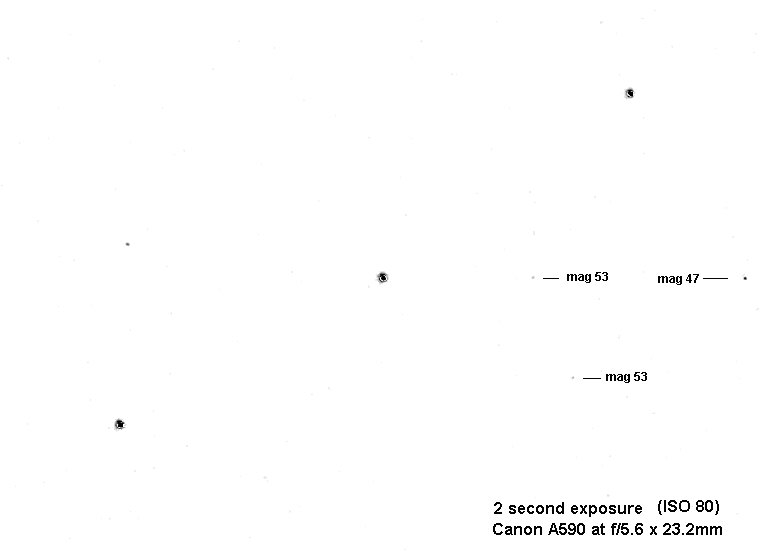
Canon A590 sky test shot results --with and without
tracking:
* Even when centered on Polaris, the dimmest stars
(approaching 8th magnitude) seem to be degraded by a scintilla of motion
--within a 10 degree field (at 15 seconds and maximum zoom). (update: might
have been "star wander".)
* Since my "barn door" tracker
works well (quite well with a lightweight digital hand camera,
and especially for short 15 second exposures), I'll trouble to use it.
* After the onset of "astronomical night", I ran barn
door drive tracked exposures on the fields around Polaris (my "Observation
Area 09c") and the beta star of Ursa Minor (OA-13a).
* Preliminary results indicate that, magnitude-wise,
I do about as well with 9.9mm zoom as with 23.2mm (full zoom): to magnitude
6.5, and that both zoom settings seem able to locate individual dimmer
stars to within a pixel. It also looks like I'd be able to resolve similar
binaries at a separation of 2 pixels for the dimmest stars.
Astro-photography:
Some kind of a camera arrangement seems like a sane,
self-documenting way to approach stellar photometry and other astro pursuits.
I'd want to use an actual, self-contained camera --either direct to the
sky or afocally coupled to my telescope.
One of the toughest aspects of doing prime focus astrophotography
with a film type SLR was critically focusing the image. However, my Samsung
and Canon hand cameras manually focus at infinity and can automatically
focus themselves on bright objects when afocally coupled to a telescope
(once a bright star or the Moon is within their auto-focus grasp). These
cameras also automatically subtract a dark field after longer exposures
(getting rid of "hot pixels") and I believe they do field "flattening"
as well --compensating for normal lens "Gaussian light fall off" and the
sensor fall-off peculiar to digital cameras (which is less important when
only the central part of a frame is used).
* It's usually best to run a well mounted digital
camera with its micro-jittery image stabilization turned off. While I can
imagine image stabilization doing some good on a single, bright, central
object, when shooting a field of stars, air cells will only affect small
parts of a field (if at all, non-telescopically). Consequently, should
a camera's image stabilization be able to lock onto the star which wiggles,
all the others get wiggled instead. I've seen frames with jittered star
images due to "image stabilization".
* For tripod or barn door shooting, I get about 1/2
arc-min images of 4th to 8th magnitude stars, but I feel that I can judge
their position to as little as 16 arc-seconds (one image pixel). Brighter
stars spread out more, of course.
* There's no point in trailing stars, so anywhere near
equatorial declinations I'd use no more than a 10 second exposure (maybe
5 seconds at 9.9mm of zoom) if not tracked.
I once managed 2 arc-second resolution with afocal
coupling into my Dogson-1 (25mm ocular, 3x zoom worked best). Without using
tracking near the celestial equator, that would seem to forbid more than
about a 1/8th second exposure, but 1/4 second might work (per my previous
reasoning).
Centered on the celestial pole
(tripod mounted and at any zoom, or afocally coupled to a telescope at
any reasonable magnification/field), the field rotates at 73 micro-radians
per second. With a 5.76mm wide sensor in a hand camera, and 1.76 micron
pixel spacing, that should allow at least a 10 second exposure, and easily
the whole (typically the maximum hand camera) exposure of 15 seconds. However:
I seem able to detect the pesky effects of even sub-pixel image travel^
("egged out" stars), so I've ended up always using the barn door drive.
^ This might have been due to "star wander", caused
by turbulence and such a small camera aperture.
I've gone to using only a 3 degree circle for my "observation
areas" (882 pixels for the Samsung S850 --about right for printing out
stereoscopic pairs) out of the center of an exposure. (Update: I'll probably
be going to "blinking" image pairs, rather than stereoscopically fusing
them.)
Originally, I used nearly the full 10 degree height
of an SLR's 35mm frame, shot with a fixed 135mm telephoto lens (which turned
48mm of glass to the sky at f/2.8, a 33.8mm aperture at f/4).
* At "4x zoom" (actual focal length: 23.2mm) using
our Canon A590, I get nearly the same field, but (and interestingly), the
effective, maximum camera lens aperture (at "f/5.5") is nearly twice as
wide (4.2mm) as the full (f/2.6) aperture (2.23mm aperture) at minimum
zoom (5.8mm focal length). Theoretically, then, this camera should have
better magnitude reach at full zoom, and when I ran more test shots both
ways, it does.
* Canon's APS-C sensor'd T5i (and the newer T6 model)
DSLR --has a full zoom of 55mm at f/5.6, which equals 9.82mm of aperture,
so I'd expect something like a 2 magnitude gain --and at its 30 seconds
maximum exposure --instead of the A590's 15 seconds. The T5i also has a
timed/"bulb" setting, during which elapsed time counts up in its display,
and 2 minutes is do-able with my barn door drive. That should reach 10th
magnitude --if the noise level allows. (It had always seemed --to me--
best to run film and digital cameras at the native ISO --usually 80 to
100. However, I've found that much of the noise at higher ISOs can be averaged
out with stacking.) I've since reached 11th magnitude with my Samsung S850.
(edited
to here: 3/30/2018)
* The alternative of "stacking"
high
definition video frames with the T5i is interesting --but messy (IMHO),
due to the compression shortcuts used in MPEG formats. Detail gets borrowed
from one frame to the next and magnitude reach isn't great, due to noise
(if I understand it all correctly). Never-the-less, the bad frames can
be discarded --and we've all seen some amazing planetary and lunar imaging
results.
* The alternative alternative is to option several
automatically sequenced exposures (our A590 does up to 10 shots) and then
try stacking them. I did just that (January 16, 2017) and got gainful results
by (manually) stacking just 5 frames, using a general purpose digital graphics
program.
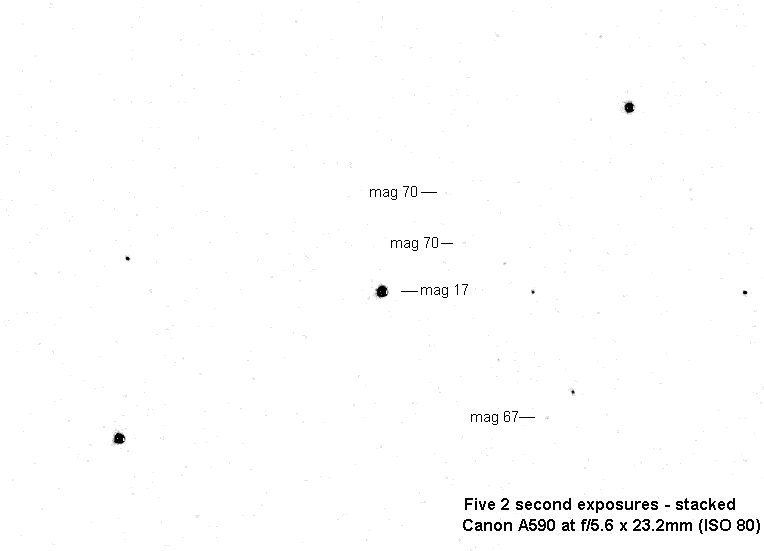 I cheated by leaving the right (stacked) frame a bit dirty,
which illustrates how 7th magnitude stars are sinking into the "mud"/noise.
Never-the-less, stacking seems to have leveled/averaged the noise enough
to extract at least an extra magnitude out of these frames. Since then
I've done better, reaching 9th magnitude --by stacking the original RGB
frames, and then histogramming out more magnitude reach ("stretching",
as amateur stackers put it). However, and set to ISO/ASA-200, I can cleanly
reach mag 9.8 without stacking.
I cheated by leaving the right (stacked) frame a bit dirty,
which illustrates how 7th magnitude stars are sinking into the "mud"/noise.
Never-the-less, stacking seems to have leveled/averaged the noise enough
to extract at least an extra magnitude out of these frames. Since then
I've done better, reaching 9th magnitude --by stacking the original RGB
frames, and then histogramming out more magnitude reach ("stretching",
as amateur stackers put it). However, and set to ISO/ASA-200, I can cleanly
reach mag 9.8 without stacking.
* Using a Samsung S850
(still only a 15 second exposure), stacking just 4 frames reached 11th
magnitude, per:
(click to enlarge) (That question marked bogie is probably
an internal camera lens reflection of Polaris.)
* Previously, it's been my impression that stacking
more than 5 to 10 frames leads to diminishing returns --aside from being
rather tedious to do it manually. The procedure is to precisely align your
frames in a digital graphics program, adjust the 2nd frame to 50% "transparency"
("opacity", or whatever vernacular your graphics program uses), the 3rd
frame to 66%, the 4th frame to 75%, the 5th frame to 80% --and so on.
However, some very solid looking tests (with graphed
results, and see the links below) indicate significant noise reduction
up to 25 frames --using 12 to 14 bit RAW frames from modern DSLR cameras
(or 16 bit, astronomy dedicated CCD cameras). You probably want a quality
camera tracking mount and a pro grade tripod to go along with that.
To make so many frames a lot less labor intensive,
you also want an automatic stacking program with astro-friendly features
--like "DeepSkyStacker" or "Registax".
My oldest (general purpose) graphics program merges
frames/images one at a time. Newer programs let you set up the frames as
so many "layers", for which you'd set the merge for each layer to 100%
divided by the number of frames for opacity. (Photoshop has some degree
of automatic stacking.)
* Again: I'm shooting $100 to $150 dollar class hand
held digital cameras --which only output 8 bit (per RGB color channel)
tonal depth, for which stacking more than (say) 8 frames might not make
sense to anybody. Another factor is that I want to preserve image resolution
and see exactly what's going on as I register and combine my images.
* With all digital photometry, it's best to have your
faintest study star images span several pixels, such that there's more
of a voting consensus from them. Also, and if the field isn't crowded,
a somewhat larger photometric averaging mask might be used to take in the
whole of a somewhat dappled stacked star's image.
** This business of stacking images has opened up new
vistas for amateur astronomy. Again: you can probably do more and do better
with a Canon DSLR, a tripod, a good, polar aligned tracking head, a dedicated
stacking program and a good sky program on your computer --then by spending
the same amount of money on a commercial telescope --plus: your observations
end up well documented.
** That all being said/stated,
I can imagine tracked still exposures and untracked video stacking going
well, but a series of untracked, timed exposures, each (say) 15 seconds
long, presents significant sky rotation from shot to shot. Derotating shots
afterwards in a graphics program --even if it's a sky program, means resampling
the images with resolution and magnitude losses. The only way I can imagine
comparing one such shot to another is by the klunky approach of printing
out and physically rotating pairs of images into best registration ---then:
either (somehow) "blink" the pair, and/or fuse and rotate them together
stereoscopically.
(Must rotate the pair through 90 degrees to detect all directions of motion.)
* Blinking use to be done by carefully aligning glass
negative plates in devices (I imagine) with partially silvered//aluminized
mirrors --which alternately illuminated and presented each of the pair.
Print-outs would work the same way --or: one might try blinking them through
a stereoscope.
One can't actually blink his/her eyes alternately,
nor otherwise completely block one side and then the other --since our
eyes then lose alignment (we all have a bit of aphoria, plus a stereoscope
adds tension biasing). However: by simply blocking part of the view
(with a hand or gray paper stock) for the dominent eye, eyeballs alignment
is maintained and a portion of the print pair can be effectively "blinked".
(I've lost confidence in only viewing pairs stereoscopically, but will
still do that to supplement blinking.)
here
- here
- here
- here
- and here
are links to what look like great web pages on stacking.
Photometry:
Magnitude --and "Poisson distribution"
* Although I was aware that CCD/photo receptors have
long been getting down to tallying individual photons (say: with the venerable
old GE-931 photomultiplier tube), until reading nitty-gritty stuff about
photometry in the Sidgwick handbook recently, it didn't "click" in my head
that the totals of such counts affected the certainty about a star's magnitude
--in the same way that I error bracket my Geiger counter totals.
For 5+ years I've been logging gamma photons --as "background"
radiation (alleged gamma radiation --another story). It arrives in ample
amounts, but since a Geiger-Mueller tube only fires on about 2% of them,
the mean sea level counts-per-minute is in the range of 10cpm to 35cpm
--depending on the size of one's G-M tube. At higher altitudes and over
more radioactive soils, the count averages can be higher.
* What one reports about logged counts can only be
stated with some plus or minus degree of certainty, depending on how high
the count rate and for how long it was counted. No doubt you're all familiar
with this statistical stuff --so essential to running tests and experiments.
If (say) the long term average was 10cpm, and one logged
any given total count over a period of 100 minutes, then that count has
a high probability of varying by the square root of 1000 = +/-31.6 --for
a 10 +/-0.3cpm average, but a low probability of varying by (say) 10 +/-1.0
cpm.
* When it gets down to counting arriving light photons,
it's the same thing: you might only have enough photons to confidently
state a star's magnitude to one place beyond the decimal point.
* Visual variable star observers are encouraged to
work well above their minimum magnitude, in order to achieve valid results.
* When the logged evidence for a distant star's planet
gets presented in terms of magnitude variations of only a percent or two,
it must take a lot of collected light to stay above the statistical noise
level.
* I won't be doing any such delicate photometry here,
but I'm looking forward to recalibrating our Canon A590 camera and having
at the area around Polaris --my northern meridian being much darker than
my southern. That, and maybe 4 more of my old "observation areas" (checking
for AAVSO targets) --well spaced through the seasons, areas in the sky
which pass over or near my zenith.
"Sky Meter"
* My thinking has been: "it is what it is", and my
focus has been on stars, which aren't as hard to fish out of the sky glow
as are "dim fuzzies" and DSOs --which so many amateurs list and pursue.
However, the "seeing" is so bad here that I joke about trading in my telescopes
for meteorological gear --in order to take up the study of weather, clouds
and states of overcast. But if I'm going to be griping about my night sky,
maybe I should at least stand ready to put some numbers to my laments --something
like: "magnitude per square arc second" (Mag/sas). That's also similar
to how the "surface brightness" of "extended objects" (planets, the Moon,
Messier nebulas) are rated.
* You might not care to get into the weeds of determining
the dimensionless magnitude of extended objects. As to "sky glow", expressed
as so much Mag/sas, more telescopic magnification (with the telescope's
aperture held constant) makes the sky appear darker, since the available
light per square arc second gets spread out across a wider (to the eye)
patch of sky. (Do see Jerry Oltion's "Understanding Surface Brightness"
in the December 2017 issue of Sky & Telescope.)
--This is a good time/place to review:
~~~~~~~~~~~~~~~~~~~
My best take on how a telescope --addresses the
night sky:
* The obvious "starting point" is bare-eyed vision,
in which (say) a 60 degree field of view (use length = diameter toilet
paper tubes if you wish) --flows into your 6mm dilated eye pupils at (we'll
call it at) "100% light flux".
* Useful (for darkening the sky) telescopic power runs
up to about 120x, at which point we're probably up against the "seeing"
limit of an average night sky (so further magnification based sky glow
darkening doesn't help).
* Were we to have kept making bigger objectives --to
support increasing telescopic power --by delivering a 6mm exit pupil (we'd
need a 28 inch primary at 120x), then --save for the telescope's transmission
losses (which also apply to the stars), there would be no sky darkening,
but the stars would get brighter, per the increased area of the primary.
* However: were we to stop making/installing bigger
objectives at some point (say: we stopped at only a 60mm objective, used
in a binocular at 10x power),
then the night sky would start darkening
as we added power --either with shorter focal length eyepieces --or with
ever longer focal length 60mm objectives --but the stars would shine as
bright (until the stars begin to spread out as diffraction disks).
* Another aspect to keep in mind (also covered elsewhere
on my pages): how much aperture you can use in a telescope depends on how
much sky you want to see in its field. Assuming (again) an affordable eyepiece
with an apparent field of 60 degrees, a maximum dilated eye pupil of 6mm,
and that you want to see 6 degrees of sky in your actual field of view,
then the above example of a 60mm objective at 10x power is all the glass
you can use. If you managed to shoehorn in a 5x eyepiece, you'd then be
looking at 12 degrees of sky, but only through 30mm of the 60mm objective.
For an 8 inch (200mm) objective, you'd be stuck at about 33x and just short
of an actual 2 degree field.
* If your quest is for stars and planets, it could
be that your best, sharpest vision is with an exit pupil in the range of
2.5mm to 3mm. In that case, you'd only need a 12 to 14 inch objective at
120x --or maybe stay with the crisp image you get at about 60x --needing
only
a 6 to 7 inch diameter objective --which telescope
is a lot easier to get out of the house, set up in the back yard, requires
less demanding build quality/rigidity, allows of an easily collimated longer
focal length, can aspire to refractor-like quality, and bargain priced
Plossl eyepieces will give excellent results.
~~~~~~~~~~~~~~~~~~~
Back to sky metering:
* I guessing that "/sas" (per square arc-second) was
chosen because --traditionally-- the night sky and "good seeing" has supported
only arc-second resolution, regardless of a telescope's aperture (and previous
to very high altitude observatories with "active optics").
* The approach I've taken has been to get my meter
onto the same page as that familiar "SQM" device, by using a "standard"
lamp: a common, 4 watt, C7, 120V "night light" --at given distances from
a sheet of good (95%+ reflectance) stationary. Below are the graphed results
of tests run by Jerry Oltion and myself.
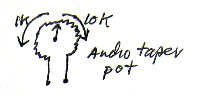
This was an earlier calibration, before down-ranging
the circuit. (That sharp turn at 150
degrees is due to my 300 degree rotation "audio taper"
pot being made up of two linear
sections: zero to 1000, then 1000 to 10,000 ohms.)
0.01 foot-candle at 10 feet is key here.
Westinghouse and GE spec their 4w C7s as having about
a 14 lumen output. Since there are 4pi (12.57) steradians around the lamp,
one would expect a light flux of about 1 foot candle at a distance of 1
foot, so those lamps are within hailing distance of being a "standard"
(1/6th pound, whale sperm wax) candle. Indeed: my C7 balanced the light
of a typical, tall, dinner table candle.
* Jerry read his C7 lamp light at 7 feet, 14 feet and
28 feet: which should have been two 4-to-1 ratios, or 1.5 magnitude differences
(Mag = 2.5xLog (L1/L2). The jump from 7 feet to 14 feet read exactly right.
The next jump should have been to 16.6m, but it read 16.82: a "shade" darker,
but surprisingly close to the "curve", given that the SQM is only critically
calibrated between 16 and 23 mags.
Final(?) wider range calibration
Final(?) useful range calibration
One might make a dial graduated in milli-foot-candles.
* I find the concept of sky brightness being measured
in "magnitude per square arc-second" off-putting. Is it necessary? Is citing
the total/lumped brightness of extended objects (planets, the Moon, dim
fuzzies) useful to the amateur?
As to the night sky, I humbly suggest that it can be
more meaningfully read in milli and micro foot-candles of light flux, something
a very sensitive photographer's light meter might accomplish --or: my "sky
meter", based on the old "holophane lumeter" and your great-grandpa's photographic
darkroom "spot photometer".
* I like the "basic" nature of my sky meter. It seems
adequate for urban skies, but one might try making a simple, lensed meter
using a photo-resistive component or a photo-transistor.
As to reading the brightness of "extended objects",
it seems reasonable to make an eyepiece version of my sky meter and cite
measurements as so many micro or milli-foot-candles, profiling large objects
from core to extremities.

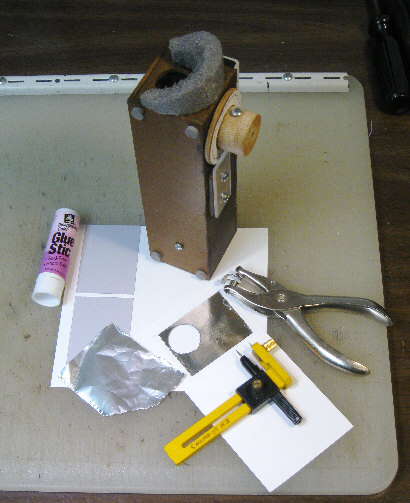
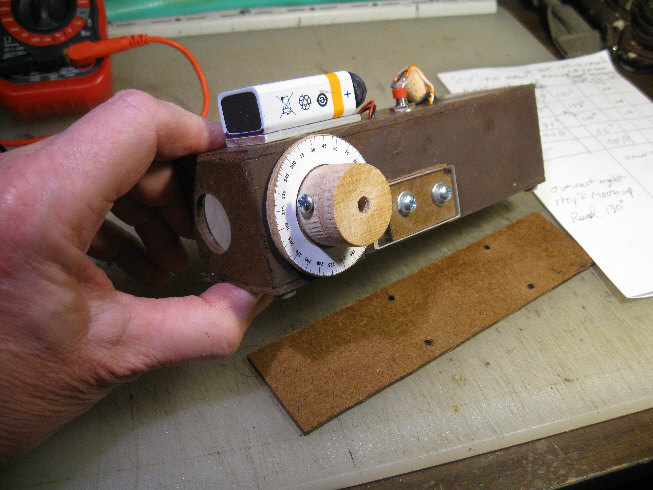
And here 'tiz: the "holophanometer" or "sky meter"
--under construction.
That cork mounts the LED --which shines down upon
a holed gray card --per:
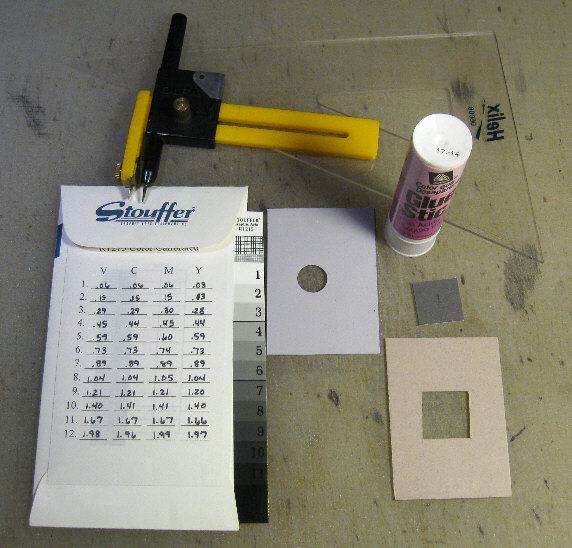
I put some quality mat "presentation" paper into my
printer and sent it
a print order for that gray card --which checked out
at 50% reflectance (density 0.3d).
You don't need those Stouffer gray steps --use any
gray card. Note: glue-stick the gray paper
onto card stock before trimming and making the half
inch hole, then make a small round gray
piece that's been backed with aluminum foil, which
prevents light on the back of the gray card
(say: Moon light) from affecting the reading. Paper
punch a 1/4" hole through its center.
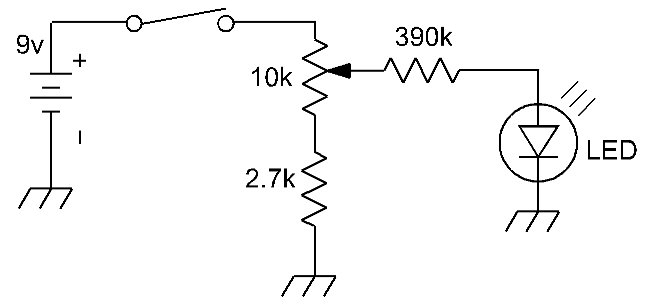
 Below is a rough drawing, a wiring diagram, and a partial
list of its components.
Below is a rough drawing, a wiring diagram, and a partial
list of its components.
(RadioShack.com part numbers)
~ 10k-Ohm, 1/4 watt audio/log taper
potentiometer (#271-1721)
~ White LED, 5mm round (#276-0017)
~ A fresh alkaline 9 volt battery
(any name brand source, relied upon to maintain 9+ volts --for years)
~ A 9 volt battery connector cap.
(#___________)
~ A 9 volt battery holder (atop
the holometer, for easy access and voltage checking). (#____________)
Or: Simply
Gorilla Glue down a piece of aluminum (as I did), then tack glue the battery
to it with Duco
Household
Cement (a colloid glue which dries fast, holds well, and snaps off with
a pocket knife).
A briefly
used alkaline 9v battery should go its rated 4 year shelf life.
~ 100K-Ohm 1/4 watt resistor
~ 2.7k-Ohm 1/4 watt resistor.
~ Momentary, normally open push
button switch. (#_______________)
~ Neutral gray card stock (or print
your own).
~ A short piece of black plastic tubing
with a frosted plastic diffuser and an orange filter.
~ A simple, plano-convex lens about
1 inch in diameter, with a focal length of 6 inches. I can help supply
that item (to U.S. addresses) if you can't get ahold of one. However, a
different focal length should
work as well, as long as the LED distance from the gray card is about the
same. Should you change
that distance or the circuit, simply calibrate what you end up with, using
a common, brand name, 4 watt,
frosted white "night light" at 10 feet from a piece of standard, 95% reflectance
stationary), such that
we can all get our meters somewhat onto the same page --and with at least
a rough comparison to the
digital read-outs of a standard "SQM" --then get the rest of the dial by
halving the current.
More photos:

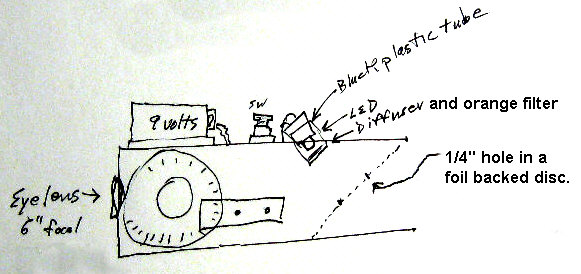
The (inside) foil backed gray disc covers the 1/2"
hole in the card stock light target. Its
1/4" hole presents a 2.4 degree (very blurry) field.
I cut the orange filter from a blue/UV
blocking, orange plastic medication bottle.
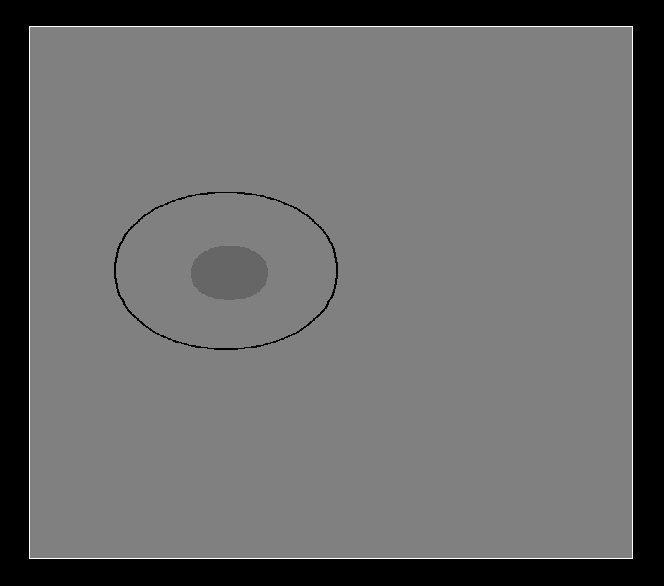
Here's what you might see through the sky meter --when
the card's
brightness needs to be turned down a skosh, such that
what's seen
through the 1/4 inch hole rather blends in. This works
pretty good
at low levels, since color differences aren't well
distinguished, but
dart your eyes around ("averted vision"). Be on guard
against your
eyes playing tricks (after-images and dissolving motionless
vision).
Try to get a quality, "audio taper" potentiometer.
Instead of the orange filter, maybe an orange LED?
(Instead of the white one I used.)
 8/11/2018 update: After waiting weeks
(here near the coast) to connect with a clear night sky, we finally got
one (following a nice balmy summer day).
8/11/2018 update: After waiting weeks
(here near the coast) to connect with a clear night sky, we finally got
one (following a nice balmy summer day).
An hour before "astronomical night"^, I read the dial
at 75 degrees = 7.5mFC = mag 14.66/square arc-second.
At the start of astronomical night I dialed 182 degrees
= 1mFC = mag 16.84. About 20 minutes later: 185 degrees = 0.95mFC = mag
16.9. That last took less than a minute of dark adaptation. The dial position
seemed unambiguous.
9/2/2018: The sky was clear and a bit darker last night
at 0.87 milli-foot-candle, for an honest mag17/sas. That was well after
the onset of astronomical night. A minute of dark adaptation was essential
for getting fairly consistent sky meter readings, the spread of which was
from 189 to 193 degrees of dial rotation, averaging 190.6 degrees. (Each
degree is worth about 0.0125mFC or 12.5uFC on that half of the dial.)
* I've a feeling that mag18/sas (about 0.35mFC) is
going to be a bit of a reach (if my night sky ever gets that dark).
Mag 17/sq-arc-sec is a really crappy, big city, urban
level of sky glow. I have medium city glow here, but lots of haze to fog
and overcast stuff, being so near the coast and our encircling bay.
^ Defined as the Sun passing beyond 18 degrees below
the horizon.
^ See Tony Flanders' Sky & Telescope article: "Rate
Your Skyglow" for a good treatment of natural and artificial night sky
glow. (The text of S&T articles seems to be Google-able now.) See also:
> http://en.wikipedia.org/wiki/Airglow
9/3/2018: Polaris (magnitude 1.97) first became visible
to my naked eye when the twilight sky checked at 6.62mFC^ --which works
out to: mag14.79/sas. (So ---what?)
9/4/2018: 'Twas a very nice, clear nightfall. I was
first able to look directly at and clearly see Polaris when the sky (in
that vicinity) checked at 10.5mFC --or mag 14.29/sas. (Yes: other, more
to the zenith, brighter stars had already appeared, like the triangle of
Deneb, Vega, and Altair.) (I feel that I've learned something --not sure
what.)
* Here's a link
to a web page with a helpful, cross-light/lumenence units nomogram --per
this thumb:
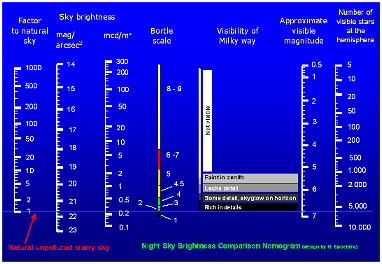 I seem to have about a one magnitude disagreement with
those numbers, but that might be due to knowing exactly where to look for
Polaris, as compared to scanning the sky for the first appearance of random
stars.
I seem to have about a one magnitude disagreement with
those numbers, but that might be due to knowing exactly where to look for
Polaris, as compared to scanning the sky for the first appearance of random
stars.
10/16/2018: ** Per the above (linked)
nomogram, it's been bothering me that a 15.6mag/sas sky can extinguish
a 2nd magnitude star. The star is supposed to be over 275,000 times brighter
--than those little square arc-second ("sas") patches of sky around it.
* With reference to the nomogram and my comments about
how a telescope works, let's take it a step further --or rather: backward
--from the starting point of a good 60x refractor with a 6mm exit pupil
(therefore: it must have a 14 inch/360mm objective). With such a 'scope,
"arc-second-seeing" becomes (20/20 vision) arc-minute seeing.
Going from this telescope's eyepiece to just looking
at the sky --is like de-magnification ("minification"). If increased magnification
(with the same diameter objective) darkens the sky (but not the stars),
then minification should brighten the sky (but not the stars --since our
retina's central rods and cones are effectively spaced for arc-minute resolution).
But switching from the eyepiece of that 60x telescope
and looking directly at the sky --doesn't "concentrate" the 15.6 mags of
light in each square arc-second --into the one square-arc-minute "points"
that our eyes can resolve, since the imagined telescope neither makes "extended
objects" (including the sky) brighter or darker --if the exit pupil (say:
6mm) is kept constant --by way of the objective's diameter keeping pace
with magnification.
(I'm hammering these points because they seem so slippery
to me.)
* Of course a star's disc, seen as a "point" on your
retina, is (theoretically) about the same actual diameter of an arc-minute
either way --but goes from being "fed" by that 360mm diameter objective
to just the 6mm aperture of your eye (which is the same as looking through
a perfect 1x power telescope with a 6mm objective). One would then
expect it to be 1/3600 as bright --an 8.9 magnitude hit. Mag-2 Polaris
then drops to mag-10.9 --against (say) a mag 15.6 sky --which somehow occults/blends
it to invisibility at that point.
* We're talking 6mm exit and eye pupils --for which
the eye's resolution drops off (it's best at 2.5mm or so). So let's assume
120x through the 'scope (to really nail that arc-second seeing), and 2
arc-minute eye resolution. That's 120x120 = 14,400 times gain/loss, or
10.4 magnitudes --for Polaris dropping to mag-12.4, leaving 3.2 mags unaccounted
for.
* There's an excellent chance that I'm laboring under
a misconception or two here.
* Again: I've been assuming here that the telescope's
objective is kept large enough to produce a 6mm exit pupil --as telescopic
power increases. Disregarding transmission losses through the telescope,
it can then make "extended object" things look larger, but not brighter
--nor does the telescope make the sky darker (than naked eye). Darkening
the night sky requires increasing power, but holding the objective's diameter
constant (therefore effectively reaching higher focal ratios --like stopping
down a camera lens).
^ * Yes: I'm aware of "lumens" (same as the foot-candle),
"candelas" (same as the candle but rigorously defined), cd/m2
and "mcd/m2", but I don't want to wander too far away from just
"candles" --a concrete concept that I've at least simulated. Legend has
it that the whale sperm/wax based "standard candle" was significantly brighter
than a regular, paraffin, candle stick --the latter of which I was able
to balance against the light from a 4 watt C7 lamp.
# As to foot-candles (FC) versus magnitude/sas: mag/sas
is certainly a different kind of unit. Never-the-less, a target illuminated
to a degree measured in either cd/m2 or FC (or milli-FCs) --can
appear to be at some equivalency (to the eye, or to a spectrum compatible
light sensor) --to a patch of sky --that's said to be illuminated to so
many "Mag/sas". (At least: that's the implicit assumption of the above
nomogram, old style "halophane lumeters" --and my assumption as well.)
As to cd/m2 versus FC: Candelas were first
established as being something like 0.95 foot-candles, then quietly promoted
to a 1-to-1 equivalency --decades ago. But the light flux of a standard
candle at one foot distant, seems to be a different concept than that of
1 candela --spread evenly and completely over a square meter. (Are they
talking solid angle square meters at a meter distant from a point source?
I try to study that stuff, but meanwhile, the "foot-candle" serves me well.)
(All these units strike me as more practical than "scientific", since it's
about eye sensitivity and mixed spectrums, but we try to apply them logically
and consistently anyway.)
Happy star trails!
Variable Star Observing
( newer approaches)
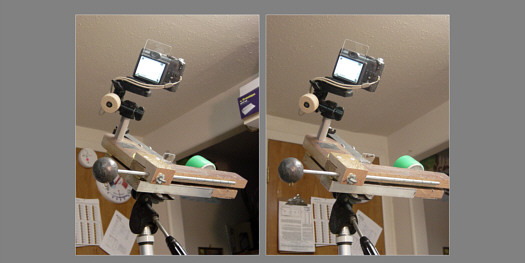
I built a lightweight tracker
--which was too light (obviously) for my old 35mm SLR and
its honking 135mm telephoto lens --even with that lead ball counterweight.
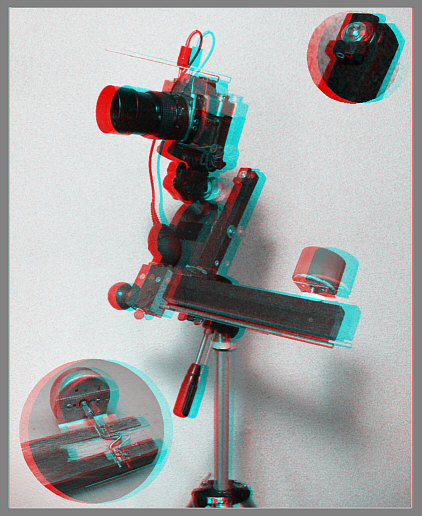
Barn Door Tracker
(use red-cyan 3D glasses, red is left)
This tracker has an "arm pit" drive that's good for
about 3 minutes. The (made in Tunisia) motor was taken from an older "Lux"
brand wind up kitchen timer. The current version of this timer can be purchased
almost anywhere (including Amazon.com)
but it's now made in China, so good luck on getting the same thing with
a nice metal shaft. The Lux timer's a bit spendy. Maybe something cheaper
would work as well. Features and issues:
~ The humble escapement of this timer will slow down
under load, so I added that sliding counterbalance. It weighs a pound.
With that heavy old SLR film camera and its 135mm x f/2.8 lens, it ranges
from barely enough (extended) to a little too much, so I keep a couple
rubber bands handy as "helpers" (and to keep the works from flipping over
in transit). For 95% of my aim points, however, first balancing the weight
on that crank arm to zero, then sliding the counterweight in 1.5" (for
about 40 grams of pressure --when aimed at the celestial pole) --works
fine.
~ That old camera tripod is a honey and can almost
handle the load, but you'll either want to use a lighter
camera or get a heavier tripod --if you're buying a new one.
~ The second head under the camera was cut off of a
typical $18 department store tripod and shows some strain. Again, use something
heavier, go to a lighter camera, or cobble
something up that will do the job.
~ To make the camera turn at sidereal rate, the lower
arm is made of 2 pieces. The outer end, with the motor and arm, slides
in and out against a short length of aluminum angle stock. It's secured
at the right length by tightening a screw.
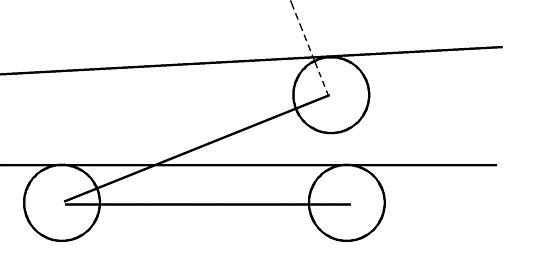
Curiously, this design has a bonus in that the effective
length of the crank arm initially lengthens as it lifts against a glass
slide on the underside of the upper arm, which (at first) compensates for
the cosine loss of its up-angle.
 I've got the lower arm length set so that the tracker
gains slightly (less than 2 seconds of time) during the first minute, holds
steady for the second minute, then loses about what it gained during the
3rd minute.
I've got the lower arm length set so that the tracker
gains slightly (less than 2 seconds of time) during the first minute, holds
steady for the second minute, then loses about what it gained during the
3rd minute.
~ Should one want to expose longer than 3 minutes,
you'd build a more traditional barn door tracker that uses a tangential,
chord, or curved screw drive and some sort of a variable speed motor --such
as this honey:
> http://www.garyseronik.com/?q=node/52
--by Gary Seronik. Note that he uses a variable voltage
regulator to the motor, which is far better than just a rheostat in series.
Supplied with a "stiff" (meaning your power supply has a low source impedance),
constant voltage, DC motors do their damnedest to run at a constant speed.
If the regulator/controller isn't on the barn door itself, then use heavier
lamp cord to run the power up and a stout automotive jack-and-plug. Possibly,
this arrangement is immune to various loading presented by the camera's
angling. If not, consider a counterweight arrangement, such that the motor
always labors under about the same load.
* Seronik points out that while a double or compound
arm barn door drive design seems an attractive solution, it's pointless
unless you can figure out a polar alignment routine to achieve correspondingly
high accuracy.
* For solid photometric results, I've found it best
to stay 1 or 2 magnitudes from the limit of what I can capture on film
or sensors, which happens to be consistent with general AAVSO advice about
staying 2 magnitudes this side of what can be reached visually with a given
telescope or binoculars.)
* Reciprocity failure sets in hard for fast films as
exposure times increase, along with color "cross-over" problems. Hypering
techniques are helpful, but only for longer exposures than I care to deal
with --for which tracking and guiding become much more critical --which
makes astrographs a lot less fun. It might be saner to get a good DSLR
or a real astro CCD camera --but that leads to all sorts of expense and
complexities. So --I endeavored to make modest exposures (60 to 180 seconds)
work, using a simple tracking device. (Later I went to 15
second exposures.)
Here are yet a few more
thoughts about barn door trackers.
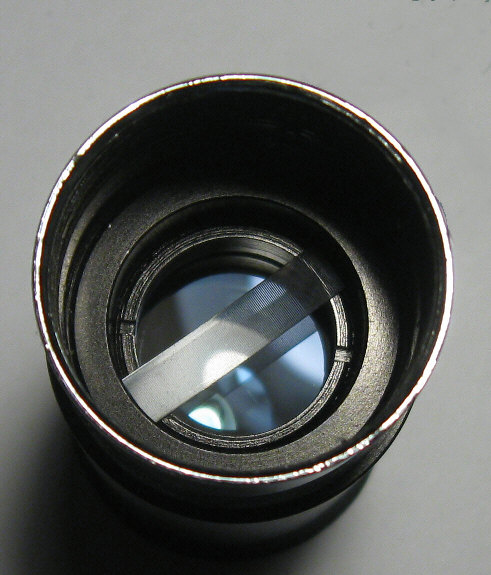
~ The white wire pointer in the camera's hot shoe is
a real eye hazard, which got replaced
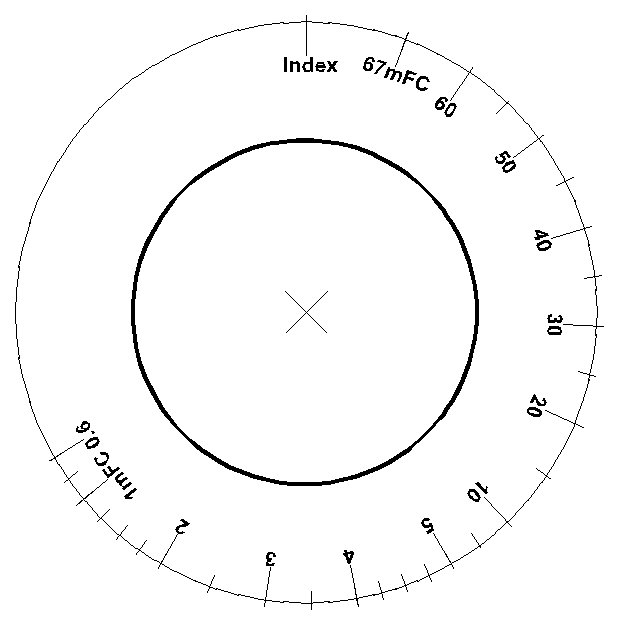
with a shorter version of that Polaris "glow finder".
~ The Polaris finder's "pupil splitter" lens "jumps"
and projects that little 3/4 degree circle of glow film (per the above
stereo photo) into the sky, where Polaris gets placed on it --according
to the lay of the following chart:
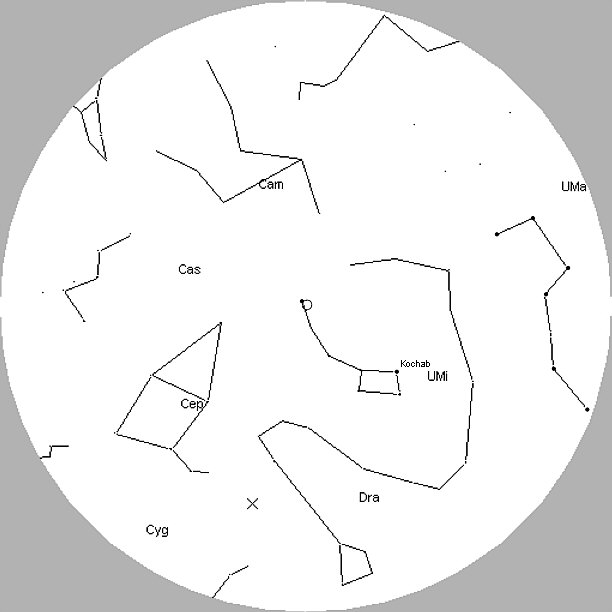
Chart for locating the celestial pole
--which you turn to roughly match the night sky. The
true celestial pole is in the middle of that little circle, on an imaginary
line connecting Kochab and Polaris --so here we see Polaris located at
about "10:30", which is where you place Polaris on the projected circle.
Newer VSO work --with my barn door
Tracker
(for which, see above for construction
details.)
* Clearly, my BD Tracker is underspecified --when loaded
up with my old Minolta SLR and a 135mm x f/2.8 lens. Something much more
modest (and modern, by the way) is called for: like our nice little Canon
A-590.
 The A-590 is an an exceptionally nice version of the common
digital hand camera. Even though its maximum exposure is limited to 15
seconds, it's sensitive and sharp enough to require careful tracking. Throughput
resolution is two arc-minutes and it reaches magnitude 8 (at full zoom),
so I attempted to do some VSOing with this little guy.
The A-590 is an an exceptionally nice version of the common
digital hand camera. Even though its maximum exposure is limited to 15
seconds, it's sensitive and sharp enough to require careful tracking. Throughput
resolution is two arc-minutes and it reaches magnitude 8 (at full zoom),
so I attempted to do some VSOing with this little guy.
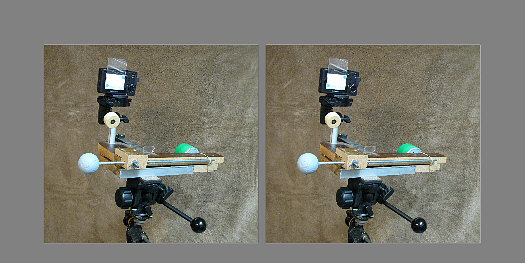
* Update: I've gone to a very similar
looking Samsung S-850 camera --which turns 4 times as much glass to the
night sky and just reaches 11th magnitude (stacked) at ISO-400. Stacking
4 or 5 frames knocks down the noise agreeably. Here it is mounted up on
my improved tracker:
But: how do you aim it?
Normally, I'd pop a "glow finder" (see
above) or a formed-to-fit white pointing wire into the hot shoe (avoiding
any hot shoe contacts) --but: modern hand cameras don't have a hot shoe.
I tried the (as pictured) sighting glass (window plastic)
again, eventually discovering that on the power management "Save" setting,
the display dims way down nicely after 30 seconds.
* I also tried bending some 1/16th inch bronze brazing
rod so as to snap around the base of the taking lens --to support and aim
that white painted pointer. (The bent-around forward end is less of an
eye hazard.)
 That wire is easily bumped and bent, so I'm urrently favoring
the reflex sighting glass approach --to get my target star well centered.)
That wire is easily bumped and bent, so I'm urrently favoring
the reflex sighting glass approach --to get my target star well centered.)
* The sighting glass works just
as well when stuck to the front of this camera --per:

It's stuck on (and quite securely) with tiny pieces
of "office tacky clay" (soft "UHU" brand) and,
being flat to the rectangular camera body, is inherently
well aimed.
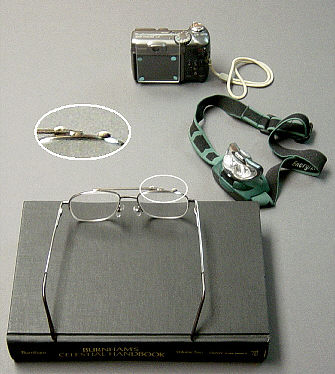
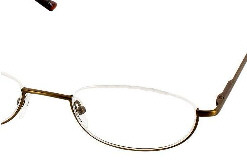
You can try using just a pair of reading glasses and
2 glow
spots (foil backed so as not to shine back into your
eye)--
* The paper-punched two dots of long-lasting, foil-backed,
premium glow tape (from www.scopestuff.com/)
are stuck to the upper edge of a lens in a pair of reading glasses. The
idea is to "split" the night time pupil of my eye at the top of my glasses
--so as to have distant objects and the reflection of the glow dots in
focus at the same time.
 * For the hard core amateur astronomer:
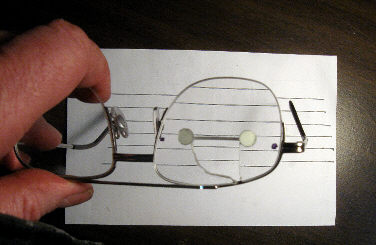
Cut a hole at the optical center of your (cheap) reading
glasses (where
the lines match in this photo) and place your glow
dots to either side. The
lens easily pops out of a metal frame. Remove only
a blade width at the edge.
Again: I barely reached 8th magnitude with the A590
(not stacked), 9th mag stacked, and 11th magnitude with my Samsung S-850
(ISO-400, 4 or 5 frames manually stacked). With both of these cameras,
much more physical aperture is turned toward the sky at maximum zoom and
aperture --than at minimum zoom. Both cameras perform at their theoretical
resolution (diffraction) limit and I can locate dimmer stars to within
a 15 arc-sec pixel (in relation to area reference stars).
However, and to my dismay: some
stars wiggled, while others held still --due to those damnable turbulent
air cells here (near the coast).
Gary Seronik's design at:
> http://www.garyseronik.com/?q=node/52
--is very appealing. The size, shape, curved threaded
rod, and cleanliness of it is worth copying. Here's a more current hot
link to the supplier for his motor:
> http://www.sdp-si.com/d790/html2/D790C14027.html
--and I see that it costs about $30. Should you want
to shop around, here's another supplier:
> http://www.techmax.com/small-electric-motors/
Hmmmnnnn --- - -
* Since practical barn door trackers are used for exposures
of only a few minutes (unless you want to fret about polar alignment --and
aligning your Polaris telescope to the hinge within a minute of arc when
you set up), and since you're going to be standing by anyway, then you
might as well be the "motor" yourself --per:
> http://petesastrophotography.com/index.html?mainframe=http://petesastrophotography.com/barndoor.html
* But that only works if you've got the tracker bolted
down to something sturdy --like a tree stump. So for use on a camera tripod,
how about just any sort of a small DC motor to turn that big drive wheel?
You let it advance to the next 5 second mark (using a normal camera lens/zoom)
or go by half step intervals (135mm equivalent camera lens, or 4x zoom
on a typical digital camera) --each time you close and hold down a remote
pendant switch.
* Not to worry about exact dimensions --just make the
threaded rod curve smooth and true, then "chase" its threads with a die
to make sure the nut won't bind. I'd make the rig short and compact like
Seronik's.
* After it's finished, park it under the stars (polar
aligned) with a rifle scope in place of a camera --aimed at something bright
near the celestial equator. Find out how far to turn the wheel at the end
of a (say) 120 second interval and place a light mark on the face of the
wheel (along the spiral, under the cursor wire).
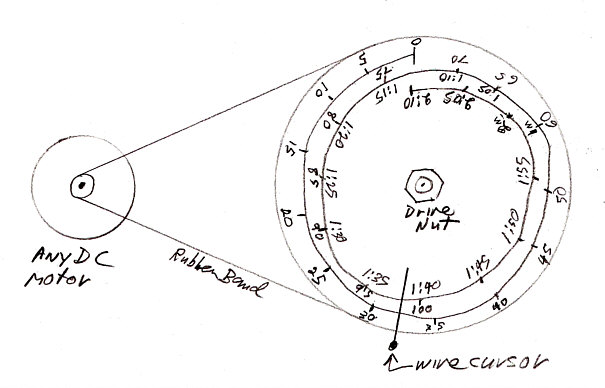
Any little "gear motor", a battery, and some lightweight
lamp cord to a remote hand switch.
(Well, okay: a thin O-ring would be a lot better,
and maybe you want to file a groove into the motor shaft.)
* Figure out how many degrees it is each 10 seconds,
then mark the wheel (per the drawing), and at each 5 seconds.
June 8th, 2016: --Been thinking
--about photometry.
* For my last photometry/magnitude graph
(from shooting on the night of 4/26/2016), I adopted the quaint old practice
of simply fitting a least kinky, mechanical drawing type "flexible curve"
to the dots. This approach "worked" well enough, but I had to admit to
myself:
~ I'm simply
not getting much star light onto these images. I can't hope to do +/-0.1
magnitude estimation for less than about 5th magnitude stars --and that's
a very low star population, even in my large "observation areas".
~ Setting
up a tripod with my barn door drive (nice as it is), and trying to keep
my camera settings current is a pain in the ass --since the Canon A-590
loses patience with my dawdling and shuts down, plus it forgets my manual
focus setting if I turn the blinding light of the LCD display off.
Hmmnnn: Does it really matter if the stars trail a
bit? On or near the celestial pole, I suppose it does, since some trail
more than others. Still: if I put a mask around the whole egged out image
---hmmnn. Elsewhere in the sky, trailing is more similar within a given
field.
What if I defocused the camera a bit, such that the
trailing is barely noticeable? I'd lose some magnitude, of course. I'd
also depend less on halation and more on the dynamic range of the sensor
pixels --for brighter stars. Moreover: there'd always be more pixels "voting"
per star --a very good thing.
Dispensing with the barn door hassle ("northing" the
contraption and not subsequently upsetting that aim point, resetting a
drive run and restarting the timer motor) --would help a lot. Of course,
both trailing and defocusing should attenuate the magnitude reach of my
imaging, but that's how I use to do it with film. My intuition is that
what results I can get that way would be more consistent.
Astrophotography with APS-C
class (and larger) sensor cameras
* These cameras are expensive to purchase new, but
might be had at considerable discount used --since they're subject to that
"latest greatest" fashion syndrome. Considering how cameras get "customer
engineered" to cram more pixels onto the sensor and more supercilious features
onto the program wheel (Canon recently added a "foodie" program to their
T6 --for blogging flattering photos of your breakfast --sheesh), a reconditioned
used camera might be a good buy.
* It use to be that affordable (film days) zoom camera
lenses were crappy, but the comes-with (or built in fixed) standard zoom
camera lenses on modern digital cameras are excellent and cover what use
to be a (film days) full range of focal lengths (35mm wide, 50 to 58mm
standard, 135mm tele --all with [film days] macro capability).
* There are two big considerations in favor of buying
a DSLR. They're popular, plentiful, somewhat price competitive, and DSLRs
don't (technically^) have to cook the sensor between shots --so less noise
and more battery life. It might make dollar sense to buy a DSLR, always
lock up the mirror, and never remove its standard lens (thereby gratuitously
exposing your camera's sensor and other innards to dust and condensation
deposits --and for that reason, you might plan on the expense of having
a used DSLR professionally inspected and cleaned.)
^ To take advantage of a swivel-out camera
back display, however, you'd be running a DSLR in "live view" mode --and
cooking the sensor anyway --right?--, so you might as well buy a "mirrorless
DSLR", or even a regular, fixed lens camera (and worry a lot less about
dust on the sensor).
* I've the impression that DSLRs are not generally
well sealed against the weather and moisture --unless such a feature is
specifically listed. That doesn't bode well for going deep into the night,
often with a great deal of condensation/dew forming on any surface exposed
to the sky. (Another argument in favor of short exposures.)
Here are starting points for the blizzard of setting
options on modern, APS-C class cameras.
> http://www.learn.usa.canon.com/resources/articles/2012/astrophotography_techniques.shtml
> http://downloads.canon.com/CDLC/Canon_CDLC_Astrophotography_Quick_Guide.pdf
Canon makes some spendy astrophotography cameras, but
most of their advice translates to lesser cameras.
* I think about getting a better camera, but the prospect
of using it for Telescope mounted prime focus astrophotography doesn't
hold much allure, since it's a helluva bother and (again) I'd rather keep
a good camera sealed up. (The exit pupil of my 25mm ocular seems to be
a fair
afocal match to the effective mid-zoom
iris/nodal aperture of a compact digital hand camera.)
Tripod and barn door mounted sky shots/astrographs
are a lot easier to manage and the full zoom of the standard lens (hand/compact
camera or DSLR) runs 10 to 15 vertical degrees. That's a nice sized patch
of sky to work with, orient on, find comparison stars within, and appealing
for trying to image sub-fuzzies/"DSOs" and nebulous stuff.
I'm finding that almost any serious astrophotography
seems to require an equatorial drive --piggybacking on a driven scope,
or riding on the
barn doors I describe in this page.
I'm guessing that a good camera with a sensor in the APS-C class will reach
10th magnitude with maybe a 30 second exposure (Canon's DSLR maximum, short
of bulb/timed). That's short enough to not require critical "northing"
of an equatorial telescope or a barn door mount to keep the stars tight.
(However: one might want to go a lot longer to get at nebulous fuzzies.)
** Aside from my standing amazement at the pixel spacing
of modern sensors --and the diffraction limited zoom optics (the light
passing through umpteen coated surfaces!) which try to match their resolution,
even common digital hand cameras will automatically do the "flats and darks"
for longer exposures, as well as having a tailored routine to suppress
longer exposure and/or high ISO noise. (Just so the truth of the image
doesn't get tailored out as well.)
* One thing missed in guides/advice to astrophotographers
is that the common advice to "drop down a stop or two^" from maximum aperture
incurs not only a serious light and noise hit, but often a resolution hit.
Pixel spacing is on the order of 2 microns for hand cameras and 4 microns
for (the Canon) APS-C cameras (that I've looked at), while the best diffraction
disk diameters (which are much smaller than the old "circle of confusion"
standards) for focal ratios of f/3.5 or f/4 is about 5 microns (which will
be the size of dimmest stars --halation making bright stars much wider).
For photometry, you want to spill out the stars across 4 or more pixels,
so f/5.6 doesn't hurt too much, but your magnitude reach has taken a double
hit.
Nebulous stuff, of course, gets a wide open lens --and
maybe a push into upper regions of the ISO choices. (Again: not to worry
about the vignetting of typically over-specified zoom camera lenses, thanks
to automatic "flatting", but peripheral stars might end up a tad noisy
thereby. I use just a central 10 degree or less circle of the image.)
* I'm talking about Canon T5i/s and T6 DSLR cameras
with their standard 18mm to 55mm zoom lens, for which the maximum respective
apertures are f/3.5 and f/5.6 respectively. Divide those numbers and see
that minimum zoom allows of a 5.14mm effective aperture, while full zoom
allows a 9.82mm aperture. Also noted: the theoretical, diffraction limited
"circle of confusion"/diffraction disk is 4.6 microns at f/3.5 (about equal
to the sensor's pixel spacing), whereas the diffraction disk reaches 7.4
microns at full zoom. Assuming that the lens is near perfect ("diffraction
limited" --and I've found lesser Canon cameras to be so), that's a good
thing, since you want at least 4 pixels illuminated for doing photometry
--which might be the case for the dimmest stars in an image.
** That being said, and while I certainly covet a medium
(APS-C) size sensor, I (again) question the wisdom of removable lenses.
That was fine for film SLR cameras, since each exposure used a new "sensor"/frame
of film, but out here near our windy, misty, rainy, dusty, salt air Oregon
coast --hmmnnn.
Another problem are those rather small effective apertures:
5mm, 10mm; and for Canon long zoom options as well. The 18mm to 135mm zoom
(f/3.5 to f/5.6) tops out at only 24mm, while the 55mm to 250mm (f/4 to
f/5.6) tops out at just under 45mm of glass to the sky. That makes efforts
to "digiscope" with a $50 to $100 binocular or spotting
scope in the 50mm to 80mm range more appealing (despite such a lash-up
being cumbersome to manage and losing the "flats" compensation feature
of a DSLR).
* What I'd like --is to do some meaningful photometry/VSOing
with simple tripod shots. It's a pain in the butt to set up/north an equatorial
drive, locate the star field, then work through a raft of manual settings
(often against the deadline of an automatic power-down/resets).
* And all that having been said: I've downloaded and
am contemplating the Canon's whopping 380 page T5i manual. (Does anyone,
even an astrophotographer, really need so many options?)
* Speaking of specific cameras, the
top-of-the-line Canon T6s (at $800+) is most helpful for using and displaying
manual settings, plus it has a button for locking in a "mode". If that
means locking in your settings --and preventing an automatic power-down,
that might be worth the premium price in itself. From my own experience,
anything less is crazy-making.
^ Manufacturers are attempting to reach beyond the
once typical f/3 (or so) of digital camera lenses and we're seeing it in
non-zoom lens options, but review commentary has been in good agreement
that wide open should only be used when you need the light. It might be
that the resolution of (say) an f/2 digital lens is just too coarse for
astrographs --unless set down a stop. My old Minolta SRT-101 SLR film camera
could image 20 micron dim stars at f/1.4, but that's 5 to 10 times worse
resolution than what's expected of today's digital cameras.
** So: what's the conclusion here? How
the heck am I going to go about "doing astronomy"?
~ As noted elsewhere, I have a problem with using a
digital astrophotography program which automatically coughs up magnitudes
and IDs for everything in a camera frame. I guess I even have a problem
with a modern digital camera that does darks and flats --much as I like
the precisely timed image files and all the EXIF data. Of course, this
all differs from the old days only by degree (a lot of degree), since Kodak
made my film, Japan made my camera, and I didn't even mix up my darkroom
chemistries "from scratch" --like my Mom did. (I'd be in a basket nearby
as she printed pictures for Dad --who was far away --fighting WW-2.)
Ohmeohmy. I'm old now, tired and usually hurting somewhere.
What the heck are we doing with
all this astronomy stuff --anyway?
* I do not disparage sky touring/appreciation
at all, since simply beholding such wonders, like admiring art, is really
the end result of all astronomical endeavors --toward better imaging of,
relating to and understandings of what we're looking at. I envy the typical
sky tourist's pattern recognition and familiarity with the heavens.
Yet, and despite how feeble my efforts are --especially
compared to today's volume of research, done with incredibly large and
precise instruments, I don't feel right unless I'm "doing" actual astronomy:
recording stuff, timing events, astrometry, charting, photometry. That's
more important to me than (say) having a better eyepiece.
It's turned out to be unlikely that I'll notice something
--worth noting, but like my many failed business efforts: "I did my part"
:-)
* Another prime motivation is understanding what I'm
doing --even to the point of not doing what I don't understand, or doing
without what I can't build, or don't want to invest the time to build and/or
understand. Of course I can't make film emulsions, today's image sensors,
the hardboard for my 'scope's OTA, nor the screws which hold it together
--so let's put quotation marks around "build".
* For what little I do build and understand, another
motivation is social: that it's within the reach of interested others --and
thus these web pages.
** What makes astronomy most interesting to me is being
in pursuit of a quest.
~ Perhaps watching a neglected spot
in the sky --for who knows what to manifest.
~ Trying to recover a long lost,
aberrant observation (like "Madler's Square" on the Moon).
~ Catching the light curve or gamma
count evidence of a nova or GRB event.
~ Something remarkable in our atmosphere
--like a formation of Canadian geese crossing the Moon (perhaps at a record
altitude), or some sort of a "UFO" event.
~ _________________________
(Fill in the blank --for what you would like to nail.)
Basic Photography
** Documenting what one sees
is a vexatious problem which easily dominates and distracts from both the
doing and the enjoyment of astronomy. After decades,
I still haven't resolved this issue. For many years I practiced fixed camera
and tripod "celestial snapshots" --which neatly compliments binocular observations
and notes. Although small telescopes reach to an arc second or two
of resolution --compared to a minute or so on my old negatives (which is
also naked eye resolution), my photography reached to about the same magnitude
(almost to 10th mag) as a small telescope or binoculars. The exposure was
10 seconds at f/1.4 (58mm lens) on pushed T-Max-400 --and later: 5 seconds
at f/2.8 (135mm lens) onto Fuji 800 or 1600 color print film. That sounds
simple enough, but it's unlikely that amateur astronomers are going to
set up a darkroom and/or scan in film negatives --now-a-days.
For reference, I've glimpsed
a 13th magnitude star with my 6 inch telescopes here in the Cities of Coos
Bay/North Bend, but I sometimes have trouble spotting 10th magnitude stars
on average nights.
Off-the-shelf consumer type (ie:
affordable) digital cameras (to my knowledge) usually don't allow of time/"bulb"
exposures and the consistent manual control one needs in order to obtain
good results. Our affordable Canon A590 allows exposures to 15 seconds
(a typical limit) at which point (I presume) sensor noise and "amp heat"
become limiting factors. Such an exposure (full zoom, wide open) barely
reaches 8th magnitude with our A590.
However, a recently acquired
Samsung S-850 (thanks, Chuck!) with 4x zoom (39mm) at a whole stop wider
(f/4.5 --turns twice as much aperture to the sky) gives tight stellar images
and reaches 11th magnitude with its 15 second exposures. I'm making stereo
pairs again with it --using my barn door drive,
of course.
I've gotten surprisingly good
Moon
shots by afocally coupling a common digital camera to my telescope
(maybe 2 arc-sec resolution). For star fields, the most practical method
for me has been to just aim a mechanical 35mm camera (the venerable Minolta
SRT-101) at the sky (as previously described). Your camera-film/sensor
might capture minimally moved star images near the celestial equator at
(say) 5 to 10 seconds, but you can use the same lens/setting centered on
the celestial pole for longer exposures. My old imaging would just "egg
out" (due to Earth's rotation) 20 micron images of dim stars.
Note that if they're moving across
the film, they won't get any brighter with more exposure anyway --right?
With the Minolta's excellent
f/1.4 x 58mm lens wide open (no problem with sharpness!), the limit was
just short of the 10th magnitude (T-Max 400, pushed to 1600 EI), which
gave plenty of stuff to study on a frame. (These weren't meant to be "pretty
pictures", but the means of doing astronomy: astrometry, photometry,
VSOing.)
When I had a darkroom and before
digital images, I printed my frames to Agfa TP-6wp, a very high contrast
graphics process paper that nicely split star images out of the fog. One
could easily see the curve of the light fall-off (common to all lenses)
toward the frame corners, especially when I used a 15 degree circle out
of the center. At a 6x enlargement, that was about a 3.5 inch diameter
circular print, which I used two of, side-by-side, as stereoscopic
pairs. (I later switched to a 135mm lens at f/4 and 10 degree circles,
which practically eliminated light fall-off.)
A 58mm lens comes pretty close
to 1 degree per millimeter on the film --since there are 57.29 degrees
to a radian. Fainter stars can be resolved down to 1 or 2 minutes of arc
(20-30 microns). These fainter images started blending into the film grain
for 8th mag stars and are gone by the 10th magnitude.
I did several experiments to
"hype" various films and found it most efficient to use pure hydrogen --in
which I "baked" the film using minimum volumes and explosion shielding.
I carried the hyped film into the field in a desiccation jar and even tried
using it with a dry ice cooled camera. Hyping does make a (reciprocity
failure) difference for long tracked exposures, but seemed to offer little
advantage for non-tracked "snapshots" of less than a minute's exposure.
Whilst having a life and a job
or business, a "spare time" program of astrophotography with the claptrap,
time and effort it takes to set up even a "barn door" drive arrangement
didn't seem to be sustainable, but taking an ordinary camera out and "going
click" --that's something which only needs a spare 15 minutes to accomplish.
Later: I came to appreciate that extending exposures to (say) a couple
minutes requires only casual "northing" of an equatorial mount/drive. See:
barn
door tracker.}
If you're using a camera with
a flash shoe, the easiest way to aim it is to bend up a piece of coat hanger
wire so it fits the flash shoe of your camera, cocks up an inch, then carries
forward about 6 inches --which points toward your target star. Paint it
white or with glow paint and be careful to prevent damaging someone's eye
with the (bend it round) wire end. {Better still}
* One of my many failed strategies
is to photograph where others aren't looking: "uninteresting" areas and
straight at bright stars (which diminish the visual observer's magnitude
reach).
* Interestingly, the Bradford
robotic scopes in the Canary Islands (Tenerife)
were programmed not to do exposures below 31 degrees of local altitude,
and to instead wait until the requested object is higher in the sky (which
is never for Polaris, so request a target just to the [astronomical] south).
That's because you're looking through twice as much atmosphere, turbulence
and dust at 30 degrees elevation. So: given the tropical locations of so
many large scopes, I have to wonder how closely the area around Polaris
is being watched --plus it makes a nice quarry: always up for us northern
hemispherians.
Again: I've used stereoscopy
and a trained eye to fuse pairs of circular prints, sometimes taken years
apart. After registering them, I turned both circles together through 90
degrees, examining all possible shifts in the star field --as well as watching
for variables. Aside from the limitations of film and paper media, the
human eye has 10x the acuity for stereoscopic parallax, being able to notice
shifts of only 6 seconds of arc! (I've discovered --nothing.)
Although my magnitude reach was
poor and magnification low, I ended up looking at as much "stuff" as a
photograph can hold. It's a mental test to pay attention to it all as the
disks turn and all that autonomous parallax processing capacity in one's
brain/"cyclopean center" chugs along.
* Of course: one might argue
that "all the discoveries at such scale and depth have been made", but
then again there are "visitors", and I doubt that many others are looking
at this field stereoscopically.
* Comparing my "then and now" star
fields stereoscopically didn't work very well, due to film defects, disparities
in sky transparency and other vague factors. Also, I've lost confidence
in only comparing fields stereoscopically --and am finding a way to "blink"
my pairs as well --by simply waving my hand to cover part of the
stereoscopic view to my dominent eye. (Stay tuned for how that's working
out.)
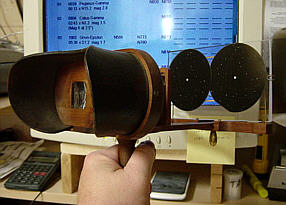
Two matched fields which turn together while being
viewed.
I've resumed doing this work, but digitally --using
a Samsung S-850 hand camera, ISO-200, a fixed tripod mount --no stacking
or tracking. That's almost reaching 10th magnitude under a poor sky. (Stacking
4 frames reached 11th mag, but I thought it likely I'd average out precisely
what I'm looking for.)
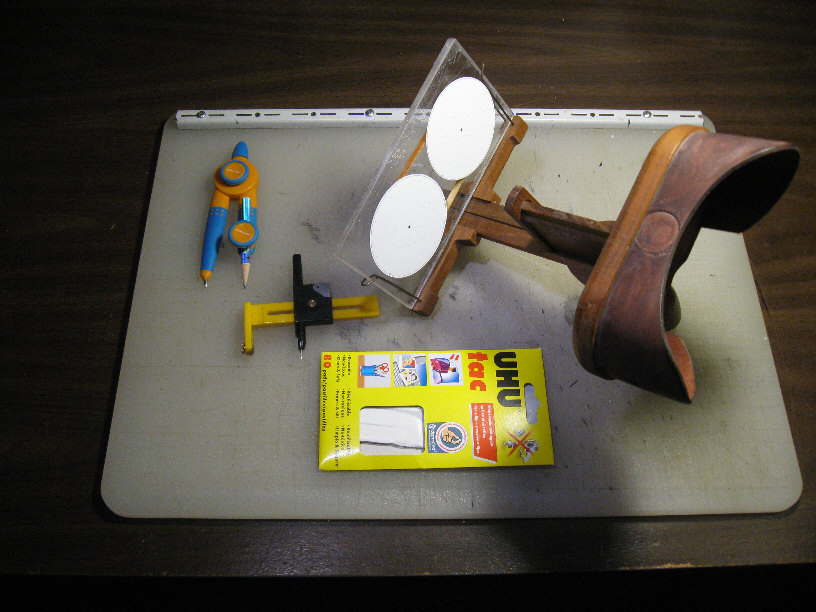
It's relatively painless to physically level, align
and rotate a pair of prints through 90 degrees.
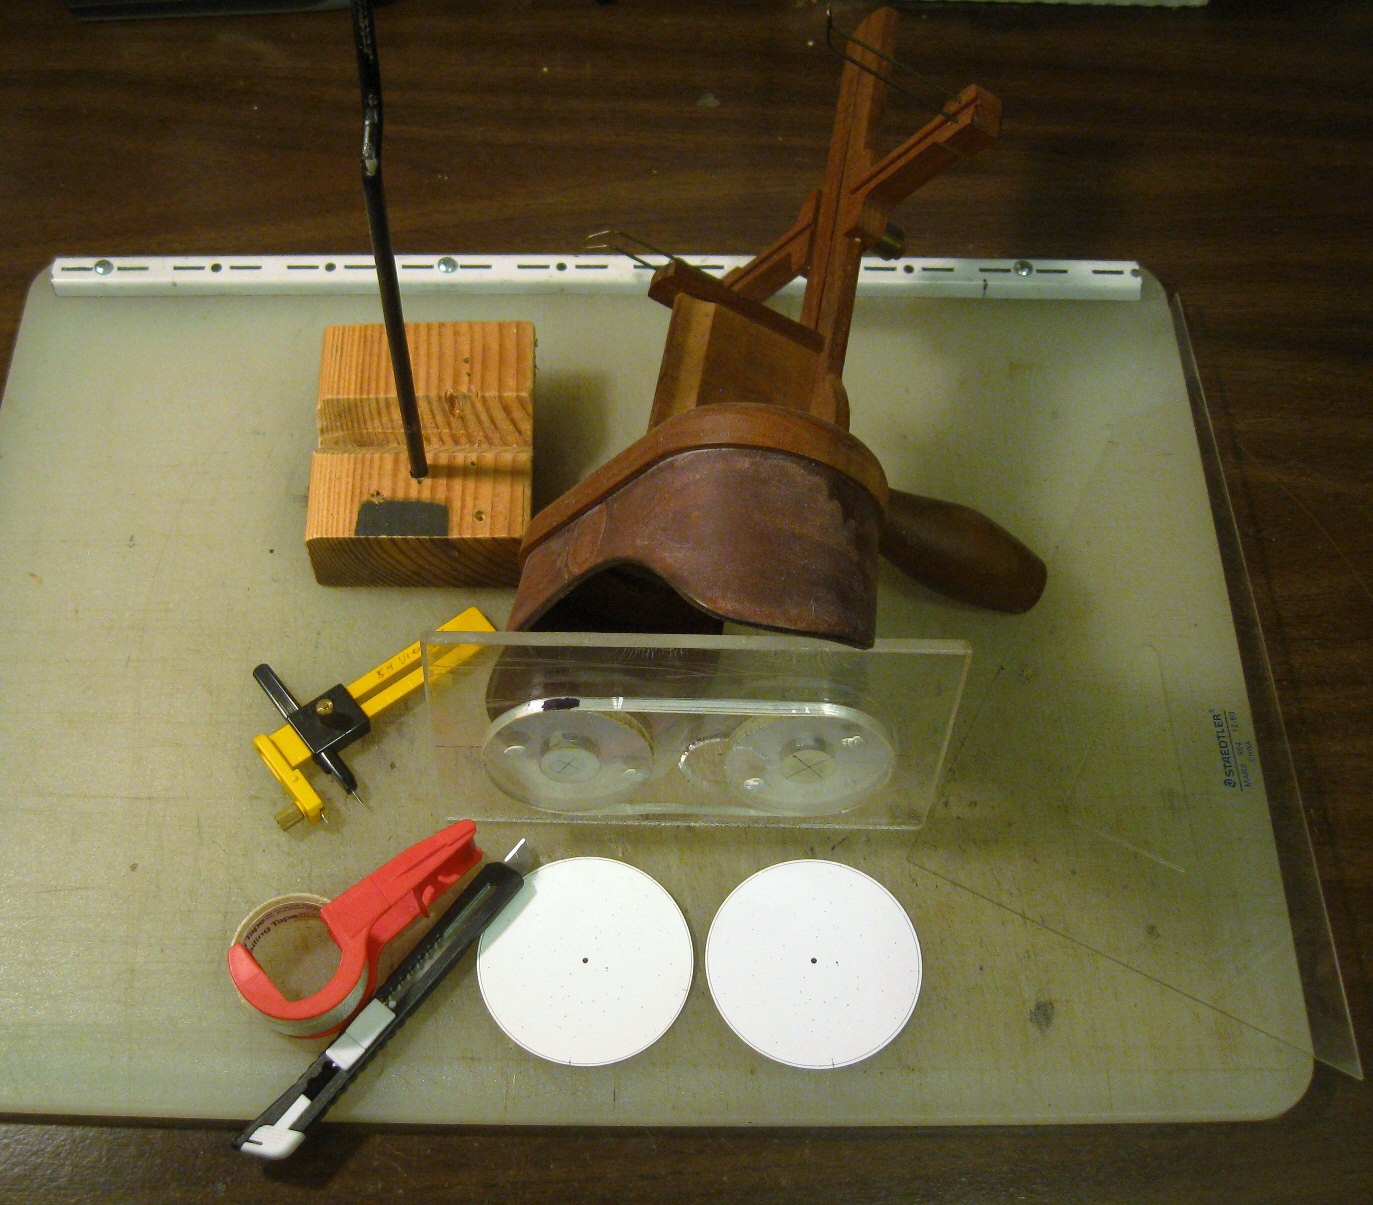
Here's more detail on that 'scope and stage insert
(click to enlarge).
The disks were made with a hole saw. They rotate on
the shoulder of two short flat head 1/4x20 bolts which pass through threaded
holes in that 7 inch wide base (which has a finger hole as well). Their
centers (3-1/4 inches apart) are well marked. Each disk has two small dabs
of office tacky clay to hold those (bright star centered) circular prints
--which were cut out with the shown yellow-black circle cutter. The 3/16"
wide belt was made from two lengths of 3M/Scotch brand fiberglass "Mailing"
(strapping) tape --sticky sides together. (It's the 2nd belt now. The first
one lasted 15 years.) That short black area marks where I've placed some
double-stick tape, so I know which disk can be clutch-slipped in order
to register the print pair. That thing with a tall prong mounts the stereoscope
so that my hands are free. I'm using a standard, traditional stereoscope
with 8" focus (5 diopter) "prismatic" lenses --about as close as you need/want
to work to 300dpi (image) print pairs made with a 600dpi+ ink jet office
printer.
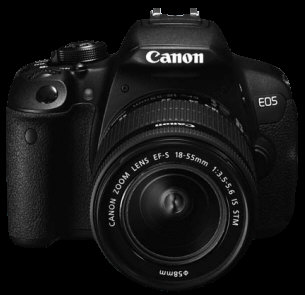 I've (of course) been looking at DSLRs --and sort of waiting
for the price break on mirrorless DSLRs. An older Canon T5i with its APS-C
18 megapixel sensor looks good (pixel spacing: a healthy 4.3 microns).
I've (of course) been looking at DSLRs --and sort of waiting
for the price break on mirrorless DSLRs. An older Canon T5i with its APS-C
18 megapixel sensor looks good (pixel spacing: a healthy 4.3 microns).
The T5i would be used for barn-door
drive and fixed tripod "snap shots"/astrographs, with particular attention
to the area near Polaris. At full, 55mm zoom (f/5.6) it turns the equivalent
of a 9.8mm aperture of glass to the sky (only a 5.1mm aperture at 18mm
minimum zoom [f/3.5]) --but I've nearly got that now with a Samsung S-850
(8.7mm at 39mm of zoom and f/4.5).
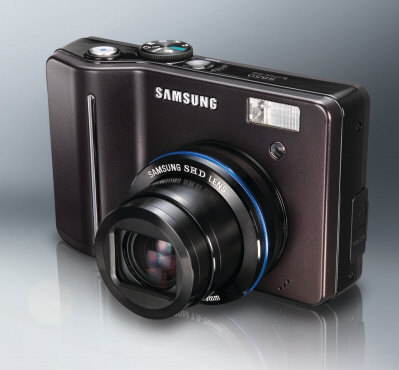
The S-850 with a 39mm x f/4.5 zoom (8.7mm aperture)
Although the T5i's pixel spacing pencils out to 16
arc-seconds (at full zoom), the diffraction disk at f/5.6 is about 8 microns
wide, which covers 4 pixels (the minimum pixels you'd want for good photometry),
so I'd expect a nominal resolution of 30 arc-sec --but probably with the
(apparent) ability to locate a single dimmer star center to a given pixel
or between two pixels (as I've done with our Canon A590 and the Samsung
S-850).
Taking just a 3 degree circular field out of the center
of the (full zoomed) 15 degree high frame should find the lens at its best
behavior, with little need to correct for Gaussian light fall-off to the
field's edge (although I believe such field "flattening" is automatic in
digital cameras, along with dark field subtraction).
UNfortunately, even my Samsung's and a Canon T5i's
apertures are tiny --in comparison to the lenses of good old 35mm SLR film
cameras (say: 58mm x f/1.4 = 41mm), and while the diffraction disk at the
sensor is still tolerable, the downside has turned out to be "wandering
stars". I confirmed that with a small refractor and an 8mm stop (same as
the Samsung when wide open at full zoom). The stars (here on the turbulent
ocean coast) move about randomly, maybe +/- 8 arc-seconds --sometimes enough
to make a star look multiple or to make a dimmer star disappear. I saw
little such motion when using a 23mm or larger stop.
At this writing, it seems that the only cures would
be to use a DSLR with a lens that turns more glass to the sky (say: the
55mm to 250mm zoom), or to use a rather large number of well-tracked frames,
so as to average the star images out. Again: that might also average out
my quarry.

"Keep Looking Up"
(Depiction of an old-time mariner finding his position
by the stars.)
* The original content on these
pages is unencumbered by copyright.
~~~~~~~~~
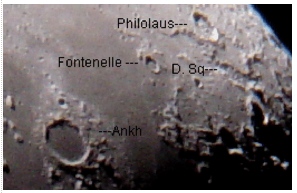