The Celestial Vault
Fast Find >> The Dogson-2 project,
Page-2,
Barn
door tracker,
Barn door-2,
VSOing,
Robotic
telescopes, Amici prisms, Clocks,
sidereal
clock,
Cosmology,
Basic
astrophotography,
Astrophotography,
The "Earl's Leg",
Tracking,
Planisphere,
Cleaning,
Modernity,
look-down,
Inertia,
How
scopes work,
SETI & UFOs, Units:
a lament, spin, Lunar
apparitions,
(Only the above page-to-page links have all been "fixed".)

You're at: https://57296.neocities.org/celest.html
(last worked on: February 11th,
2025)
* For a more complete background on ATMing, try the
following link: https://stellafane.org/tm/index.html
For excellent overviews of amateur astronomy, see:
https://en.wikipedia.org/wiki/Amateur_astronomy
and:
https://www.handprint.com/ASTRO/atm.html
~~~~~~Many old links that were here have been moved to
Dog-2~~~~~~
The Dogson-2 project, Choosing
a 'scope project, Light gathering power, Cerium
oxide,
Ocular case, eyepieces,
Aperture
limit, heated mirror, Observing
table, Sky glow, Discrepancy,
Sky compass, Foreleg,
Focusers,
Glow
finder, Refractors,
Binoculars,
StarRocker,
Seeing,
Bearing tests, Bearing
tests update, The "Earl's Leg",

Hey Neocities,
Thanks for this free Web space!
5/30/2022: * I've been given an
interesting 40x zoom Canon SX730hs camera to check out. I didn't expect
much from such a lens, but when I imaged a line pair target, its (effective)
25mm diameter lens yielded 3 arc-sec resolution --4 times better than telescopic
theory for stellar rez. (Of course line pairs are much easier to resolve
than double stars.) It's been nearly a week now, waiting for some open
night sky --here near the coast of Oregon.
* Still trying to figure out
my approach to the "doing" of astronomy --since I was 14 years old. I gave
celestial "snapshots" a fair run, did a little manual "stacking", even
built a couple "barn door" drives. I often
think a "StarRocker" and binoculars or maybe a monocular
or spotting 'scope woud be pleasant to use.
* August 15th, 2020 update:
Discouraged by the bad seeing (here near the coast) and the penetrating
cold of our wet winter weather --I've been doing very little astronomy.
I needed a new starting point, one which would support an --at least potentially
useful project --but not too demanding of time (away from my obligations
at home). I wondered about timing occultations (sans high tech accessories)
or checking the progress of binary stars. --Hmmmnnn.
Some years ago I thought I had a solution: imaging
portions of the night sky via the robotic telescopes
run by the "Bradford Group" out of England. In theory, their setup was
ideal, and I did download some imaging --but: their system broke down,
over and again. On-line "real time" options elsewhere were out because
I only use public WiFi for one or two hours out of the day. At first NASA's
MicroObservatory
Network of robotic 'scopes seemed limited (to school students and to
a few preselected targets), but now I see a plethora of choices (I counted
61 at this posting). All that's required of users is an email address (for
notification when your imaging is ready), selection of a target, and a
few (limited/coached) settings. We get to choose what, but (of course)
not when --which is (presumably) the soonest the object is up and a 'scope
is available. I've placed an order today. We'll see how it goes. This NASA
sponsored project is now over 20 years old, so I hope it's been maintained.
* 9/3/2020 update: There was trouble with the tracking
and aiming, so I'm going back to doing my own imaging.
* The named targets/objects (planets, Messier objects,
Cygnus X-1, Omega Centauri, etc) are plentiful and diverse, plus by choosing
a wider field of view, one might monitor other objects in the main target's
vicinity.
* Letting NASA and Harvard-Smithsonian project speak
for itself: "Many students have a deep interest in astronomy, but a limited
opportunity to use telescopes to explore the heavens. The MicroObservatory
Network of automated telescopes is designed to provide access to classroom
teachers who wish their
students to conduct projects over the World Wide Web.
The intuitive interface makes it easy for even 10-year-olds to take pictures.
Telescopes can be remotely pointed and focused; filters, field of view,
and exposure times can be changed easily. Images are archived at the website,
along with sample challenges and a user bulletin board, all of which encourage
collaboration among schools. Wide geographic separation of instruments
provides access to distant night skies during local daytime. Since
first light in 1995, we have learned much about remote troubleshooting,
designing for unattended use, and for acquiring the kinds of
images that students desire. This network can be scaled
up from its present capability of 240,000 images each year to provide telescope
access for all US students with an interest in astronomy. Our WWW address
is: http://mo-www.harvard.edu/MicroObservatory/"
* From their "About" page: "This Observing With NASA
website is part of a NASA-funded project to make the MicroObservatory robotic
telescopes accessible to all audiences who want to appreciate and understand
the amazing images and data from NASA's space science missions. Using many
of the same technologies that NASA uses to capture astronomical images
by controlling telescopes in space, YOU can control a sophisticated ground-based
telescope from the convenience of your computer. " --So these facilities
no longer seem restricted to school student use.
~~~~~~~~~~~~~~~~~
9/3/2020 update:
* I've been working on some sort of an astronomy pursuit
plan/approach/program and methods for decades, often with my friend Chuck
on the sky navigational methods, sometimes in attempts to work with the
AAVSO, many times in attempts to use the troubled robotic telescopes of
the old Bradford Group (telescope.org), and recently: NASA-Harvard-Smithsonian's
"Micro Observatory" 'scopes --which turned out to also be troubled.
It seems that, despite the sky quality here, I'd best
rely on my own imaging, which means going back to a tripod mounted, non-tracked,
"snap shots" approach --with a great little Samsung
"S-850" hand camera that my friend Chuck found for me at the Goodwill.
This camera reaches 10th magnitude with sub-arc-min
resolution if I stay on or near Polaris^. This is on par with traditional
"visual" and binocular AAVSO work (which, I gather, has been largely displaced
(if not discouraged) by advanced, digital methods).
Using a camera is self-documenting, it allows me time
to get past my long standing problems with pattern recognition/orientation,
my emerging (old age) visual problems, and the (care giving) need to not
be away from my wife for very long at night.
^ There doesn't seem much to see near the pole, but
fewer distractions are so much the better.
* I think I'll let my old brightness graphing go and
mostly estimate/eyeball any brightness/changes in my imaging. It bothers
me that I never know if I'm imaging through a little dark cloud --and that
the more/deeper one 'scopes in on a piece of sky, the larger the stellar
population in the vicinity of a targeted star. Especially with arc-minute
resolution, I'd have to say that it just _looks_ like a given star is changing.
(Clocking known binaries should be a simpler assignment.)
* Cool as it is, I'll also let routine stereo pair
comparisons go --in favor of traditional "blinking" time spaced image pairs.
I find it too easy to "fuse" and overlook static discrepancies between
a stereoscopically viewed pair of images. Blinking should be sensitive
enough to the travel of visitors --and faster to accomplish.
* Aside from waiting out the poor seeing here, the
initial difficulty is in getting my little camera's settings right --and
in the right order, but that should eventually become routine.
* The underlying idea is to engage myself in a potentially
useful observation program that's easy and not time consuming.
Choosing A Telescope Project
(more of this on
the the Dog-2 page)
* It's best to read widely, to understand the terminology/jargon,
know how telescopes work, and (if possible)
have some idea about what kind of astronomy you want to be doing and where
--before deciding what to build or buy. My advocacies assume (of course)
that your circumstances and goals are much like my own :-) You're
in or near town, have a safe spot in your yard or a nearby yard that's
somewhat sheltered from annoying lighting, that you'd like to make just
one trip --not be bashing through doorways over and again, while trundling
a bunch of gear outside.
* The average "good seeing" night
offers us (atmosphere limited) one arc-second resolution, assuming you
have a modestly good telescope (6 inches of objective diameter and up).
The average person with "20/20" vision resolves one arc-minute (= 60 arc-seconds)
of resolution. While the use of a 60 power telescope seems to be indicated,
and does indeed offer nice crisp observing on most nights, to see
all the fine detail that the sky offers (on an average good night),
and all that the eye can take in, requires 120x to 180x power (in part,
due to the "rule of thumb").
* Taking that 120x number, and at an eyeball pupil
dilation (and a matching eyepiece "exit pupil") of 6mm, suggests an aperture
(objective diameter) of 28 to 30 inches (6mm or about 1/4 inch times 120x).
However, if we're talking "count the planetary stripes/gaps and split the
binary star" resolution of brighter objects, your eye's resolution might
be best at 3mm --and then, only 12 to 14 inches of aperture fills the bill.
* If we're instead talking nebulous "faint fuzzies",
then we probably want that 6mm pupil, but maybe we don't want a bunch of
field-of-view limiting power. Affordable (but good) Plossl eyepieces yield
an apparent 50 to 60 degree field of view. The longest (fullest field)
eyepiece that fits a 1-1/4" focuser is of 32mm focal length --which delivers
about 40x power with a typical Newtonian telescope (say: 1300mm focal length),
so there you have about 1.25 degrees of actual field --whereas the official
sizes of some interesting objects (neighboring galaxies, nebulae, clusters,
"IFNs") range up to 2 degrees or more.
more:
The term "seeing" involves more
than resolution and atmospheric stability. At least an eyeball estimate
is made of the dimmest, naked-eye visible stars which can be seen (at good
elevation). So besides supporting arc-second telescopic magnification,
a good night sky (and location) allows of seeing 6th magnitude stars. (I'm
lucky to see all the stars of the "Little Dipper" --a 5th magnitude test,
and stable arc-second resolution is unusual here.)
Today's amateur astronomer is often dissatisfied with
an eyeball estimate and carries with him/her an electronic meter device
which reads out sky darkness in terms of "magnitude per square arc-second".
Presumably, that's because a good sky supports arc-second resolution. A
good reading close to town might be 18th magnitude per square arc-second.
A great location out in the wilds might read 21st mag/arc-sec.
However: that's not a limiting magnitude, since dimmer
objects still augment the background brightness --enough to be teased out
with good, big scopes, disciplined vision and techniques like digital photographic
image
stacking.
* I use terms like "presumably" and "might" here because
I'm unsure of the facts. I'm guessing that, because our (20/20 vision)
eyes resolve to arc-minutes (60 arc-seconds), then maybe it's half that
(say: a square spot, 2 arc-min on a side) when dilated at night.
The edge-of-town place where I live might read 17 mag/arc-sec.
Since a 4 square arc-min spot (120 arc-sec on a side) contains 14,400 square
arc-seconds, that suggests that the sky glow light of a 17 mag/arc-sec
sky gets concentrated that many times into the spot our eyes can resolve.
A magnitude change/step of light is about 2.51x, or
the 5th root of 100. Therefore a change of 10,000x would be 10 magnitudes
-times- a factor of 1.44 (say: half a mag more). For what it's worth, that
puts us into the ballpark of 6th mag naked eye vision near town.
That we can plainly see the outline of a tree against
even a 21st (square arc-sec) magnitude sky --suggests that our eyes can
make out large objects (and telescopically magnified small objects) a whole
bunch dimmer.(See Jerry Oltion's excellent article
on telescopic and surface (or "extended object") brightness on page #28
of the December 2017 Sky and Telescope magazine.)
more:
To see the wide stuff requires wider angle eyepieces
(and larger diagonals), shorter objective focal lengths, and/or lower powers,
but if you do too much of that with large mirrors (ie: low "focal ratios"),
you can end up spending serious money on eyepieces, a diagonal and maybe
a correcting lens (such as a "Paracorr") as well. Worse still: the larger
diagonal means a larger black hole in the middle of your telescope's exit
pupil --which takes out your best core vision. The alternative is a small
mirror of modestly short focal ratio --say: a 5 inch f/6, which might yield
a 2 degree field of view at 24x with that 32mm focal length Plossl eyepiece
(1.25 inch barrel diameter) --along with a healthy 5.3mm exit pupil,
and the image should still look tolerable at the edge of your field of
view.
* One might first choose an eyepiece and somewhat design
the scope around it. Again: a 32mm x 50 degree eyepiece (Celestron sells
it for about $40) maxes out a 1.25 inch focuser --but so does a Meade 5000
series "Super Wide" 24mm x 68 degree (at $250 in 2007). For the richest/deepest
field, divide your preferred pupil dilation (let's say it's 6mm)
into the eyepiece's focal length and that's also the optimum focal ratio
for your primary: f/5.33 and f/4 respectively for the above examples. An
oldster with 5mm night pupils would get f/6.4 and f/4.8. Someone going
for best resolution on planetary detail, binary stars and such might prefer
(say) a 3.5mm exit pupil --for f/9.2 and f/6.9.
* On our way toward a wide, "rich field" project, we
take notice that a good (or even a not-so-good) pair of binoculars
provides a 5 to 7 degree field of view (maybe 2 to 3 degrees if of higher
power) and with a large exit pupil. They only turn 50mm to 80mm of glass
to the sky, but if you do the simple math --to see a (say) 5 degree patch
of sky with a (say) 5mm exit pupil and a (say) 50 degree eyepiece, then
you're operating at 10 power. That means you can only
use (in this instance) a maximum of 50mm of objective (or -say- 70mm,
for a 7mm exit pupil).
** The kicker: with a binocular or a refracting telescope,
there's no black "hole" (diagonal shadow) in your exit pupil. That has
to be far worse than how much the "secondary obstruction" upsets a telescope's
diffraction disc (the smallest resolvable point). It's certainly worse
than losing 6% to 15% of the light to the shadow --then another (say) 25%
to the lowest power image edge --if you've deliberately installed an undersized
diagonal.
* There's often talk of "light gathering
power". A 50mm binocular objective has some 100 times the light gathering
power of your naked, 5mm eye --which suggests a gain of 5 magnitudes --and
6 + 5 = an 11th magnitude limit, which is about right for the stellar magnitude
reach of a 50mm objective at low magnification. Such a humble instrument,
well
mounted and accessorized, could be very useful for VSOing.
However: we're talking stars here, not "extended objects" --which
means visually large things like a nebula or the Moon --
--and no telescope can make any "extended object" brighter
--only bigger --but which does help a lot in being able to see small
dim objects.
** Note that we have to keep backing
off in focal length, effective aperture and power in order to see more
sky with a practical telescope.
Although amateurs are increasingly opting for expensive,
wider angle eyepieces, I'm operating under the assumption that most of
us can't usefully pay attention to more than about 60 degrees of solid
image angle (a "steradian"). Depending on cost and refinements, Plossl
eyepieces range from about 50 to 60 degrees of apparent field of view,
so let's go with 50 degrees --and eyes that dilate to 6mm --then:
Observing Target Span
Power Aperture Primary
Focal ratio
for a 32mm eyepiece^
The Milky Way
60 deg 1x 6mm (eyes)
Barnard's Loop 10
deg 5x 30mm (1.2")
f/5.33
M31 (Andromeda) 3
deg 17x 100mm (4")
f/5.33
Our Moon
1/2 deg 100x 600mm (24")
f/5.33
^ Here the eyepiece's focal length-to-eye pupil ratio
is the same as the effective primary focal length-to-aperture ratio. One
might care to "waste" some primary diameter by using a slightly larger
exit pupil (than your eye's pupil) --for comfort in finding and fitting
your eye to the 'scope, but (again) a reflecting telescope's secondary
shadow grows as well, taking out part of your central (best) core vision
--which argues in favor of (properly mounted) binoculars
and low power refractor scopes for objects and areas spanning 3 to 10 degrees
of sky. At 7x to 10x, you simply can't use more than about a couple inches
of glass/objective.
* Given the high prices of shorter
focus refractor telescopes, I'm tempted to see what can be done with the
objective lenses of a moderately priced (or maybe a junked out) pair of
binoculars --say 70 to 80mm diameter. I estimate that my Konus 20x80 binoculars
have something like a 300mm focal length, which is only f/3.75 --interesting.
Would eliminating the prism set and using a good Plossl 25mm eyepiece (12x,
6.7mm exit pupil, 4.2 degree field) give me a rather nice "rich field"
telescope/monocular?
* Although 35mm film type SLR camera lenses make the
light go through many (hopefully well coated) glass surfaces, it's toward
the good cause of delivering a flat field --to a 1 x 1.5 inch piece of
film.
I looked at what I could see through my old 135mm Minolta
f/2.8 telephoto (which has nearly 48mm of effective aperture). Using a
25mm Plossl by day I saw a nice, 9+ degree wide, crisp field. Using a 20mm
Plossl eyepiece by night (6.75x, 7.4 degree actual field, 7.1mm exit pupil),
the magnitude reach at night was not impressive.
So what about my old Minolta 58mm f/1.4 lens? A 6mm
eyepiece should give about 10x, 5 degrees, a 6mm exit pupil, in a very
compact package --but with minimal eye relief (meaning: your eye is very
close to the eyepiece).
** Another consideration in the decision to make, buy
or repurpose optics for a telescope --is that the grind and polish ATM
will be working with an assortment of unusual substances. Aside from silvering
chemistry (which few of us any longer engage in), there's hot pitch, solvents,
glass dust plus fine grinding and polishing compounds. You want to avoid
scattering, inhaling and ingesting these items, or letting kids play in
or have access to the area. You also want to avoid flushing coarser grinding
compounds and sludge/slurry down household drains --where it might clog
up.
The polishing compound sold as "cerium
oxide" is special in that it's made up of variable components, one of which
might be radioactive (as is the batch I've been using). Here's the list
from an old MSDS sheet:
"Rare Earth Oxide": 30% - 65% (presumably: that's
the nominal cerium oxide --Craig)
Calcium Oxide:
10% - 15%
Strontium Oxide:
1% - 6%
Alumina Silicate:
1% - 40%
Fluorides:
4% - 10%
Silica:
2%
(Clearly, this is a poorly defined and controlled substance.
Though not listed, the radioactive component is sometimes said to be thorium.
My cerium oxide is a heavy beta emitter. [I don't know if there's any alpha.]
** What you want to purchase is "white" cerium oxide,
like the kind "Got Grit" sells. I checked a sample from Got Grit and it
added no beta or gamma counts to the background level here.
--Craig)
Type of mount:
All of the 'scopes I'm suggesting are Newtonians or
refractors, but they differ on account of how they're mounted. Here's a
typical commercial Dobson:
An early Orion 8 inch Dobsonian (with an added
handle)
The first "standard telescope" (circa 1946), as presented
in Jean Texereau's: "How To Make A Telescope", is well engineered and kinematically
excellent. That slim elevation rod not only locks in and verniers a given
altitude setting, but damps tube vibrations to the stiffly built tripod
base and obviates the need to critically maintain balance around the altitude
axis/bearings. We see similar features in round tube refractor mounts,
but the advantages of a square "OTA" (optical tube assembly) should be
obvious.
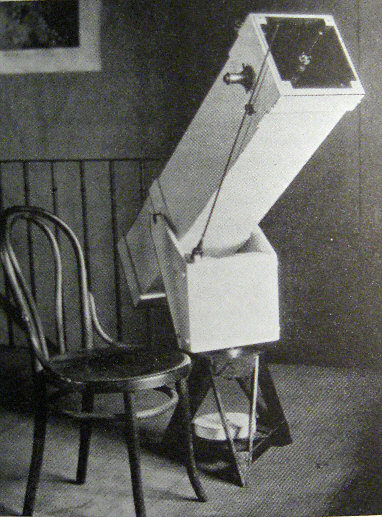
Jean Texereau's "standard telescope"
(He credits Couder for the mount.)
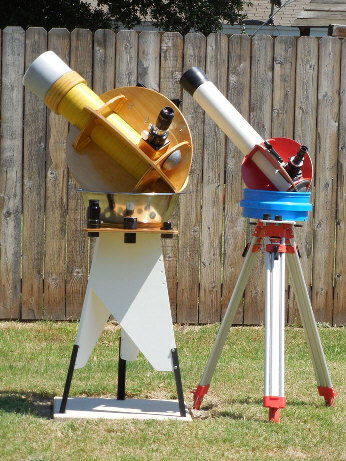
An affordable, commercial 4.5 inch 'scope, which is
("German") equatorially mounted:
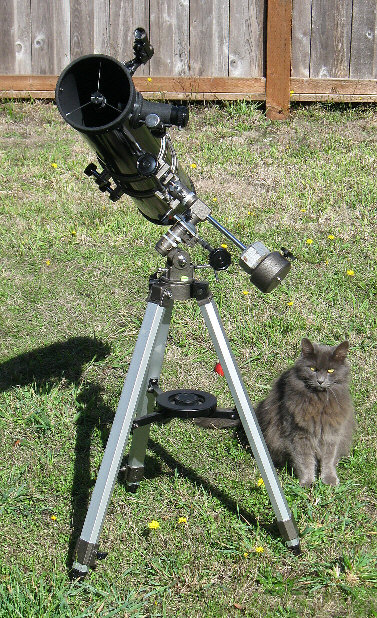
"Fluffy" affectionately rubs against my tripod legs
at night,
making a point about the wobbliness of this gangly
'scope.
I added an extra RA (right ascension) pointer and
more counterweight.
(I found this optically good 'scope awkward to transport,
set up and use.)
Jerry Oltion's
"Trackball telescope" (find links to it at his web site) --haunts me. It's
a Newtonian, but the rear half is inside of a large sphere (perhaps
home made, perhaps purchased as a globe for a luminary fixture), and that
sphere rests upon an ingenious mount:
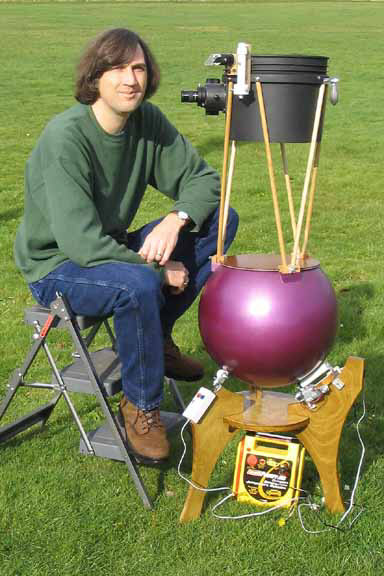
 --which drives the sphere. You can turn the sphere
and orient the eyepiece for comfortable observing, you can aim the scope
at any part of the sky (including straight up), then simply let go of the
sphere and it stays locked to that spot in the sky's declination and right
ascension. (Of course my "Dogson" telescope defies any approach to make
it track.) The downside (in my minority opinion) is that even a 6 inch
objective must have a rather short focal length and it might still require
a load of counterweight in the ball's bottom to keep it balanced. (Some
effort should be made to ventilate the primary and the ball's interior
and extensions are needed for collimation --not big problems.) Rarely have
ball mounts been made to track so simply and nicely as Jerry's.
--which drives the sphere. You can turn the sphere
and orient the eyepiece for comfortable observing, you can aim the scope
at any part of the sky (including straight up), then simply let go of the
sphere and it stays locked to that spot in the sky's declination and right
ascension. (Of course my "Dogson" telescope defies any approach to make
it track.) The downside (in my minority opinion) is that even a 6 inch
objective must have a rather short focal length and it might still require
a load of counterweight in the ball's bottom to keep it balanced. (Some
effort should be made to ventilate the primary and the ball's interior
and extensions are needed for collimation --not big problems.) Rarely have
ball mounts been made to track so simply and nicely as Jerry's.
Ball mounts are very appealing, but ATMs usually place
the telescope to the side of a smaller ball, which requires a large counterweight
on the opposite side --perhaps offset from the telescope's tube.
I've been trying to think of simple, compact ways to
ball mount and track a small telescope --maybe a refractor --maybe half
of a binocular. I'm imagining a table mount version of the trackball. (A
very sturdy table.)
Here's a solution: a pair of swell looking (pseudo)ball
mounted refractors:
These be "Art Swivels" --by Art Gamble of Wichita
Falls, Texas
as presented in the April, 2015 issue of Sky &
Telescope
Gary Seronik (Jerry Oltion's predecessor for Sky &
Telescope Magazine's "Telescope Workshop" column) wrote: "Remember Chuck
Lott's 'pseudo-ball' telescope mount --that I featured in the December
2013 issue? By coincidence, just as that issue was going to press, I received
an e-mail from Art Gamble of Wichita Falls, Texas, describing a remarkably
similar design. His implementation was a little different, but the root
of the idea: a ball-and-socket mount utilizing a segmented 'ball', was
the same."
This is Chuck's "Clover Ball" mount (from Tom Conlin's
web
page --who originally suggested the idea.) David Davis
then followed with a 4 (half) disc version.
There's still the problem of trying to aim/navigate
a telescope (or binoculars) anywhere near the zenith (and I have a morning-after
cramp in my neck as I write this). Until now I've tried to mitigate that
by placing the finder on a long enough outrigger so
as to minimize neck twisting, but see the next item.
Don M's "Star Rocker":
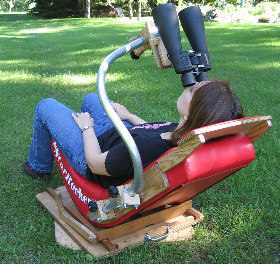
See the section on binoculars
for more.
Yes: with care, I think one could mount a small ("department
store") refractor telescope onto such a bino-chair and use it at the modest
power it's capable of.
That seems to solve the aiming/finding and comfort
problem, but something more elaborate is needed in order to make notes,
sketch, check charts and such, so add in a lamp and a side-mounted lap
table --with clips to hold your stuff --and maybe a heating pad under the
table to drive off the dew. (How about heating the chair too !?) (A gimbaled
mug holder for your hot chocolate? It's a standard recreational boat accessory
item.)
Here's a simple suggestion for
using a department store telescope --in this case: a Meade 70mm x f/10.
I stripped out its failed goto electronics, shrinkage split plastic gears,
removed its pathetic "B-B gun" red dot finder, worked some while to make
the altitude axis perpendicular to the azimuth axis, snugged up the alt-az
clutches, added a glow finder and a spirit
level based altitude setting circle^. Its objective shows diffraction rings.
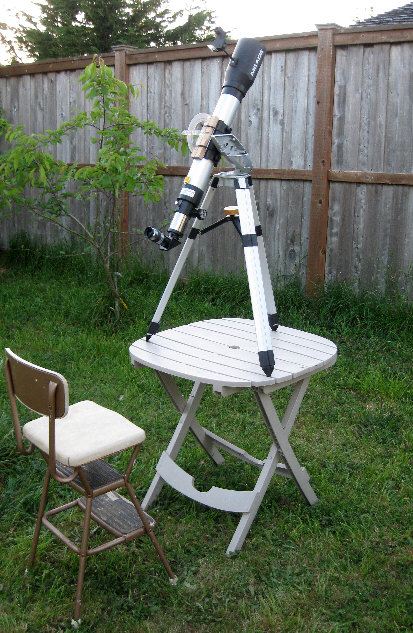
This photo somewhat illustrates --
--the "ideal" of doing "observation table" based visual
astronomy (short of going electronic with remote monitoring/control) --using
some sort of a table-mounted 'scope. The ideas are: affordability, simplicity,
comfort, contemplation, warmth (an electric blanketed chair?) and freedom
from dew (an electrically heated table? --and working at a low enough telescopic
power that the heat waves don't matter?).
That plastic garden table needs more beef, but the
top is big enough if you park the tripod's feet into the gaps.
One might heat a working portion of the table top by
means of a moisture proof heating pad. Surfaces dew up sloppy wet at night
here where I live. Again: I wouldn't expect problems with heat waves when
working with a small aperture at low powers --say: 22x via a 32mm eyepiece
for a 2.3 degree field of view and a 3.2mm exit pupil.)
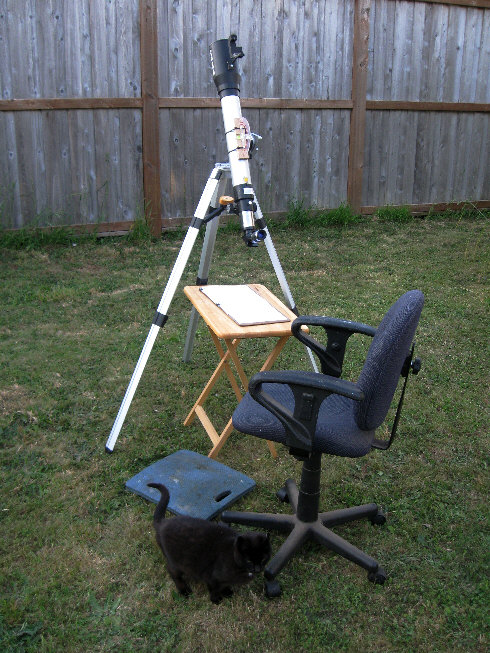
This arrangement is much simpler and readily do-able.
That's just a regular office chair (weighs 30 pounds)
with its wheels still on. Being able to use the arm rests and table helps
immensely, as does the cushion seat. It happens to work out (for me) that
the chair's range of height, the folding table's height and the tripod
at full extension --provide comfortable observing between 35 and 80 degrees
of altitude/elevation. I use the kneeling pad between 80 and 90 degrees.
After using a "department store telescope" and its
comes-with tripod for a while, you'll want to build a really stout, vibration-free
tripod of your own. However: stay tuned to this page, whilst I try and
report on some of my old remedies for the shakes. (Of course the easiest
remedy is low, binocular range power, and both of the above configurations
really beat holding a pair of binoculars.)
^ Once "zero'd" to the OTA, the altitude setting is
quite accurate. In the spirit of old time mariners, who "ran their latitude
down" (longitude being so hard to determine), we can sweep an altitude
certain (at a given time) in order to acquire the quarry. I've tried several
ways to get the azimuth (short of a rocker box
base and circle), but have so far failed to come up with something
accurate and practical.
Son-in-law Pat gave me a bundle of
nice red oak scraps. That altimeter was the first thing I made --
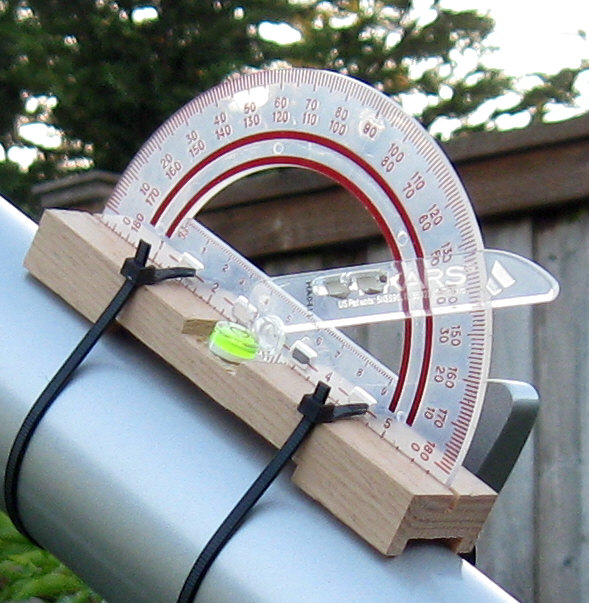
--using a salvaged spirit level capsule and a common
back-to-school supplies protractor.
First the bubble is "zero'd" and held in place with
two dabs of Uhu (brand) office tacky clay,
then it's tacked and secured into place with two spots
of Duco Household Cement. That 360
bubble is nice but not essential. A forehead mounted
luminary helps in general and makes it
unnecessary to use glow film behind the protractor's
graduations or for the glow finder's
pointer (below image). (Take the link for its construction.)
I moved the finder back, since its short lens otherwise
makes the pointer too large.
The finder would have to be extremely and impracticably
"out riggered" in order to simply lean back and look up from the eyepiece.
Mounted close to the OTA, you have to "take a knee" and hold your head
sidewise --in order to look up and sight in an object near the zenith.
Another solution is a mirrored
pair of binoculars or a monocular/short refractor --and a large enough
mirror such that you'd do your finding/navigating through the mirror as
well (along with mirror reversed charts, which a sky program like "Guide"
can print out).
Here's that plastic table again,
along with binoculars (which I'll tripod mount for now) and an ordinary
mirror:

There's a heating pad under the mirror. This set-up
was to find out how much
heat/watts it takes to keep that mirror free of dew--
--and whether that much heat would affect the view
through 10x50 binoculars. As expected, the mirror dewed up right away,
so I switched on the heating pad, set to its lowest heat. In 16 minutes
it cleared.
After 2 hours, and at an ambient of 50.7 degrees Fahrenheit
and 88% relative humidity (common during summer, near the Pacific coast),
the lowest heating pad setting (15 watts, applied to a square foot of glass
mirror) was still keeping the mirror dew free --except for one edge where
it over-hung the heating pad a wee bit. I read the mirror's surface at
49.5 degrees F.
* I could see no heat wave deterioration of the image
at 10x. (Yes: I do have a sizable front surface mirror --a surplus item
from an old microfiche reader.)
To get the wattage for this modern times, solid state
(triac) controlled, 120V AC heating pad, I used a modern times device called
a "Kill-a-Watt Power Monitor" which, thanks to Oregon's Pacific Power company,
I was able to check it out of our public library --like a book. (I previously
used it for another project.)
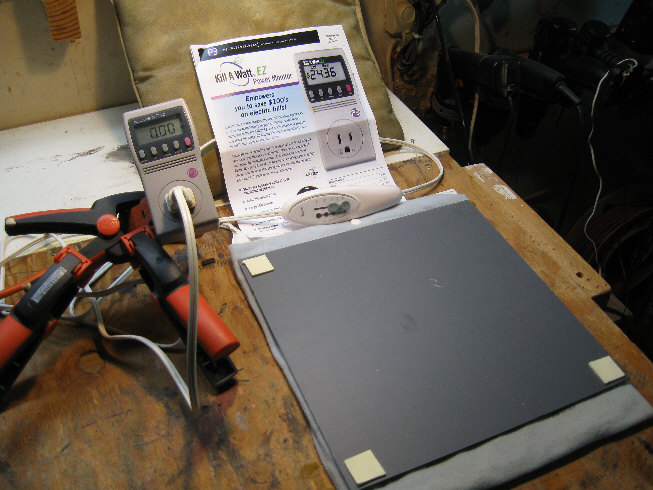 It's designed to log kilowatt hours going into appliances,
so it took 15.5 hours to tally up an indicated "0.24 KWH" at the heating
pad's "Warm" setting, which is about 15.5 watts running. If you're heating
a square foot of mirror with nominal 12 volt power, the current draw should
be about 1.3 amps --maybe into a heating pad designed for RV use.
It's designed to log kilowatt hours going into appliances,
so it took 15.5 hours to tally up an indicated "0.24 KWH" at the heating
pad's "Warm" setting, which is about 15.5 watts running. If you're heating
a square foot of mirror with nominal 12 volt power, the current draw should
be about 1.3 amps --maybe into a heating pad designed for RV use.
Here's a very nice chart (by Eric Schiff) which indicates
dew point against different ambient temperatures and relative humidities:
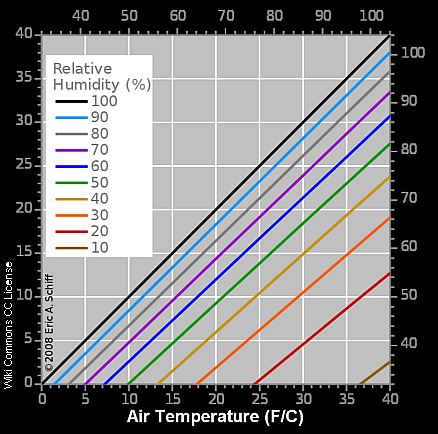 However, my coastal situation here is probably sufficiently
"worst case" that your location on this chart is covered by the wattage
I used.
However, my coastal situation here is probably sufficiently
"worst case" that your location on this chart is covered by the wattage
I used.
BUT --my friend Chuck said: "how about using a fan".
Well ---of COURSE. The air is above the dew point (otherwise we'd be feeling
our way around in the fog), so just use the air's heat.
The set-up for testing de-dewing with a fan.
That yard stick was for determining air velocity across
the mirror's face (here seen backside up). Some while ago Chuck gave me
a nifty little Samsung S-850 hand camera (he found it at the Goodwill Store)
which (among other neat tricks) takes "Motion Capture" at the rate of 30
discrete JPEG frames per second. Using the fan's lowest setting and
a few of those annoying little styrofoam, "bean bag chair" type balls (which
weigh almost nothing and accelerate in a breeze almost instantaneously),
I photographed their journey along the yard stick: 2 inches per frame,
60 inches per second, 3.4 miles per hour (for what that figure might be
worth).
So okay: lets go to the test. Again, the unaided mirror
dewed up right away (46 degrees, 80% humidity, clear night sky). I switched
on the fan --but the dew did not clear. So I wiped the dew off (the fan
still running), but it promptly returned. Then I turned on the heating
pad ("warm" setting again) and the mirror cleared in 10 minutes. Next I
unplugged the heating pad and restarted the fan. In 10 minutes it dewed
up once again --hmmnnn --doesn't work.
* And: that 120V fan takes 30 watts at the lowest speed
--twice the heating pad's power.
* One downside of the "Sky Window" approach is (of
course) mirror reversal --which we put up with in refractors with mirror
"star diagonals". Judging from my mock-up experiments, that's easier to
deal with and more intuitive when looking down into a tilting
mirror (again: one large enough to navigate through).
* Another downer is dirt. The mirror is exposed to
dirt and pollen (and cats) settling on it, so have a good protective overcoat
on the mirror and stand by to do frequent cleaning. (Philosophy on cleaning
runs from doing it frequently to prevent etching and bonding --to "don't
obsess about it --dirt doesn't matter". Salt air near the coast is a real
threat.)
The results of using various common
eyepieces with various Newtonian telescopes
* For a good introduction to eyepieces, see Doug
Tanaka's Web page at:
> http://bpastro.org/astronomy/amateur-astronomy/selecting-eyepieces
--^
^ However, I feel compelled to rewrite and extend his:
"But medium-powered eyepieces produce exit pupils that range from 24mm
in size. Choose one that produces a 2mm exit pupil. This exit pupil most
closely matches the resolution of the human eye: about 60 arc-seconds.
The resolution of a telescope is 4.55 arc-seconds divided by its aperture
in inches. For optimum resolution we need to find the magnification that
will produce an image of 60 arc-seconds, which computes to roughly 13x
per inch of aperture. This will produce an exit pupil of 1/13 inch, close
to 2mm."
Try instead (and I'm being repetitive to my "choosing"
paragraphs):
"20/20 vision" amounts to a resolution of about one
(1) arc-minute --or 60 arc-seconds, typically with an eye dilation of about
2mm under good lighting. Amateur astronomers are familiar with dividing
a telescope objective's inch aperture into the number 4.55 in order to
get its theoretical resolving power in arc-seconds. While 2 millimeters
(about 1/13 inch) of eyeball pupil diameter, divided into 4.55 inches (116mm)
of aperture, gives nearly 60 arc-seconds, and while most observers are
--sometimes-- said to gravitate toward toward eyepieces with that exit
pupil, the lens of your eye might perform better at a pupil diameter closer
to 3mm --depending on how good your vision is. Find out what's best for
you by spending time with your telescope.
From the above paragraph and Tanaka's article, you
can see that using a power of about 13x per inch of aperture yields a 2mm
exit pupil, and that 8.5x per inch yields a 3mm exit pupil. (Also: the
focal ratio of your telescope divided into the eyepiece focal length gives
the exit pupil.)
To be clear: an exit pupil of 2mm with (say) a 6 inch
(150mm) telescope aperture yields 75 power --a bit more than you need to
boost good arc-second sky seeing to arc-minute eye resolution --but that's
fine. An exit pupil of 2mm with a 12 inch telescope aperture yields 150
power --which you might need to comfortably sort out detail and split double
stars.
* A confounding (but intuitively
true) rule-of-thumb: To get full performance out of (say) photographic
film (or a modern sensor, or the retina of your eye), the lens should be
2 to 3 times better. But to get full performance out of that lens, the
film has to be twice as good. And for either the lens or the film to hit
their specifications, the imaged resolution target (or that night's "seeing")
has to be twice as sharp --a vicious circle.
Unfortunately, when our eyes open
up wider than 2 to 3 millimeters, more light does get in, but the sharpness
of the retinal image usually falls off, which might even result in star
magnitude loss --as their point images spread out into dimmer, more blurry
little blobs. Again: you probably want to use a 6mm exit pupil to observe
faint fuzzy stuff.
From The Rule-of-thumb, we see that, on a "good night"
of arc-second or better "seeing", one might lay on not 60x of power, but
120x of resolved power (which requires 10 to 12 inches of well figured
aperture) --in order to realize a throughput of arc-minute resolution onto
your retina. (That is to say: while a crisp 60x image is visually pleasing,
your goal might be to milk out all the available sky resolution.)
In my humble experience, on nearly any cloudless night,
I've been delighted with the brightness, field richness, clarity, contrast,
ease of finding and tracking when using 40x to 60x of power --through most
any telescope. A 6 inch by f/8 telescope with a standard one inch (25mm)
Plossl eyepiece yields a well defined, one degree (two moons wide) field.
Moreover, in the form of a reflecting telescope with a full length "closed"
tube, that's as much telescope as I care to carry around. (My Dog-2
'scope weighs 30 pounds.)
I had the opportunity to closely study an 8 inch by
f/6 commercial Dobsonian telescope with a scant round tube of 9 inches
inside diameter (should have been a tad larger). It would have been possible
to use to use a low profile 1.25 inch focuser if the lowest power ocular
was to be 25mm by 50 degrees. My impression is that any telescope larger
and shorter than a 6 inch x f/6 should be fitted with the equivalent of
a 2 inch focuser.
(Longer focal lengths are made, but 1.25 inch Plossl
oculars with an apparent field of 50 degrees start clipping with a maximum
27mm field stop --at 32mm of focal length, Panoptics clip at 24mm. For
2 inch barrel oculars, that's 55mm and 39mm.)
* It's been suggested (by Doug Tanaka & others)
that most of us can only critically look at about a 50 degree wide
field of view at one time. Jean Texereau
was doubtful about the utility of apparent fields wider than 60 degrees.
* Good information and advocacy about short
focal length "richest field telescopes" (RFTs) is on Mel
Bartels' web pages, along with a wealth of other resources.
Mel offers an interactive utility for diagonal sizing and performance,
as well as a telescope planner utility with which you can plug in scores
of real world eyepieces. If you like the simple "Newt" program and are
trying to go RFT, you'll love Mel's utilities. (Be sure to check out his
short focus, wide angle, very rich field of view, 6 inch aperture telescope,
with which he's been drawing impressions of immense filamentary structures
--which might otherwise have gone unobserved. Some of these may well be
discoveries!)
The missing eyepiece chart:
I removed my eyepiece chart in favor of downloading
the "NEWT" program to play with eyepiece and 'scope geometry options. In
the course of plotting your course toward building a scope, keep in mind
that 1.25 inch barrel eyepieces allow a maximum field stop of 27mm, and
2 inch barrel eyepieces allow a maximum field stop of 46mm. That stop,
against the telescope's focal length, sets the maximum actual field of
view. Example: 27mm divided by 1200mm = .0225 radians. 57.3 x .0225 = 1.29
degrees --which is part of the NEWT program --along with doping out a diagonal
which will support the chosen eyepieces and focuser (which might legitimately
be "undersized", depending on the intended use).
* In general, I suggest affordable Plossl eyepieces
(aka: "oculars") with about a 50 degree apparent field of view.
* I suggest avoiding "get the ladder" Newtonian
focal lengths over about 1500mm.
* To design my telescope, I started with the standing
and stool-sitting eyeball height of young people and myself, then built
an affordable, do-able telescope around that dimension: one that's (hopefully)
inherently stable, vibration free, easy to transport, simple to set up,
intuitive to steer around and adequate for the less than ideal skies most
of us live beneath. I ended up with traditional (6" x f/8 to f/9) optics
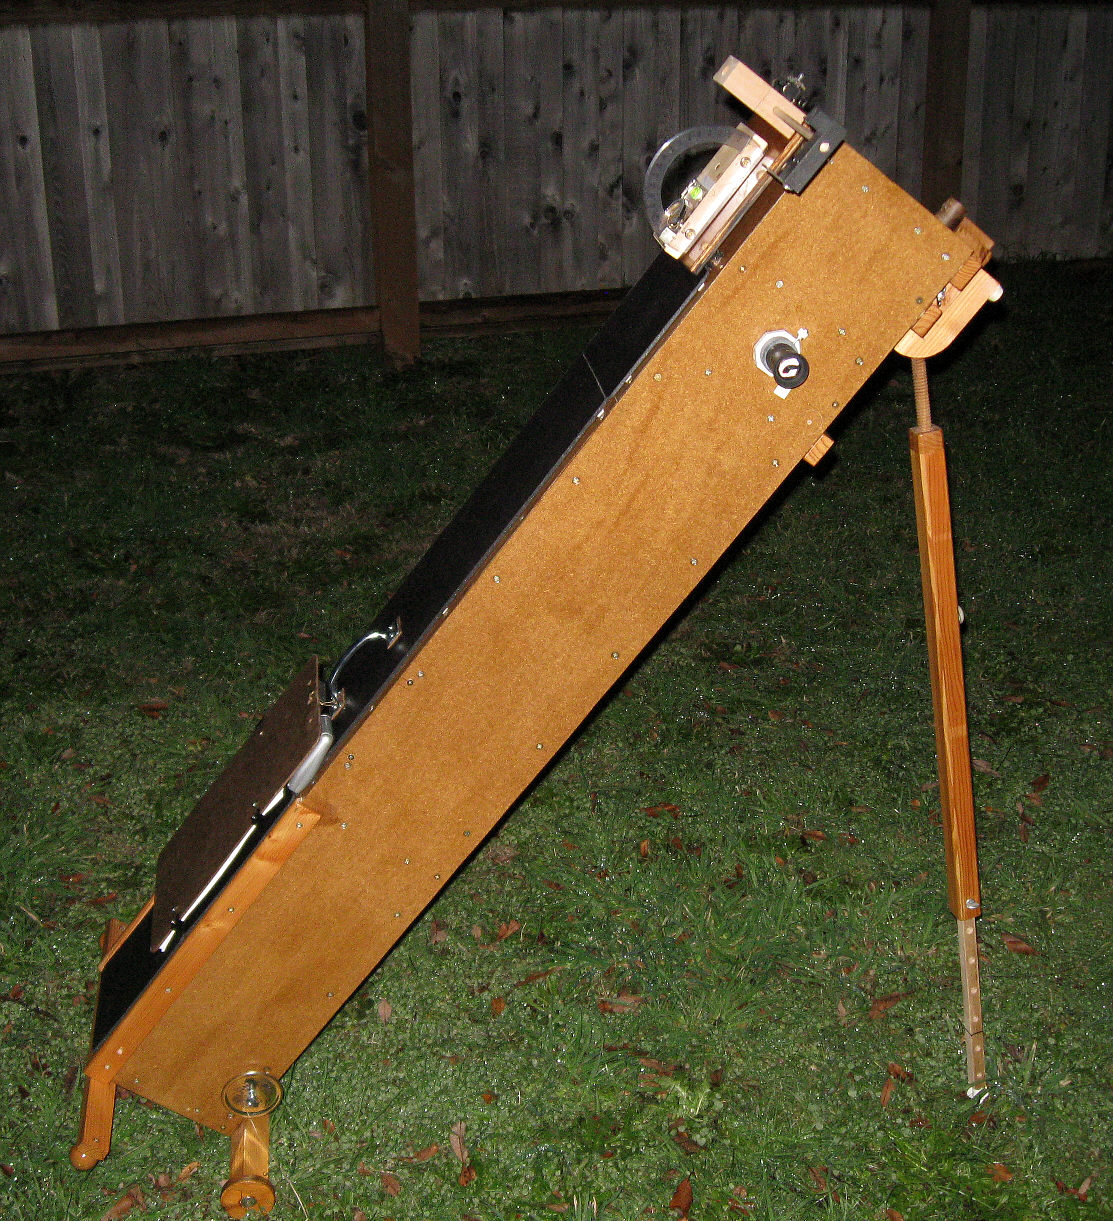
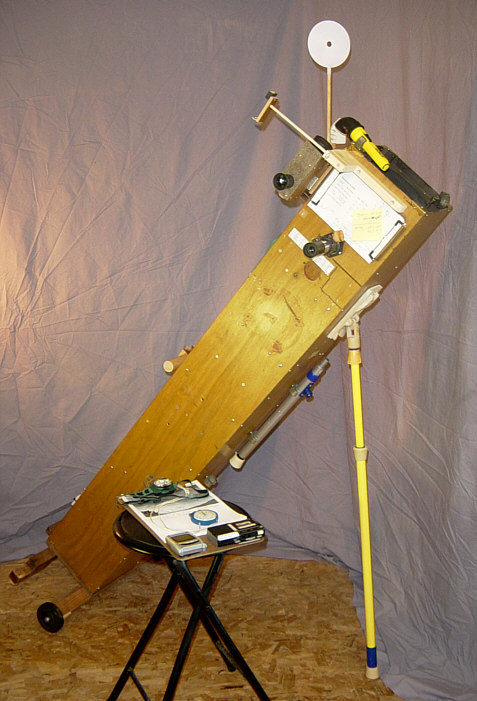
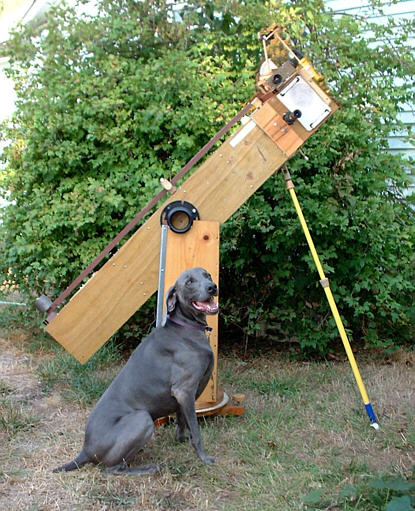
in a design I call a "Dogson".
It turned out to be a 5.75" by f/8.74 (as
masked) with 75% illumination (secondary limited) to the edge of a
.85 degree (51 minute) field of view, and is quite usable for a (one magnitude
dimmer at the edge) 1.25 degree field with an affordable (say: $40) Celestron
32mm eyepiece.
For wider angle observing, I've got a pair of Russian
20/80 binoculars (2.75 degrees) and a pair of excellent
10x50 Brunton binoculars (6 degrees, purchased at a close-out price).
** That all having been said: my 6 inch mirror turned
out to be damnably difficult to make (this first time). Such problems as
I experienced are usually written off to the errors of newbie ATMers, but
an experienced and very active voice at the Eugene, Oregon club advises
beginners to start instead with a 10 inch mirror. He recounts that, despite
his many exemplary telescope project successes since, his only failed and
abandoned mirror was a traditional 6 inch. More-over, he's not seen but
one really good 6" mirror.
So at this point, I've made one "good" 6 inch mirror
(at least by my standards), but only after 76 hours of polishing(!) --work
which should have taken me about 6 hours (of actual polishing and figuring).
Only the making of my second 6 inch mirror will demonstrate if I've finally
got the process bolted down, but I'm presenting what appears to be the
methods and materials which --work.
* Here's the main page of my as-built
drawings for Dog-2:
Since this plan and photos, I've gone to 5"
wheels (which turn only with the 'scope) and
one inch extensions under the over-center balls --for
better ground clearance on rough terrain.
(Click these images to enlarge them.) (A more recent
image on right, and see.)
* It's time to address the Dogson design/concept's
deficiencies:
~ Chief among them is low altitude
(below 30 degrees) sky and terrestrial observational performance. You can
hoist the butt end up onto a stool or table, but the balance and vibration
gets bad. (Dog-2's low altitude adjustment was somewhat designed around
a Cosco brand step stool that we own. With added crutch tip feet, it seemed
ideal to use with this scope --sitting, small kids stepping up, and "butt
hauling" for the range of 15 to 30 degrees.)
~ While (screw) jacking the Dogson
up and down in altitude goes swimmingly, some won't like turning this 'scope
in azimuth --with its non-turning wheels dragging in the dirt (and there's
usually some backlash).
~ By today's strut and string 'scope
standards, at 30 pounds it's heavy for a 6 inch telescope, though maybe
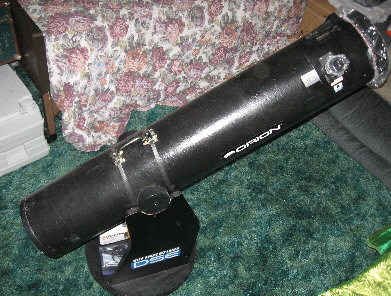
not when compared to other long focus, closed tube scopes. I have on loan
a typical, commercial, 8 inch Dobson (Orion brand). The tube assembly with
mirrors weighs 24 pounds and the base weighs 25 pounds. Were I to scale
my Dogson up to use an 8 inch mirror, it would weigh 71 pounds, and I'd
need to stand on a step stool at times. (The Orion's tube is only 9 inches
inside diameter and a trim ring at the mouth reduces that to 8-3/8 inches,
so this scope should have been a bit larger and heavier.)
~ The Dogson is not a scope for
swinging about and earning your Messier certificate. It's for picking and
finding a target/object, studying it, and maybe shooting an afocally
coupled snapshot (if the object is bright enough).
~ So far, I can't think of any way
to make this telescope track.
* Dogson Advantages:
~ As a one-hand lift, one-piece
telescope (not counting a stool and kneeling pad), you can take it and
go (if the separately stored mirror has already been slipped into place).
~ At astronomical altitudes (above
30 degrees) the OTA/tube is itself two parts of a steady tripod to the
ground. There are no vibrations, no shaking when you adjust the focus,
and no balance problem when you use a large eyepiece or mount a camera.
If you're tired, rest an arm on the scope.
~ By using the Cosco stool or a
typical plastic garden chair (has an 8 inches lower seat), an adult can
comfortably observe from about 45 degrees of altitude to the zenith. For
the range of 30 to 45 degrees, an adult who's able to use a kneeling pad
or a low stool is accommodated.
~ The mirror is securely held captive,
but easily removed with a single thumbscrew --such that it's convenient
to store the mirror at outside temperatures (in a cheap, desiccated, air
tight container).
~ The primary mirror cell rides
on a sled which can be moved to adjust focus and/or to accommodate gross
prime focus changing accessories --like an erecting Amici prism, Barlow
fore-lens, and close subjects (to 100 feet). More such accommodation can
easily be designed in. This gross focus adjustment range can also make
up for a mirror that fell short or long of its target focal length --without
having to bore another focuser hole.
~ The "focuser" also focuses --helically:
such that distances of 1000 to 10,000 feet might be estimated.
~ Despite not having a rocker box,
the Dogson does have setting circles
~ It also has a swing
out (and around to the other side, if desired) lightweight finder --
~ --and a swing-up camera mount.
~ Since the tube is square, it's easy
to mount accessories and features like those black "Fomecore" top-side
insulation panels, internal baffles, the cell sled, tension arms, the secondary
strut positioning "float block", a plumbing parts focuser, slide-off mirror
access panel, frame attached Dog leg and feet, swing-out finder and the
DDNU navigation platform.
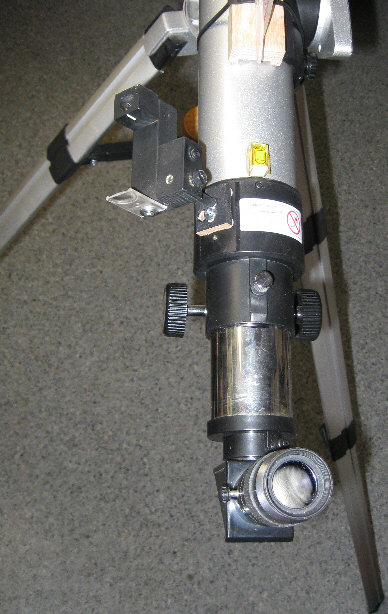
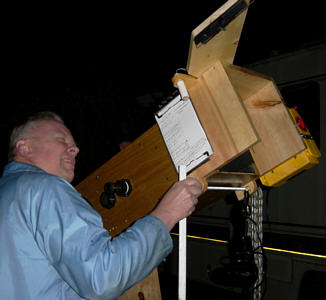
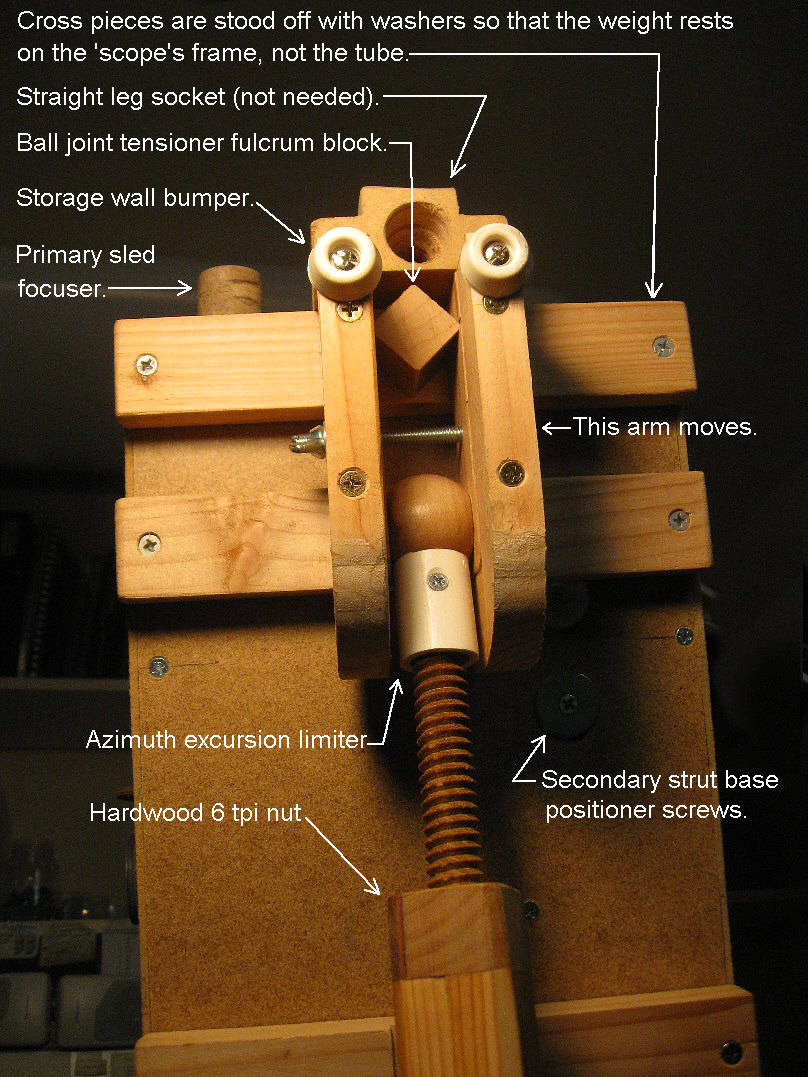
Focuser detail
(The set line and bumper piece is for laterally positioning
an afocally coupled, swing-up hand camera.)
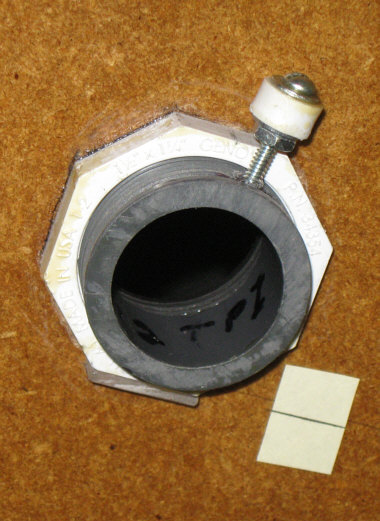
This limited helical focuser is cobbled from plumbing
parts (you can see the inside detail here). It can
hold the waist banded, short barreled 32mm Celestron eyepiece in the below
image, but such slow adjustment wasn't otherwise needed. Given smooth barreled
eyepieces and the sled approach to primary focusing, one can easily do
fine focusing with less than parfocal eyepieces by simply turning and push-pulling
them in a simple "eyepiece holder" like the below pictured plumbing item:
a 1-1/2" to 1-1/4" ABS, male trap adapter (under $2, and thanks to Richard
Berry for the suggestion). The nut adjustment and washer produces any desired
degree of buttery smooth grip upon a standard eyepiece barrel.

A few 1-1/4 inch choices
Rack and pinion focuser, Plumber's delight eyepiece
holder, Smooth barrel eyepiece, Celestron 32mm eyepiece
The traditional focuser at left is usually fitted so
as to allow an inch of inward travel. As such, and with an eyepiece fully
seated, the top of its tube stands an eyepiece 4 inches off of a round
tube, 4-1/4" off a square tube. Using a low profile helical or friction
focuser like that ABS plumbing item can bring the eyepiece in to only an
inch and a half (leaving a bit of inward travel), which in turn allows
a significant reduction in diagonal size/obstruction, diagonal weight and
potential vibration problems. (The plumbing item is a no-go with that Celestron
eyepiece, of course.)
Modern Times:
4/16/2016: * Yes, I'm aware of "goto" 'scopes and the
amazing "Safari" ($20 --!) application for i-Pads --which I've played with
for a few minutes, and which affordably turns any telescope into a goto
instrument --or buy a long focus optic for the i-Pad, which then itself
becomes a worthy, navigating, astrophotographic telescope --!-- (but you
might then want to mount it onto a good tripod).
* Basically everyone we know, young and old, has a
hand-held computer/cell phone/Internet device --except ourselves. My understanding
is that once you've acquired an I-thing (used ones are affordable or free)
with GPS and inertial/gyroscopic capabilities --and have downloaded a Safari-like
sky program, it can then be operated (sans any updates) without a communications
contract. But: the Luddite in me says: "whoa".
* Please send me corrections for errors on these pages.
Our great-grandchildren had to tell us about WiFi a few years back. We
stood there like amazed bush people as they sucked the Internet out of
thin air. We pack a bottom-feeder CDMA Tracfone (under $10/month) for hello-goodbye
voice and have no Internet access at home which would cost us $55/month
--more than water and sewer!-- unless part of a $90/month "bundle". (We
remember $10/month for an Internet connection.) So instead, we use a pair
of Chromebooks
to cadge free public WiFi.
Some of the "passions of our times" (like posting this
page to the Internet) we must share (even embrace --and ain't HTML grand?),
but when I make use of things that are price fixed and far beyond my understanding,
the more alienated I feel from my own activities and interests. (This is
really more about my own struggles here with modernity --than any retro
advocacy.)
Grinding: The grinding part of this
project was pretty straight forward, plus I benefited from good advice
by my circle of astronomy friends.
* Unlike 58 years ago when I made my first mirror,
and per suggestions from others in my astronomy e-group, I short-circuited
the little incremental abrasive steps by starting with #120 grit (102 micron
average, 165u max), then #500 (20 micron average diameter, 40 micron max
--quite a jump) --and straight to polish after that. The old timers didn't
have today's "micron" grits and generally went from #600 grit (12u average,
30u max) to polish. I wanted to find out how tough it is to polish out
#500 grit pits --with today's advantage of using cerium oxide.
Answers:
~ The rough and fine grinding both
went fast --maybe too fast for good control. I spent more time gauging
my progress (ended up using automotive leaf gauges and a truly straight
[hard to find] steel rule for the sagitta) --
~ --and trying to judge when #500
pits had vanquished the #120 pits (made a glass slide with #120 grind on
one end and #500 grind on the other for microscopic comparison).
~ You can switch to "wet testing"
the mirror (plain water is best) by reflection (a flashlight next to your
eye) shortly after starting the #500 grit grind.
~ Be very sure to do the "pencil"
or "felt tip marker" test for contact --before calling it quits with your
finest fine grind. (Simply mark up the mirror, then see if a few strokes
cleans your marks off evenly.)
~ Yes: it's plenty tough to polish
#500 grit pits out of Pyrex --something like 20 hours to pass traditional
microscopic inspection. The alternative is to use a final, very fine grind
with "micron grit" --maybe 12 micron. However, this is the point at which
your mirror is most vulnerable to getting scratched (a reason why I skipped
micron grits).
* There are many little questions and decisions:
~ How much grit per "wet" (1/8th
teaspoon);
~ How long is a "wet" (go by ear,
and you can add drops of water to extend it a bit).
~ How hard to bear down during rough
grinding (as hard as you can comfortably sustain without getting sloppy:
20 pounds total for me).
~ How wet is a wet (sluice off the
tool and mirror in your plastic bucket, leaving both wet).
~ How wide & long is the "hogging"
stroke (what you're comfortable with -maybe "4/5ths".
Don't tip the mirror.)
~ How close to the RC (radius of
curvature) should I rough grind (2% long, since the "1/3rd
W" "maintenance stroke" pretty much stops RC progress when you need
to (fine grind or polish). You can hog #500 grit to 1% long).
* Again: For a more complete background on ATMing,
follow this link:
https://stellafane.org/tm/index.html
Much of the following
is duplicated, extended and updated on my Dog-2 page.
The Dogson Telescope
Some of the following appeared in the Fall 2008 Issue
#59 of Amateur Astronomy magazine.
(Last worked on: 6/3/2016, but lotsa older stuff here
yet.)
This telescope, without my knowing how it would end
up, went through design changes for 59 years --since I was 14 years old.
I think it's finally matured into a satisfactory 'scope, but we'll see
how practical it is to use --once I get to see the night sky again, here
in rainy Oregon. The only things which haven't changed since my initial
equatorial mount effort is that it remains a long focus Newtonian instrument,
embodied in a closed tube (the "OTA"/optical tube assembly) --and a rectangular
one these past 20-odd years. The accompanying photos reveal extra holes
and scars which attest to mistakes, redesigns and modifications --in the
Dogson's long struggle to be born.
Now that the design has finally stabilized, best I'd
recognize/admit that this is only the second "roll-out" in 13 years --by
calling it the "DHS-2A1" (and, as ever: just "Dog-2").
The "DHS" part recognizes and appreciates Mr. Holcomb's
and Mr. Sellers' priority (see below).
In my opinion (something which changes
with age), it's important that the doing of astronomy be physically comfortable,
not demanding of time or sleep, and not overly intrusive into one's family/personal
life. Whether it's simply "sky appreciation" or (as is my preference) some
sort of a personal project or thesis that you're pursuing --don't stand
when you can sit, don't observe at 4 AM when you can do it at midnight
on another date, don't guide photography for minutes if you can get adequate
results in seconds without tracking --or if you can conveniently whistle
up imaging from a robotic telescope --or if the astrophotography you need
already exists and is accessible, via the many Internet resources we now
have.
The most pleasant way to personally
take in the night sky is probably with a good pair of binoculars,
either while leaning back in a lounge chair (using a counter-balanced binocular
mount) or comfortably seated at a sturdy table (your short tripod mounted
binoculars fitted with angled oculars, your charts and etc at hand). Next
best would be some kind of a (light concrete) table mounted telescope,
perhaps in the style of a Questar. 3rd best (hopefully) will be one of
my forthcoming "Dogson" telescopes --perhaps even a "Dogstar" version.
* In general, I suggest you'll
be happier looking at familiar objects (perhaps some variables that you
follow for the AAVSO) and using low to medium magnification --not much
more than 60 power, since that's about as much as average "seeing" supports
with excellent contrast, visual resolution, a nice field of view, a comfortable
exit pupil and eye relief.
For observing
with a telescope, one is tempted to go for a 45 degree "erecting prism",
such that sky charts, aiming and moving the scope are intuitive --rather
like a binoculars experience (but without the sore neck). We're cautioned
that such an "Amici" prism "won't work with DOBs and other Newtonians"
--for lack of enough inward focus travel, but that it should work with
most refractors and Cassegrain or Maksutov-Cassegrain telescopes.
A William Optics Amici prism
should also work with a Dogson-2 telescope, due to its traveling cell sled,
and provided it has an adequate secondary mirror. However, at this point
I only intend to use an Amici (if at all) for terrestrial observing, and
future Dogsons might forgo this option in favor of more focal length (f/8.66+).
(I've read that even the best Amici prism will add a horizontal spike to
bright stars.)
* I also suggest that you'll
be least happy when trying to do imaging (photography), unless you keep
your approach really simple and fast (like: a camera aimed at the sky and:
*click*). I'm really torn on that issue, since I do much better
actual "astronomy" by analyzing photos/astrographs --than I do in "real
time" at the eyepiece. (For more on that approach, see my (and others')
"barn door drive" experiences). Never-the-less, I fantasize
about doing direct astrometry,
photometry
and sketches --in real time --at the eyepiece. (Ha!)
* In my humble opinion: if you
live in or near a city, a 6 inch f/8-10 (however configured) might be all
the telescope you want or need^, and something much smaller (like binoculars)
is what you'll likely use the most --provided that you're familiar with
and can navigate with your instrument, you know what objects/fields it
works well with, and you have a well configured observation setup/setting
--including a well behaved telescope or mounted binoculars,
a nice chair, an ample work table, notes, adequate illumination, warmth
and charts near to hand.
* Yes: "adequate illumination",
meaning white light --perhaps as a headband mounted LED lamp. Adequate
"red light" is no better than white at not knocking down dark adaptation
(IMO), and fuzzy "night vision" is only good for logging and bragging on
having noticed faint "DSOs". I want to study, count, measure and describe
stuff.
* The nebulas in Orion, of course,
are reason enough to purchase or build a larger 'scope. Our Coulter 13"
really did a job on that and other such objects, but I think you need reasonably
dark skies --and it is not fun (IMHO) to drive to some distant spot, set
up, fight sleep, and then drive home half dead (unless you go through the
greater inconvenience and grunge of turning it into a fursluginer camping
trip).
^ Most observers (especially
modern ATMs and ATBs) disagree with me, saying that bigger is always better
(aside from any portability and set up inconvenience). My opinion is influenced
by living very near the Pacific coast under an urban, often hazy/cloudy,
light polluted sky. I jointly own a good 13" reflector with my friend Chuck.
I've wheeled it out and tested full aperture, then with a 5" (oval off-center)
aperture mask, looking nearly straight up at something like M-13, --and
seeing little advantage in the full aperture.
I'm also biased in favor of the
people-compatible dimensions, weight and the relative simplicity of "eyeball"
collimation possible with a 6"x f/8 to f/9 instrument.
* So: many opinions here but no
"discoveries" to report (other than what's turned out to be film anomalies).
Like many observers, I've seen fascinating
apparitions among the Moon's fleeting shadows. Do take at least 15
minutes to steadily watch the Moon's terminator sweep along while the Sun's
grazing rays catch prominences --so stark and isolated on the terminator's
dark side that they look like colossal artifacts.
Here's the new
Dogson link --which is what's become of my "6x10" Dobson telescope
project. The scope shown here is what's become of Dogson-1 --now in the
hands of my friend Buddy, who follows the stars under far better Oregon
skies than we have here on the coast --and he's already improved upon how
I'd configured that scope --
 --by turning it into a "Buddsonian".
Buddy's loyal dog "Shadow" is demonstrating the design's stability. It
uses a high rocker box plus the foreleg that you see in the early part
of my Dogson article: the best of both designs!
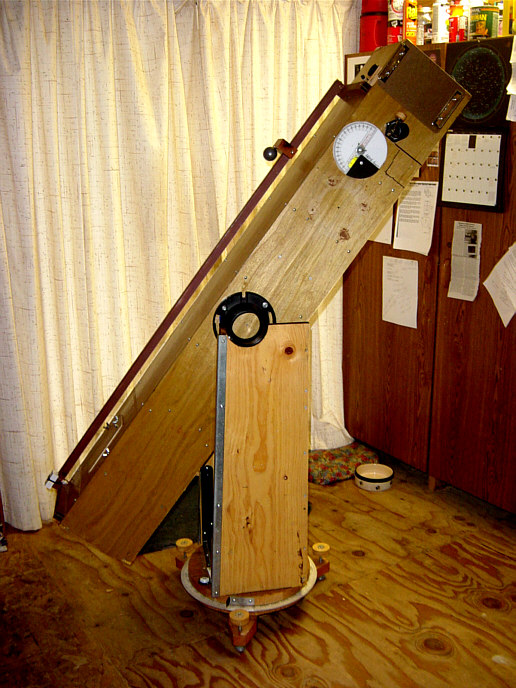
.* Here's an
early photo of my pre-Dogson, 6 inch f/10.5 reflector telescope :-)
--by turning it into a "Buddsonian".
Buddy's loyal dog "Shadow" is demonstrating the design's stability. It
uses a high rocker box plus the foreleg that you see in the early part
of my Dogson article: the best of both designs!
.* Here's an
early photo of my pre-Dogson, 6 inch f/10.5 reflector telescope :-)
This scene was "first light" with a temporary primary
mirror.
--At this point she was an overweight
square tube job with lotsa baffles and an altitude bearing only 10 inches
from its (shallow helical) focuser.
I used traditional Wilson Art
"Ebony Star" for the azimuth bearings (against 3 Teflon pads, of course),
and I wasn't satisfied with it. The static equaled the dynamic friction
(nice), but with both something like twice as high as I'd expected. *here*
are some earlier friction tests with various materials . Tight/loaded bearings
make a 'scope vibrate, since the energy is otherwise dissipated into one-way,
non-elastic motion.
Heavy duty thanks goes to my
astro friends David, Ted, Chuck, (later on, Jerry and Tom and others have
joined our group) --also Fran and Virginia (my departed parents) --for
their material, intellectual, and inspirational support. I'm also indebted
to a host of sources I've accessed over the years via the Internet, a number
of fine
books, our magazines Astronomy, Sky &
Telescope, and Amateur Astronomy: a fine magazine for astro doers.
Here's the earliest (stereo) view of --what became
Dogson-1 --before I painted the interior flat black.
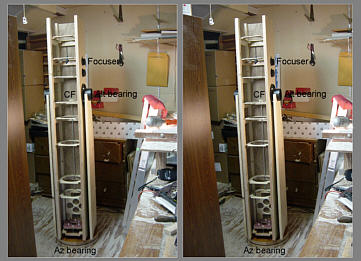
Setting circle details
I spent some while going in opposite directions: wanting
on one hand an eyepiece that doesn't move around much (ie: very near or
even inside of the altitude bearing):

The Dogson's earlier incarnation as a Dob
with a very high altitude bearing. Note the
corner
convection vents and the over-sized tube.
--and on the other extreme: wanting to lay that bearing
nearly on the ground, so as to make the tube itself part of a stable tripod
configuration.
Dog-1's wheels, which don't turn, get relieved by
the pads of that upper arm at high altitudes --just
before
the scope's center of gravity goes over center.
Dog-2 (seen here before the last of the flat black
paint) ended up with 5 inch
wheels and 1 inch extended over-center balls for better
rough ground clearance.
However it was to come out, I wanted my telescope to
be simple, stable, humbly practical, and easy for others to build, but
perhaps it's mainly "easy" in that one doesn't have to worry about weight
distribution.
I'd been inspired by the obvious
stability of F. J. Sellers' 1920s design, which our regional discussion
and construction group: "The Toledo Scope Works", took a look at some time
ago. (David, Chuck, Jerry, Tom, and Ted of the Scope Works were the reason
and the resources by which I was able to resume my old passion for astronomy
and telescope making. They've been supplying me with ideas, software, encouragement,
and components for years. David made the mirror and Chuck made the Crayford
focuser for Dogson-1. I've yet another 6" mirror on hand from Jerry --"Dog-3"?)
** A newer fellow at the Skop Works, Mel Bartels (who
goes way way back with the Oregon ATM scene, plus he has a great presence
among our literature and web sites --including his own) --alerted me that
this type of mounting goes back much further than Sellers. It was invented
by the first manufacturer of telescopes in the United States: Amasa Holcomb,
who you can read about at:
> http://www.bbastrodesigns.com/HolcombeMount.html
> http://labbey.com/Articles/Mason/Largest.html
> http://en.wikipedia.org/wiki/Amasa_Holcomb
Holcomb was a self-taught American Renaissance man
who lived a long life and made great use of his time. He started making
telescopes later in life, purely for the love of doing so, but ended up
filling many orders from private and institutional clients. There are a
number of observatories which still bear his name.
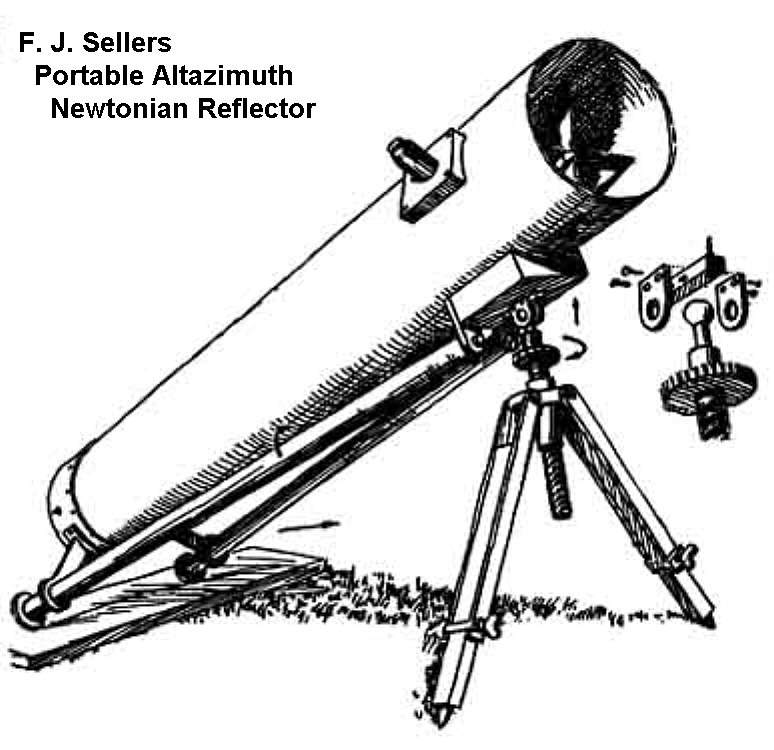
Sellers, a professional astronomer, considered alt-az
mounts superior to equatorial for visual use. He discarded
several designs before settling on this one. (Yes:
he carried
along that little board in back for smooth azimuth
guidance.)
My 'scope became a "Dogson" (with a humble tip of the
hat to John Dobson's fine telescopes, spirituality and philosophies) after
I started trying to figure out how to add a foreleg or two:
(04) Modeling design variants and trying
to get a "feel" for how it would handle.
"side
bar"
--which reminded me of a 1992 effort
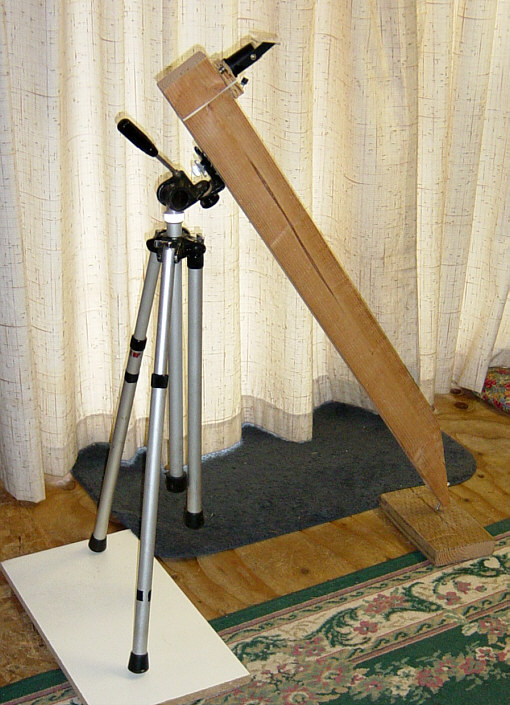
dubbed the "Earl's Leg":
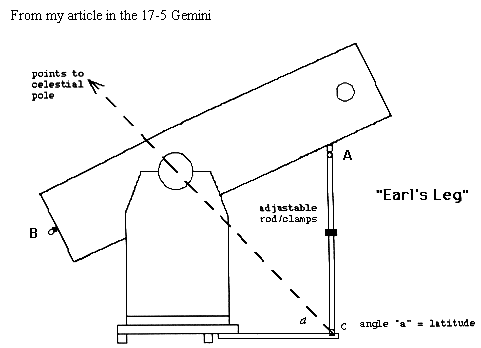
"B" is okay, but attachment point "A" doesn't work
as well on this fat boy --as it
did on the Earl's long tall Sally refractor tube.
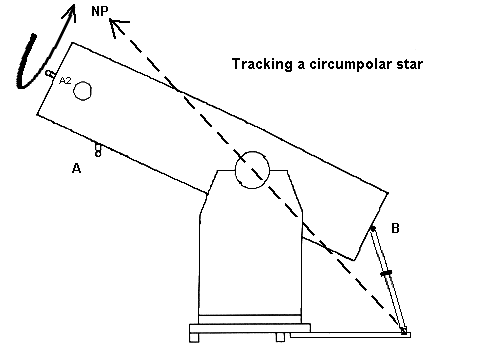
The classic Earl
(of Crawford)'s "Arm" was a cord in tension between the front of a
refractor and an anchor point --perhaps in the floor of a landed gentleman's
observatory and library --which compelled an alt-azimuth mounted telescope
to follow an approximate equatorial path across one's southern meridian
(and additionally served to "ground out" tube vibrations).
* Tension was maintained on the cord by attaching a
counterweight near the refractor's eyepiece --which makes for a problem.
With any hour-angle (right ascension) distance from your southern meridian,
the weight and the cord tries to pull the telescope back. (See the above
linked illustration.)
* If you instead use a ball-and-socket ended rod (as
I've illustrated here), it had best be a lightweight puppy, lest its weight
pulls the 'scope away from your meridian. (Right: just up the bearing friction.)
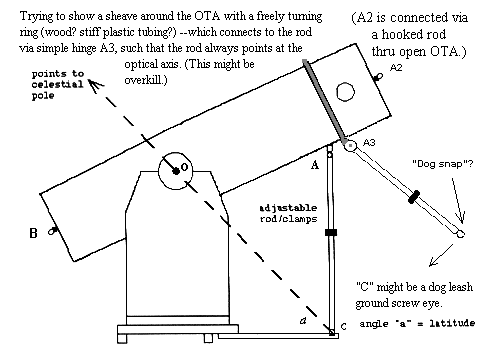
How the Earl of Crawford might have dealt with today's
fat Dobs
A1, A2 and A3 being progressively better. (A3's hinge
is part of an around-the-OTA slip ring.)
** In the March 1989 issue of Sky & Telescope (which
I came across a year after my article was published in Gemini, Maurice
Gavin, an astronomer who was living in Surrey, England, contributed an
article describing an approach to Earlizing a Dobsonian --in which two
strings rise from point "C" and pass through a pair of eye screws in the
mouth of the tube --to either side and on a diameter through the optical
axis. It appears that the taut string is simply allowed to pass across
that diameter. (See this
posting
about a lecture he gave to the British Astronomical Association in 1988.)
** In his 1989 S&T article, Gavin also suggested
the possibility of using an adjustable rod with universal joints, but somehow
didn't get around to attaching such a rod at point "B" (in order to track
northward). (Yes: I wrote to him in 1993, but I don't recall getting a
response, nor do I remember more details from that article.)
* See Mel Bartels'
excellent mechanical drawings which illustrate most of these (and other)
approaches to tracking alt-az mounted telescopes.
* Of course the Dogson, with its near ground level
altitude bearing, is tough to Earlize. You'd need a pivoting ground rod
in the butt end and a stout pole north of the 'scope, to the top of which
the Dogson would be tethered.
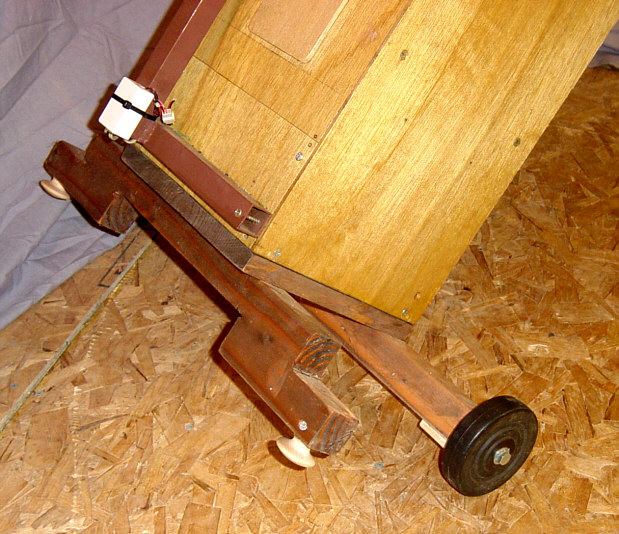
Soon thereafter my "Dog Leg" 'scope (the leg was once
going to be jointed) became the "Dogson".
Even with the earlier versions of this scope (as in
the photo below) I was trying to either incorporate or simply hold onto
a forward staff while using
the scope, in order to better control my nudgings and to "ground out" vibration.
My altitude bearing kept getting closer (and more sensibly)
to the ground:
That 1 inch longitudinal square tube on top is for
torquing
the scope true. The door skin wood I used for the
tube made it
twist --badly. I used the torque tube to attach the
adjustable carry handle
and as a conduit for to pass wiring back to the 'scope's
rear
clearance light and a miniature muffin fan --which
blasted thermals
off the face of the mirror. It once clearly made a
difference in being
able to see Saturn's Cassini gap, a near arc-second
detail that night --when
the mirror was still warm. I "switched" the
gap on and off several times,
along with the fan. It took about 2 seconds both ways.
However, my small
mirrors are well ventilated and cool quickly so I
don't anticipate
installing fans in future scopes.
To make a long trial and error story short, my first
Dogson ended up looking like this:
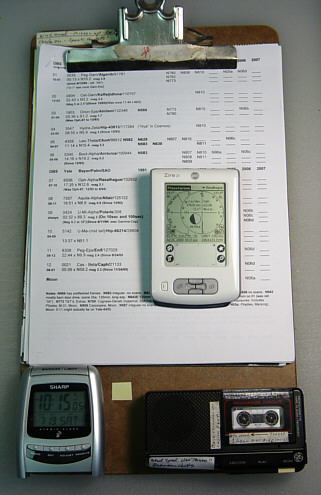
That flimsy stool is only for holding my clipboard
and whatever's attached: stop watch, a good clock,
microsette recorder and a headband light for seeing
stuff at night. My poses were to stand, stoop,
or go down
on a knee. The short leg was used under 30 degrees
of altitude
(ie: not often). Those rubber cane tips come off to
be replaced by --
--a cut down plastic caster which swivels to catch
the dirt and allows the pole to be smoothly turned.
I need a lot of light to see its little display, but
this affordable --
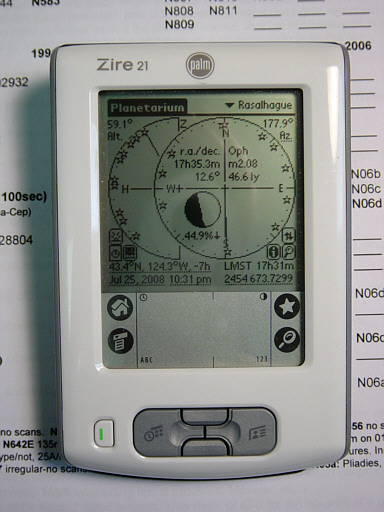
--Zire 21 and the Planetarium program supply the information
I need
to aim my scope. Each of those stars was at
the center of one of my
"Observation Areas" --which I watched and photographed
for years
in hopes of at least getting to know a few small parts
of the sky.
The Dogsonian design eliminates bearings, counterweights,
weight and thinking^.
^Well, some. It takes a bit of thinking to relate sky program or
planisphere co-ordinates to one's plan for the evening and night. What
I'm trying to say is that it takes a lot less thinking to turn out a Dogson
--a 'scope which doesn't need balancing, and which has cell sled focusing
with a good range of adjustment. It's easier for an amateur astronomer
to build and to transport this one-piece design (plus kneeling pad, which
stows on top of Dog-1).
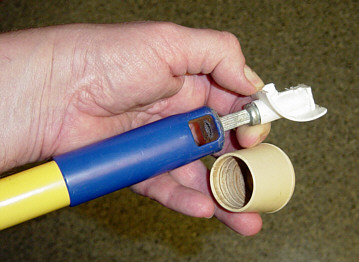
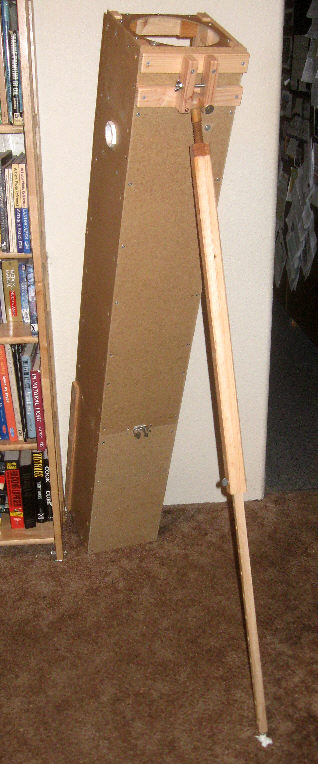
Yes: that's an ordinary hardware
store or paint shop "pole sander block" and extension tube (30 to 60 inch)
--which attaches with an Acme thread --which, when turned, gives slow-mo
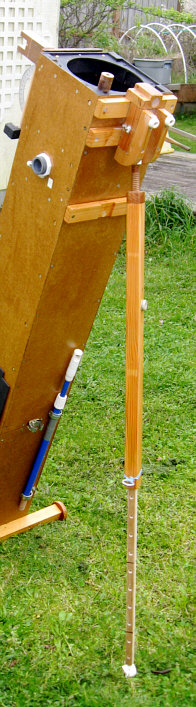
on the altitude. Dogson-2 uses a much longer thread, but operates the same
way.
There are cheap through professional extension poles
to choose from. That aluminum pole was easy to
cut down and it adjusts in steps. Dog-2 uses a custom
made pole--
--and adds limits to the pole's
lateral
excursions, such that the 'scope can't easily fall
over.
An early image at left (sans leg excursion limiting)
and a recent image of the leg snap set.
The larger leg section is made of two channeled (dato'd)
1x2 furring pieces glued together. The thread "wants" to be a square-ish
3/4" 6tpi ACME, but I used an affordable 6tpi "V" profile tap and die set
instead. The (not very hard) hardwood ball is from an art crafts supply
store. That 1/4-20, mid-leg thumb screw became the (ground down, slips
in to lock the leg) 5/16 eyebolt seen in the right image.
~~~~~~~~~~~~~~~~~~~
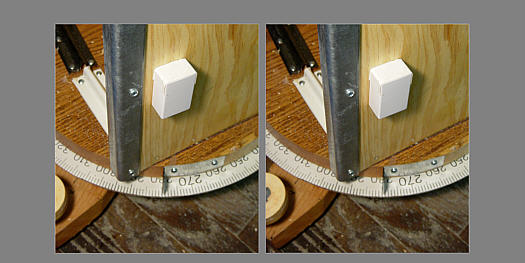
* The altitude can be set from zenith down to 30 degrees
(9/15/2016), at which point I yield my field stool to the scope's butt
end and get down onto a kneeling mat --or: I just wait for my quest to
clear 300 (and the trees). Originally, the foreleg was going
to be articulated (folding in half by steps), thus the "dog"
name.
* With the scope set up for stool sitting eyeball height
(at 53 degrees altitude), I found that I could turn the thread and track
in altitude from 49 to 62 degrees --and lean the scope in azimuth through
18 degrees.
~~~~~~~~~~~~~
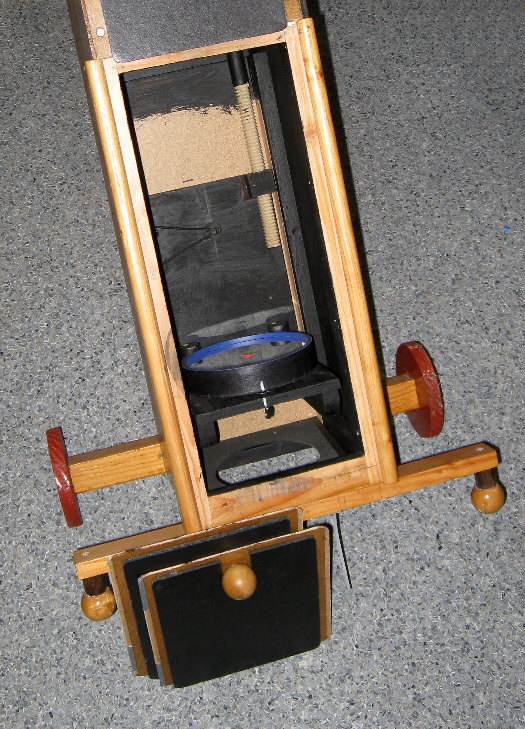
You might ask: "where does one attach the setting
circles?" Well the "DDNU" goes right here:
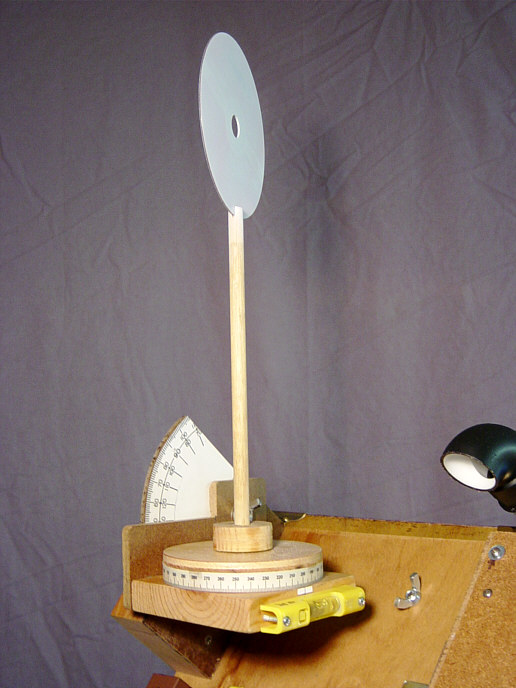
This early Dobson-Dogson Nav Unit attaches with
a single wing nut. The most recent version (2016)
has 4 feet and attaches with a single brass flat-head
screw,
and is meant to stay atop the telescope's OTA.
The DDNU's altitude readings are not dependent upon
the scope being leveled --until you're near the zenith,
then I keep an eye on that extra level (below image).
With this early DDNU version, you start by
getting the current alt-az of Polaris (or maybe a
radio
tower), sight Polaris with that disk, calibrate the
circles
to read true, then go after your quarries --back-sighting
on Polaris for the azimuth. (Arghhh: I went to a magnetic
compass.)
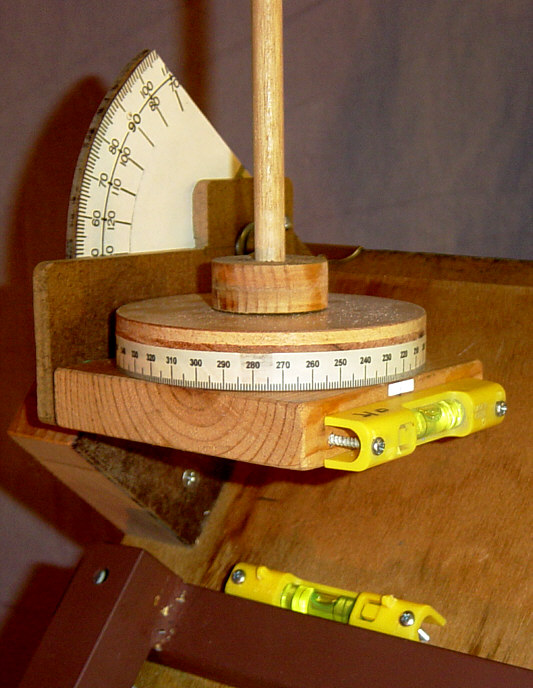
(10) That second level is for navigating
at higher altitudes and/or finding somewhat level
ground.
Before going with a magnetic compass, I replaced the
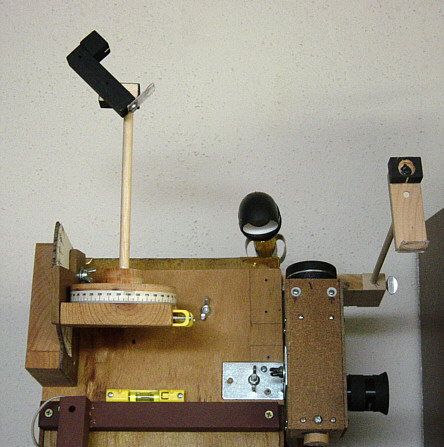
white CD sighting disk with a more sensible 2nd finder (which could
still be aimed horizontally for aligning on something
like a radio tower --although that would often require a step stool).
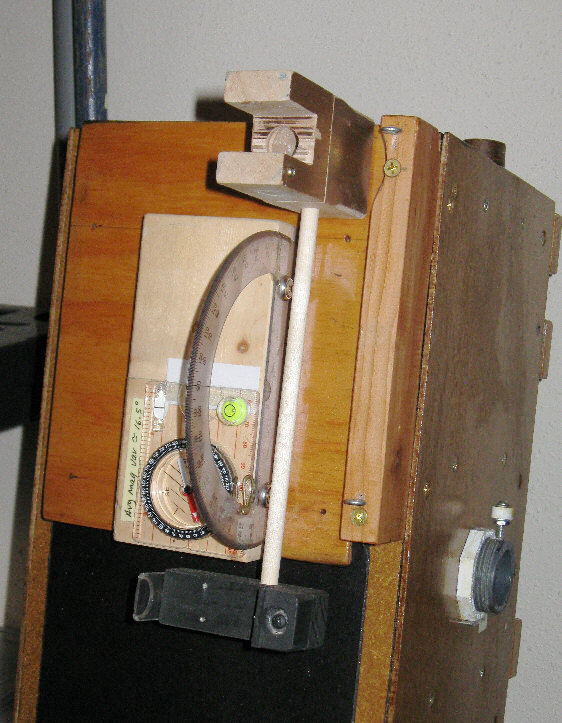
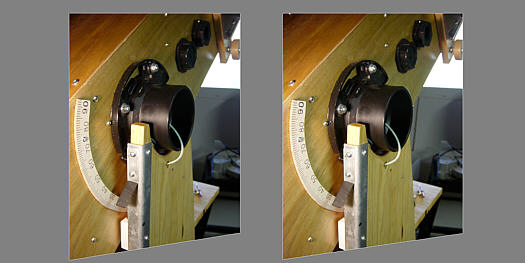
And finally: a magnetic compass --along with a swing-out
glow finder (seen here on Dog-2).
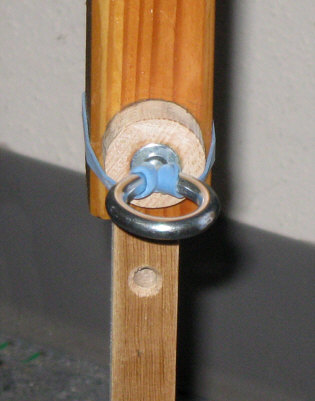
With the glow finder stowed I sight through that pair
of fixed eye screw rings, get a bright object centered in the eyepiece,
then swing out and aim the glow finder (which usually needs a bit of adjustment
at the begin of each session). Those eye screw sights keep me from having
to grovel on the ground in order to sight along the OTA.
* A helpful addition to the problem of "finding"/aiming
has been a new 32mm Celestron Omni eyepiece --affordable and as much field
of view one can squeeze into a 1-1/4 inch focuser. Its light gathering
is somewhat crippled by my 1-1/16 inch diagonal, so it might be 50% dimmer
at the edge, but the 40 power 1.25 degree actual field is all there. My
old 25mm Plossl (Surplus Shed "500" series) only passes a 0.84 degree field
(75% illumination at the edge).
There's a little cover for the glow finder's lens,
which otherwise dews up quickly and I've rounded the sharp edges. In use,
the glow finder usually ends up above my head when deployed and I've yet
to so much as bump it. This configuration seems natural to use --just turn
my head and look.
During a recent session (the night of 6/4/2016 UTC),
the spirit level altitude indication was within 1/3rd degree (and is usually
quite accurate) but my compass was off by 8 degrees on one object (Jupiter).
Nearly all the hardware in the vicinity of the compass is brass. Maybe
I need to degauss what's not (mainly: the diagonal strut).
The sky-ball approach (using just
the device on the left):
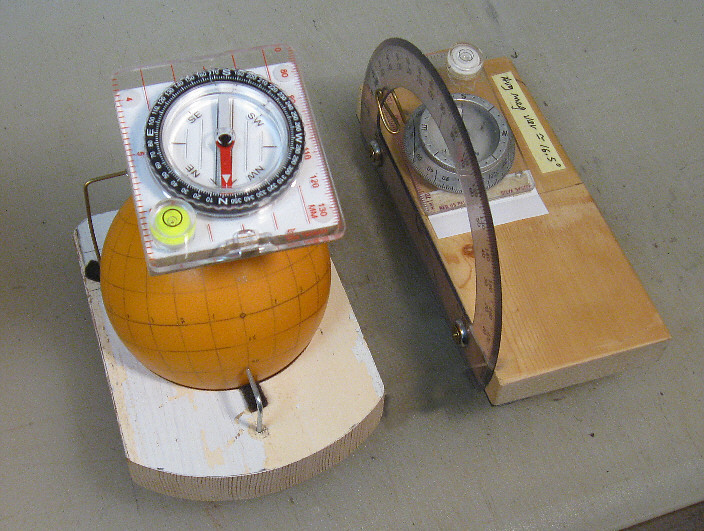
--requires a fairly heavy ball and seems hard to work
with in the dark. (More)
* While the level based altitude indication is accurate
enough, finding the azimuth with any of these devices has been difficult,
so why not simply use the imprecision of a magnetic compass (using a minimum
of ferrous metal screws and whatnot in its vicinity)?
* Yes: something like a GPS, a Celestron "SkyScout",
or a "Safari" ap'd i-whatever would probably work well, but I'm trying
to use low-tech methods --that I understand, can make, and maybe improve
upon.
What finally made the Dogson practical has been its finders
and a widest actual (1.25 degree) field eyepiece. Getting an object into
the eyepiece's field of view with a conventional finder or manual setting
circles can be difficult, especially in that "low power" was 64x and 0.84
degrees for Dogson-1. For direct finding I started with a luminous (glow
paint)
collimating finder:

The paint got replaced by "glop" film from "Scope
Stuff",
which is 100x better. This is similar to a 1952 design
by Stanley B.
Rowson, but also in the vein of "points at" type
finders made by my friend Chuck.
--and just below it in the above photo was a finder
scope with a 6 degree field made from a binocular objective, a rectangle
of front surface mirror, and a 20mm Plossl ocular with a home made copper
wire "points at" reticule:
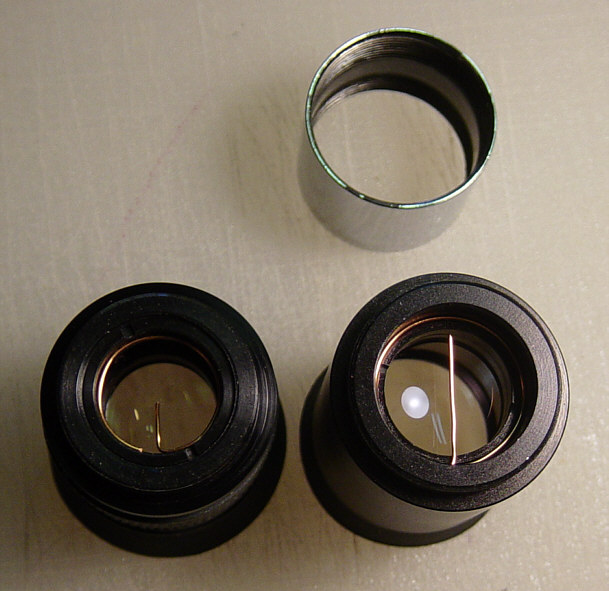
At left is the finder's Plossl with a #24g wire
pointer. At right is a 25mm Kellner with a straight-
across wire reticule, for timing the passage of stars
and extended details. (That's since become an "X"
of two wires.)
With the 6 degree finder as an in-between step, it
was pretty easy to nail an object in the sky, but Dogson-2 has just a glow
finder (with the ability to swing it around to the other side --for guiding
the scope while a guest is observing). What made that work is a 32mm Plossl
ocular with a 1.25 degree field. It will be about one magnitude dim at
the edge (due to the one inch diagonal), but be plenty good enough for
bringing the quarry to center.
* Extended comments 1: > While
that copper tubing strut mount for the secondary painted nicely and presents
smooth edges, I found it ever harder to bend and work with. I consequently
went to a 3/16 inch steel strut, but this time presenting a curve
to the optical path (to eliminate "spikes"). It's mounted from the bottom
of the tube, so as to keep it away from the DDNU's magnetic compass over
the top panel.
> Dogson-1's oversized square tube worked out quite
well with room for convection vents, wiring (but no more battery stuff
after this), a mirror cell sled arrangement and a long threaded rod for
moving the cell sled back and forth (when trying out cameras, different
oculars and focusers). I used Dale A. Keller's "Newt" program to place
and size the baffles. For Dog-2 I decided that I can get away with just
2 baffles. There are also a pair of top vents, so as to not force convection
currents over the entry baffle and into the optical path.
> The top side of the second baffle below the secondary
really catches the light and should be treated to something like a black
velvet or a flocked black covering, but the stuff didn't stick to my HDF
board. Consequently, all of the tube's interior relies upon the rough backside
surface of HDF and a good coat of flat black oil based paint (brushed on).
> I originally decided upon an f/9+ telescope because
a 6 inch mirror can be finished sphere and still be about 1/10th wave away
of perfection. (A 6" f/8 sphere is about 1/8th of a wave from paraboloid.)
However, when David made the mirror for Dogson-1 he troubled to fully correct
it :-) Since giving this scope away (to become the "Buddsonian"),
I've been given another 6" mirror plus I've purchased 6" blanks for making
a new 'scope. This next one will also be figured paraboloid. I've been
persuaded that even at f/9, on a really good night, a spherical 6 inch
mirror can noticeably fall short of one that's been figured. Also: the
height of the eyepiece was too tall for kids and shorties at f/9, so the
aim point is now a more traditional 6" x f/8 (or so) scope.
* Another consideration is the
"sweet spot", and how critical collimation becomes with a short focus scope.
f/9+ is really to be preferred, but I think f/8-plus is still manageable
with "eyeball collimation".
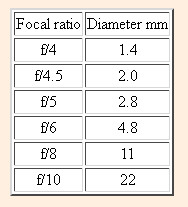
The "sweet spot"
--thanks to Gary M. Bloom's (now missing) web page:
"The Perfect Telescope"
Comment 2: The plastic half-lens'
optical center is level with the pointer and top of the target block, but
is cut off 1/8th inch higher, such that the phosphorescent pointer's image
(projected at infinity onto the sky) easily clears your line-of-sight over
the block. The blunt point is about 1/3rd of a degree wide --as projected.
Mine is made from amazingly bright and long lasting glow film that I got
as a sample. It's otherwise to be had from ScopeStuff
as their "Glop" product. The next versions will probably use a "pointless
arrow". See here for the view through it, and
here
for a drawing and prior art.
General comments, unrelated
to the Dogson mount design
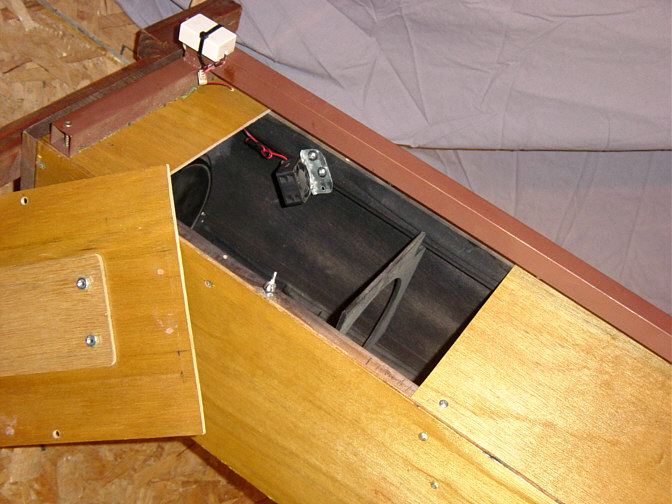
One of the nicest features of Dogson-1 and 3 is having
a back door for easy access to the
mirror --which gets removed after each session to
a "SnapWare" sealed container with desiccant
(and a monitoring hygrometer). (The lesser door covers
a hole through which a fan once injected outside air .)
**Click here** to
see Dog-2's slide-off access panel.
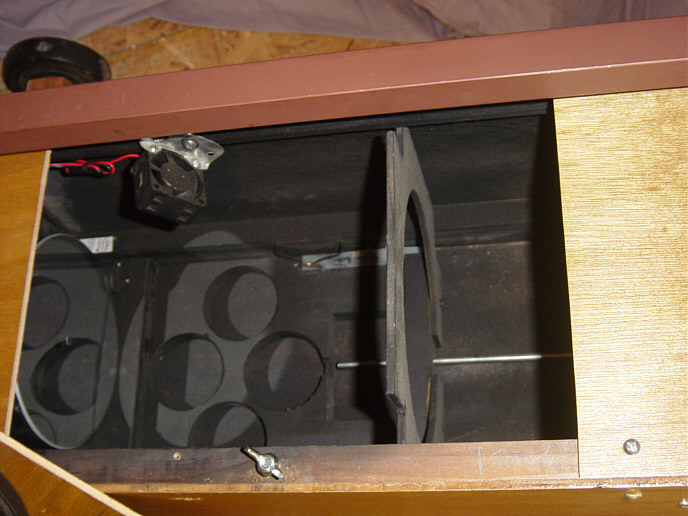
The mirror cell sled is moved by turning the
threaded rod stock --seen on the floor of the tube.
The
sled carries the rear-most baffle and positions the
mirror
via the usual thumb screws in back (mirror is held
against
them only by gravity), as it rests on two one inch
dowels. The
dowels are held in place by screws which are about
1/8th inch
eccentric, such that the mirror can be centered in
the tube by
turning the dowels. Spring clips locate the sled as
it moves.
* Dogson-2 also has centering dowels, but a wooden
threaded rod.
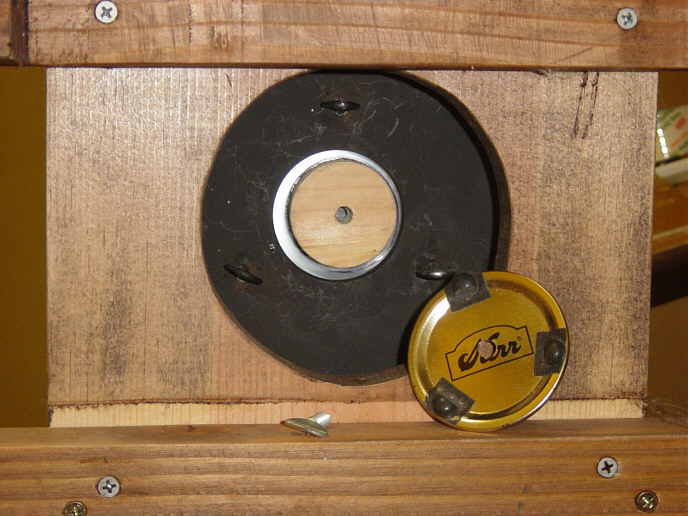
This view of the bottom of the scope and the
back of the mirror cell reveals that a wooden puck
is glued to the mirror's back with dabs of silicone
rubber. There's a 1/4-20 T-nut in the other side of
the center hole which accepts the thumb screw which
holds that canning jar cover in place--
--and thereby holds the mirror captive to the
cell
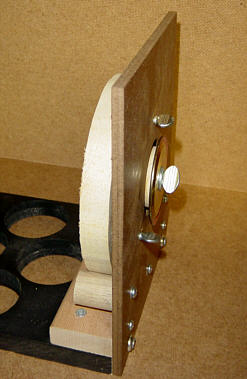
(This cell-sled design isn't beefy enough.)
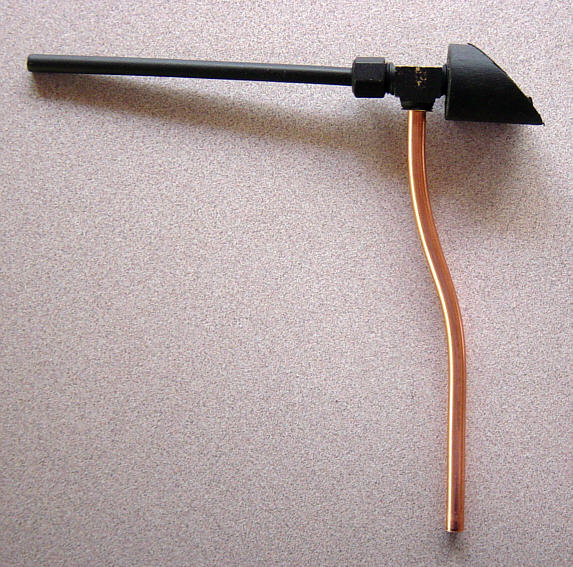
The secondary's copper tubing strut
mount at least looks nice and has a smooth
profile in the beam --
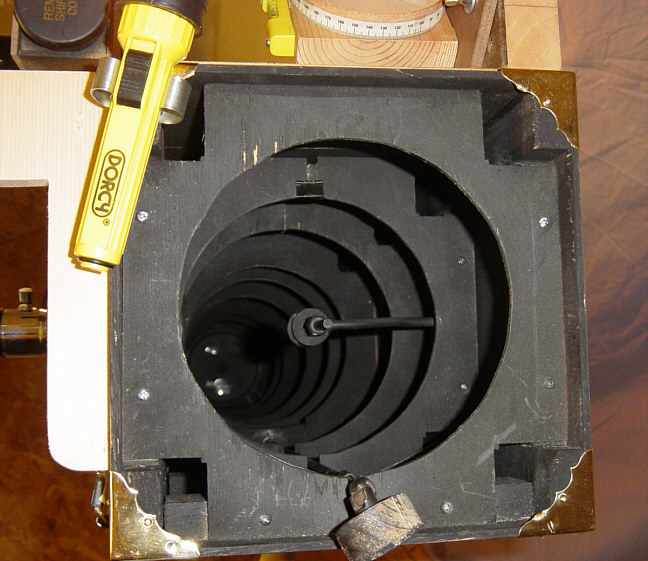
--and it took paint nicely, but I've gone to a doubly
curved
3/16" steel strut for Dogson-2. Also: that universal
joint has been eliminated and it's just the knob now
(for turning the threaded rod which moves the
mirror cell-sled), and it got moved to the left corner.
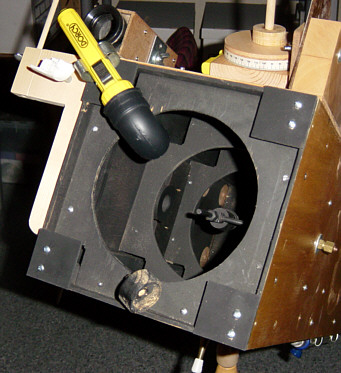
Later on those pretty brass corners got replaced with
sensible corner
baffles. In this photo the elbow light is shining
light pollution down into the
tube, providing some background light for my non-illuminated
crosshair
reticule --for when all that baffling worked too well
and normally ample our city light
pollution and haze cover was insufficient.
I've officially designated the current Dogson project
"DHS-2" in recognition of the resourceful guys, Holcomb and Sellers who
originated this type of telescope. (Holcomb's was a diagonal-less Herschelian).
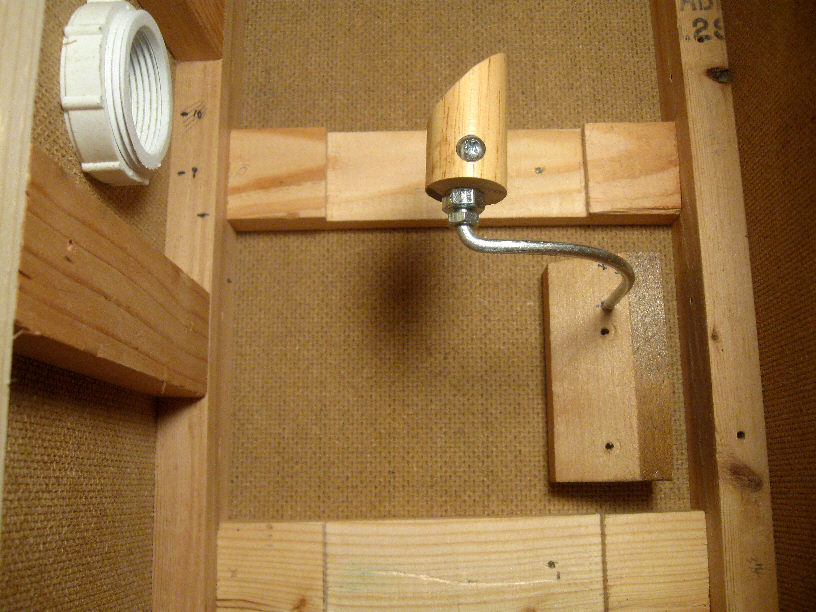
Dog-2's diagonal is supported by a positionable float
block and the whole of it gets involved for collimation.
I doubt that secondary vibration will be a problem,
but
that gap between the nuts carries a dampening washer
--
--and you might like to try this experiment to see
how effective a loose washer can be at stopping
vibrations. (Far better than a dangling loose chain).
Here's the unfinished interior of Dog-2 (only two
baffles this time).
Here's how the "glow finder" works:
This type of glow finder was first described by ATM
Stanley B.
Rowson in 1952 (*click
here*)

Here's the first wire mount --on my old Minolta SLR,
--and here's what you see:
--with the phosphorescent pointer "jumped up", superimposed,
and locked on a distant target.
Here's some stray old ATMing stuff --patched
in (for now):
The pitch lap
(rev: 8/17/2015) (but see newest
comments.)
It had been decades since I last made a pitch lap --thanks
to gifts of mirrors from good friends. I started with some came-with kit
pitch from Willmann-Bell that had been sitting around since 2009. Unsurprisingly,
the W-B "bend test" indicated it was too brittle, so I ended up adding
5 milliliters/pound of linseed oil to get it "right", but that turned out
to be too soft.
Along the way, I realized how vague are the "thumbnail
test" and the "bend test". Just a little warmth from your hands, or the
warmth from working a small piece can make a big difference. So I came
up with the following:
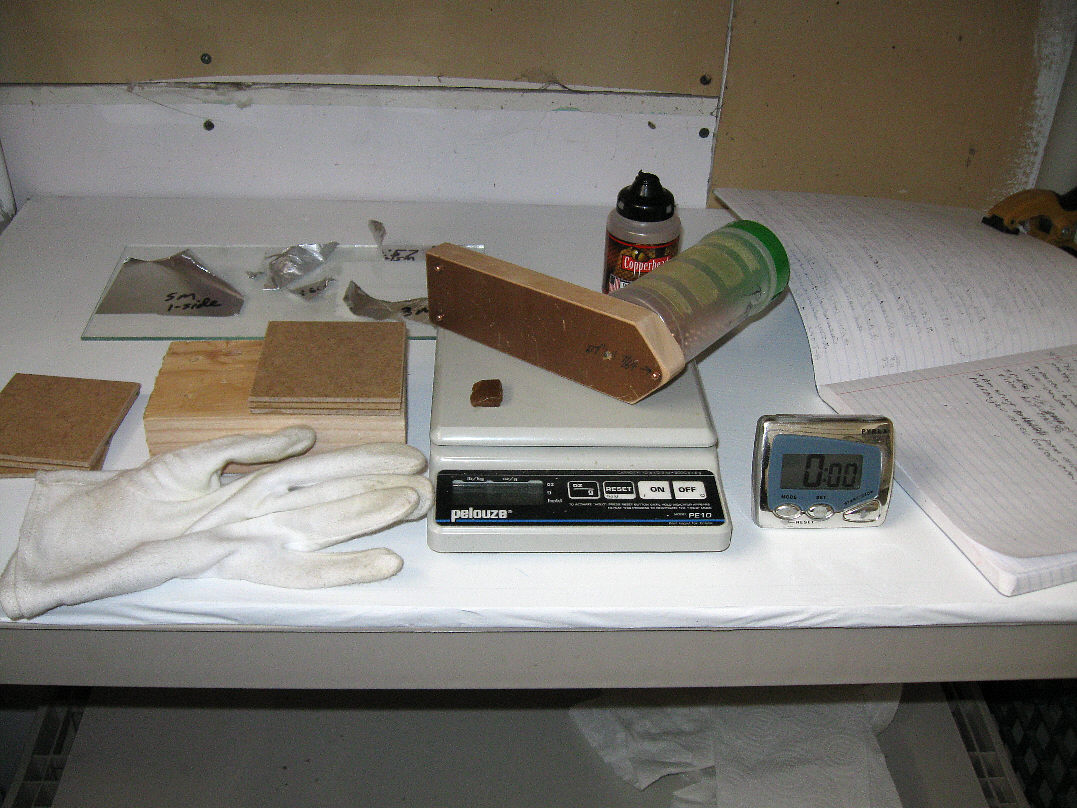
A test for pitch harness
The 1/4" x 1" square pitch tiles are kept in a 68 degree
Fahrenheit water bath until tested and the room temperature (or that of
an enclosing box) is maintained at 68 as well (20 degrees centigrade).
What you see is a hardwood arm with two glued in BB bearings in the back
and a single test BB in the front --captive and located by a 7/64 inch
hole and a bit of "office tacky clay" (wonderful stuff). I added enough
lead shot to that tube such that the scale read 800 grams (with the arm
level).
For more about these tests, see here.
For more about my approach to making a small pitch
lap (ala Jean Texereau), see here.
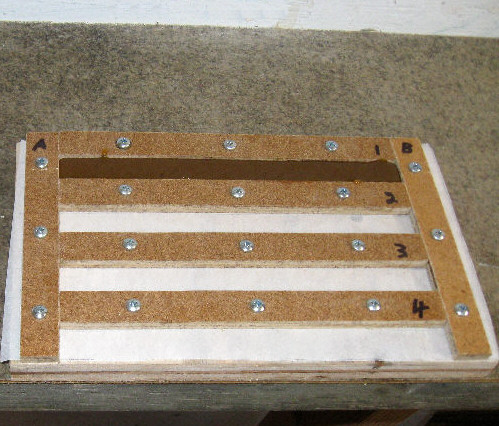
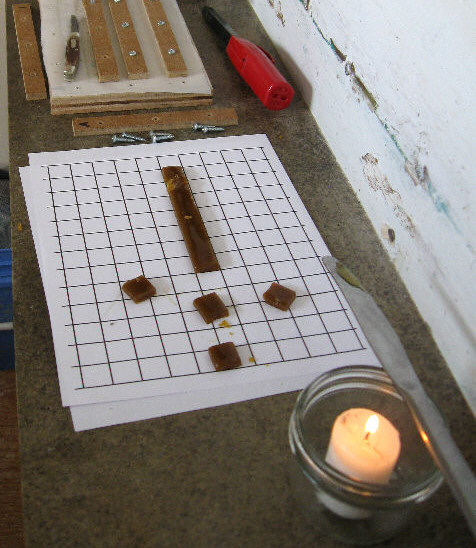
Aluminization
8/17/2015: A seemingly inevitable "hobby killer" which
we all face --the more so as average amateur mirror sizes and shipping
costs increase, is getting a finished mirror aluminized, or recoated. I've
thought about this at length (and haven't we all) in search of alternatives.
Recently I even had a go (several glass-to-aluminum tests and two full
"goes", actually) at gluing common kitchen foil (ie: "Reynolds Wrap") to
a good mirror surface --once with 3M Photo Mount Spray (disastrous), and
again with Bob Smith Industries epoxy (much better --only "horrible" this
time). The idea was to end up with an already figured surface that needs
only a final polishing.
I believe (now) that the aluminum in kitchen foil is
much too soft and ductile for such an application, the adhesive would have
to be more fluid (for thin, even, bubble-free distribution) and very slow
setting, and it would have to stick to the foil. (The epoxy stuck well
to the glass [partially aluminized], much less so to the foil --which might
have had a processing film of some kind on it.)
8/17/2015: Another idea:
* Top grades of aluminized Mylar have (had?) amazingly
good specifications for thickness and surface uniformity, so many attempts
have been made to use aluminized Mylar --alone-- to make a telescope mirror
by biasing it with air pressure/vacuum or electrostatic pressure. Why not
simply make a bag of it around a finished glass mirror and pull a vacuum
--almost any degree of vacuum? I bought a silvery novelty (birthday, "get
well", etc) balloon at our local grocery store and gave that approach a
try. It didn't work for beans.
* Just to see what would happen, I pulled a vacuum
on a disc of ordinary (looked like "single strength") mirror glass. I could
almost find focus at a vague radius of curvature, but the effort held no
promise.
Oh well
Cleaning the mirrors
(rev: 4/9/2016)
Have on hand:
* A plastic shopping bag --large enough to cover the
mirror's cell (if duct taped to mirror).
* 1 quart of 70% rubbing alcohol.
* 1 gallon of distilled water.
* 2 quarts of large pharmaceutical cotton balls
* 2 boxes of unscented facial tissue.
* Roll of paper towels (drying hands, spills, mirror
cell, possibly for blotting, but not rubbing the mirror).
* Dawn dishwashing detergent.
* Three clean pans or mixing bowls.
* Several new surgical gloves (to be worn throughout).
* Teaspoon and a quart measure.
* Good, bright lighting.
* Black electrical tape and 3M Scotch tape
~~~~~~~~~~~~~~~~~
0) Remove the diagonal/mount, primary cell and mirror
from the OTA. (Separate them --or not.)
1) Lay out all your materials onto a nearby table that's
covered with paper toweling.
1b) If the mirror is held in place with clips, This
is a good time to make sure the clips aren't too tight.
2) Cut off the top of the shopping bag squarely (so
as to eliminate the handles).
2b) Open and place the bag on a level surface.
Lower the cell onto it (mirror up) and raise the bag up to the mirror's
edge, pulling it around the cell (assuming it's duct taped to the mirror
--or that you just don't want to remove the mirror from the cell) and snugly
fitting the open end around the periphery of the mirror, using short pieces
of "Scotch" tape to secure it, with the excess folded over and taped down
to one side (about halfway up the mirror's edge).
3) Finish up by sealing the bag in place with one overlapped
turn of black electrical tape. Take care not to run the tape too
close to the aluminized upper edge/face of the mirror. (If the mirror
is held with clips, be sure to dry any water that gets under them after
the final rinse and blotting.
4) Use a laundry tub of a large enough sink, with a
hand sprayer. Scrub and rinse it --spray head and faucet handles as well.
4b) Place a plush towel into the bottom of the tub
such that it's folded over 2 or 3 times where the mirror will rest upon
it. The idea is to somewhat over-hang the mirror's face or to lean it back
a bit, allowing water to freely run off. Be sure the drain is not blocked.
5) Pour out a cup of alcohol into one bowl, mix a quart
of water (slightly warm) and a teaspoon of Dawn into the 2nd bowl. Pour
a pint of distilled water into the 3rd bowl. Set out your cotton
balls, wads of facial tissue and a handy waste receptacle. Have a
few sheets of paper towels stacked and ready to grab..
6) Put on your rubber gloves and lower the cell-mirror
assembly sideways into the tub, such that the mirror's surface is vertically
on edge --resting on the folded over portion of the towel, and maybe securely
leaned back, such that you can see it's surface with good bright lighting.
7) Play/spray slightly warm water onto the face of
the mirror, dissolving and pushing off what dirt it will remove. (Not very
much, in my experience.)
* Some advise to "soak" off dirt and grime, but I don't
think it's a good idea to prolong this or the other steps beyond a few
minutes. I get the impression that the reflective coating can be a bit
hygroscopic. In any event, you should attempt to keep the mirror fully
wet or fully dried.
8) Keeping the water running and lukewarm, the spray
head deployed and handy, completely wet a large cotton ball in the Dawn
detergent solution, then lightly wash the mirror with it, using a gentle,
backward rolling stroke/swipe. Discard the ball before you completely turn
it over-around and start in with another.
* It's critically important that you initially roll
the ball in a direction opposite the ball's travel, such that removed dirt
is immediately and continuously rolled up and away from contact with the
mirror's surface. Subsequent cleaning might be done with one "side" of
a cotton ball per single stroke. (I get 3 such "sides" per ball.)
9) Immediately rinse off the mirror with the spray
head.
* Does it look clean already (or as clean looking as
it's likely to get)? If not, repeat steps 8 and 9. Any grime
or greasy "smear" should come off. Caked on deposits might take 3 soap
sessions --and you'll probably have to gently swab (not scrub) to get the
mirror clean. (You might read elsewhere about "using only the weight of
the cotton ball" or some such. That's not likely to do the job.)
10) After the final spray rinse, completely wet a fresh
cotton ball in distilled water and very lightly rinse the mirror with it.
Do this several times with fresh balls.
11) Now rinse again, using the bowl of rubbing alcohol.
(The alcohol might now be removing what water and soap could not, so turn
the cotton ball as you rinse/wipe.)
12) Dry by blotting/pressing with wads of facial tissue.
Quickly follow with fresh tissue wads.
* Spots of water are tenacious. Designed to be
absorbent tissue is essential. Gently wipe/brush to dry only as you have
to --but be quick enough about it that droplets are not allowed to dry
by evaporation.
13) A clean dry mirror accumulates static electricity
and dust --like a magnet. Use a small squeeze bulb air puffer hand to blast
it off (which, of course, imparts more static electricity). A camel's
hair lens brush also works --and also leaves static electricity.
(In the bad old days we could buy a radioactive darkroom photographer's
negative brush, which would discharge the electricity. I believe
they used polonium.)
4/14/2016: * I've had Dog-2 outside several times
now. (We might get one good night a month during winter near the Oregon
coast.) The dropping in and removal of the primary (to its sealed and desiccated
box) goes swimmingly.
* Presumably, such an approach, or maybe an arrangement
for placing an air tight desiccated cover over the primary of a larger
telescope, could preserve a silver coating indefinitely. The Reverend Ellison
(pages 102-103 of ATM-1) reported such results using lesser efforts. (The
cost of silver nitrate is quite high now, but so is the cost of shipping
a mirror --especially a large one.)
* As to mirrors which remain exposed: the advice in
Sidgwick's Handbook, sections 7.2 and 7.4, runs opposite our common practice
of only washing a mirror when it's become ungodly dirty. The recommendation
is to preventively wash an aluminized mirror with detergent ("Dreft")
--maybe every 2 months --especially if near the ocean --and even if it's
a silicon dioxide over-coated mirror.
Again, here's the mirror/cell
compartment access:

--how the mirror is held in place by one thumb screw
(dummy mirrors in these photos).
The current cell sled is far more robust, but
the mirror is still located and collimated
by gravity versus 3 solder tipped
thumb screws and 2 eccentric support pegs:
--and where it's kept --with a handy pair of white
cotton gloves, when not being used:
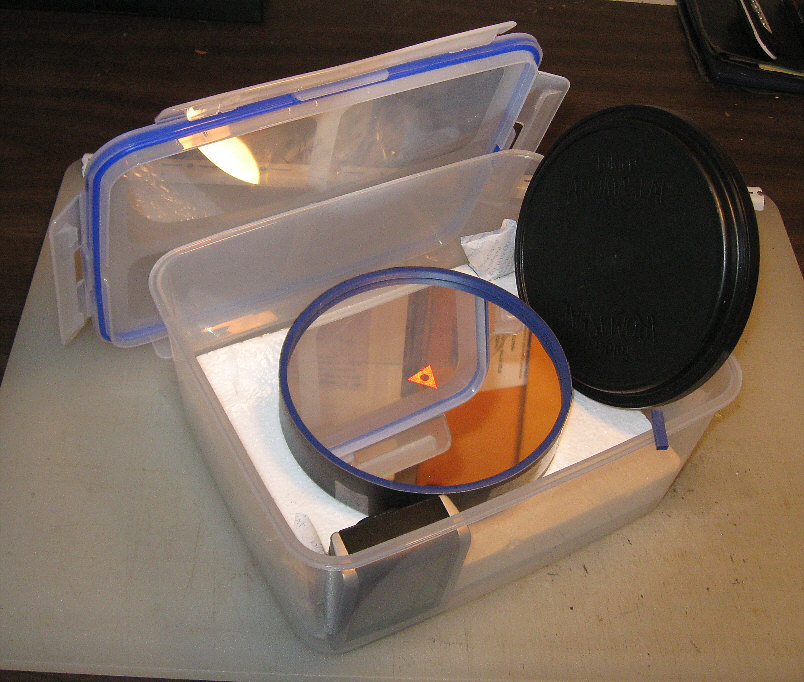
This "Snapware" keeper contains desiccant and a thermometer-hygrometer
unit which displays its highs-lows memory. The keeper is stored in my unheated
shop, so the mirror starts out a bit above outside temperature. That blue
surround is a smooth, aperture defining, square cross-section O-ring. It
covers 3 un-aluminized vacuum chamber support marks and is held in place
with a paper collar. This is probably a good idea, even if you have nothing
(like a turned down edge) to cover up.
* There use to be a wrapping paper for silverware
and plated silverware, guaranteed to prevent tarnish. My copy of "Fortunes
In Formulas" sez it's made by dipping wrapping paper into a solution of
sodium hydrate and zinc oxide. (Preparation details on request.)
Bearing Friction Tests
(for alt-az bearings, such as in Dogson mounted telescopes)
(rev: 5/25/05)
Unless otherwise specified, all these materials were
dragged along a fairly smooth "Formica" (Wilson Arts equivalent) surface
--namely: the counter top in our kitchen. I made a little sled arrangement
and pushed it along with a home-made/calibrated gram force gauge.
These tests could be run over again using Wilson Arts
"Ebony Star" --that pebbled stuff which is THE favorite for Dobsonian bearings.
(I special ordered it in, but it arrived here long after I first did these
tests.)
Materials
Creeps Static 3 in/sec
12 in/sec Comments
friction Friction Friction
4 1/2" dia cork pads
170 gram 92 gram 92 gram
4 1/2" dia soft felt pads
65g 47g
65g
2 1" dia hard felt pads
60g 47g
47g
1 5/8" dia soft rubber pad
65g 47g
65g
x wooden block (pine)
120g 47g
47g
1 1" "Slideglide"
(Shepherd #9452)
32g 28g
30g Pretty good
1 1" "Slideglide" roughed
30g 28g
30g Quite good
1 1" square, smooth black Teflon
35g 30g
35g Some jerkiness
1 1/2" sq Blk Teflon, roughed
30g 28g
32g Quite good
3 5/8" dia nylon glides
32g 28g
30g Surprisingly good
Fuzzy Velcro, Lt. duty (loops)
70g 50g
jerky
Hard Velcro, Lt. duty (hooks)
35g 30g
35g pretty good!
Fuzzy Velcro, Hvy duty (loops)
65g 40g
Bad jerky
Hard Velcro, Hvy duty (hooks)
65g 40g
Bad jerky
Teflon (smooth) running
on milk jug
30g 20g
jerky
Milk jug running on Formica
35g 25g
jerky
Same as above, but add dry
soap
15g 05g
jerky
Teflon (smooth) on Formica
plus silicon lube
very jerky
Materials
Creeps Static Description of dynamic
Comments
friction creepage performance
Teflon (smooth) on Formica
plus dry thin soap smear Yes
---> 5g to 10g range
Some jerk
(Ivory, Teflon unsoaped)
Teflon (smooth) on Formica
plus dry thin soap smear Yes
---> 5g to 10g range
Some jerk
(Ivory, Teflon soaped)
Teflon (roughed) on Formica
plus dry thin soap smear Yes
---> 15g to 30g range
no jerk
(Teflon unsoaped)
Teflon (roughed) on Formica
plus dry thin soap smear No
20g 15g
jerky
(Teflon soaped)
Teflon (smooth) on Formica
plus heavy soap smear
Yes ---> 25g to 65g
range no jerk,
excellent
force proportional
creep
Teflon (smooth) on Formica
plus heavy soap smear
Yes ---> 15g to 20g
range no jerk,
good
but with path worn shiny
proportional creep
Teflon (smooth) on Formica
plus heavy soap smear
Yes ---> 15g to 25g
range no jerk
with path moistened
still good
* January 4th, 2019 update:
* Am now using 7 inches of 2x4 (weighs 355 grams) for the sled and
3 test pads for the feet, adhered to the 2x4 with self-adhesive of with
Uhu brand "office tacky clay". I have the same smooth, Wilson brand kitchen
counter top and gram force gauge. What prompted this entry was noticing
how easy it was to gently slide my (filled to the limit) "Mr. Coffee" maker
across the countertop without sloshing out any water. I removed its foot
pads and cut them into 3 fresh surface test pads. I don't know what the
stuff is, but it feels like baby soft rubber.
Materials
Creeps Static Description of dynamic
Comments
friction creepage performance
Old Mr. Coffee foot pads
on freshly washed/dried Yes!
<220g 220g creep to 600g+
Start of creep is
counter top.
Excellent creep/stiction imperceptible and
proportional
The nearest (tactile)
equivalent I could find on Yes
~120g 120g creep to 170g
No jerk, slow creep
hand as old 5/16" pads (Wax-
Good creep/stiction start, but
slide
man or Shepherd brand --not sure)
rate zooms.
New Waxman, 5/16" "Soft Dot" Yes
170g 170g to 275g and somewhat Proportional
creep
"bumper" pads (in Pkg #2101)
jerky.
at lower end range
New Waxman "Raised Bumpers". No
170g 120g at any rate and
Plastic, 3/8" dia. Pkg #2101
very jerky.
Stamp pad type stamp rubber No
220g 170g at any rate & jerky
(freshly resurfaced)
A typical add-on pencil No
170g 130g at any rate & jerky
eraser (cut up into pads)
A classic, Papermate brand, Yes!
~170g 170g to 470g & rates are Excellent.
Imper-
"Pink Pearl". Mine is an old
force proportional ceptable
creep at
eraser but it's still sold.
the start of range
Eberhard Faber "Rub Kleen" Yes!
~220g 220g to 600g+ & rates
Excellent. Imper-
"Design" (An old eraser^
proportional to force ceptable creep at
which is no longer sold)
the start of range
Staedtler "Mars" plastic No
220g 180g at all rates & jerky
eraser
An "Art Gum" eraser.
(Have yet to find or acquire a sample.)
** I call this creepage "Lewis effect", a salute
to Martin Lewis, who first advocated force proportional, intuitive, hand
guidance --based on a special material he found: "PFA" and "PFFA" sheet,
normally used as a release sheet when applying heat transfers to T-shirts.
See his article in the October 2003 issue of Sky and Telescope. "Stiction"
refers to the jerky difference between static friction (the force it takes
to get unstuck) and (the usually lower) sliding friction. See also:
http://astro.umsystem.edu/atm/ARCHIVES/OCT03/msg00417.html
~~~~~~~~~~~~~~~~~
In general:
* Soap, other organic lubricants and "creep agents"
(molasses?) are difficult to use in an environment which is subject to
dew and running moisture.
However, since Ivory soap worked so well when wet,
one might consider placing a renewing stick of it next to the Teflon pads,
or simply re-applying it by hand as needed.
* It's tempting to try making small hydraulic struts
out of PVC pipe, O-rings, and such instead (as Chuck suggested, to achieve
pressure proportional creep rates), but I think I'll pass on that.
* The use of Velcro hooks patches is also tempting
--and I'll try them. They should be immune to contamination. I suspect
I'll need fairly large pads, lest the hooks bend over and produce hysteresis
effects when I try to reverse the slew direction. I get the impression
that it works because hundreds of plastic legs bend and "walk" along. The
heavy duty stuff I tried appeared to have much thicker and shorter hooks
(under a microscope). Both light and heavy duty had rounded hook tops,
since they're merely loops which have been sliced on one side. Apparently,
the mating "fuzzy" loops Velcro worked poorly because those loops are too
densely packed to bend and "walk".
* Lewis' objective
is to be able to guide a Dobsonian type 'scope with hand pressure. Previously
I was trying for a "joy stick" guidance arrangement --which would verge
on actual tracking ability (for up to 100 seconds): moving the stick x
distance to move the scope 1/100th x. It would really be nice to simply
push on the stick to achieve the desired rates, rather than to accurately
move it.
Ocular problems and imaging:
I bought a bargain Meade 26mm Super Plossl "LP" 4000
series eyepiece from the Surplus Shed and it turned out to be an oddball,
specially made for ETX telescopes. The barrel fits loosely in my focuser,
measuring 1.231 inches in diameter (will add some tape), compared to 1.240
inches for the other two standard 4000 SP eyepieces I have. More
importantly, it's probably the only "4000 series" eyepiece that isn't par
focal. I had to back it out 5/16" (8mm) to focus on an object that I had
looking through my Meade 9.7mm SP-4000. Other dimensions (barrel, body)
are different too.
I'm wondering, however, if the "LP" isn't the better
eyepiece anyway. I'll have to repeat my comparisons (and hopefully against
other eyepieces) to be sure, but in my "first light" tests on Jupiter,
there seemed to be a halo --or cone-- of halation around the planet with
the standard lens, which wasn't there when using the "LP". (Update:
confirmed that again with the new mirror -6/5/2005.) I also saw quickly
skittering ghosts --thinking they were meteorites at first. (Update: not
sure of that now.)
** It's important to note that I have an epiretinal
membrane in my right eye, vitreous floaters and deterioration in both,
so it takes me some while to sort out just what I'm all looking at. I don't
use much less than a 1mm exit pupil on account of my eye problems. Eventually
my friends will confirm what I seem to be seeing.
Here's how the two 26mm and my 9.7mm eyepieces compare
in a casual test of their anti-reflection coatings:
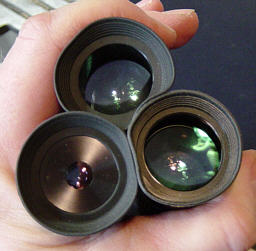 The standard 26mm SP-4000 (from Harden Optical) is at
top, the "LP" version (from www.surplusshed.com) is on the right. At this
angle (to an overhead incandescent trouble light) I see more and brighter
reflections in the "LP" 26mm. The two standard 4000 series oculars have
similarly colored reflections, the LP looks greenish-brown by comparison.
It appears that the eye lens of the LP isn't black edged.
The standard 26mm SP-4000 (from Harden Optical) is at
top, the "LP" version (from www.surplusshed.com) is on the right. At this
angle (to an overhead incandescent trouble light) I see more and brighter
reflections in the "LP" 26mm. The two standard 4000 series oculars have
similarly colored reflections, the LP looks greenish-brown by comparison.
It appears that the eye lens of the LP isn't black edged.
By turning this threesome a wee bitty: the standard
26mm shows a bright, full scale reflection flash. Must be a plano lens
surface in there someplace (uncoated?). I can see the same flash looking
in from the field lens too, but I couldn't see any such flash in the other
two, fore or aft.
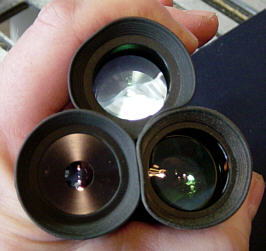 Here's what those 26mm oculars look like under an overcast
sky (the "LP" version is on the right).
Here's what those 26mm oculars look like under an overcast
sky (the "LP" version is on the right).
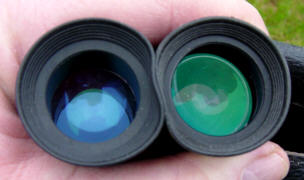 Here's what the 9.7mm SP-4000 looks like closer in --catching
a single 2-tube fluorescent light fixture this time:
Here's what the 9.7mm SP-4000 looks like closer in --catching
a single 2-tube fluorescent light fixture this time:
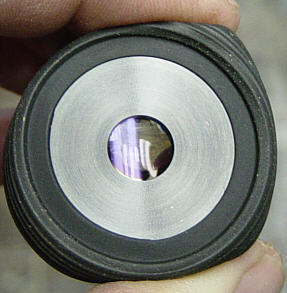 I ordered up 25mm and 10mm coated (they didn't state: "fully
coated") Kellners from the Surplus Shed (see: http://www.surplusshed.com/
I ordered up 25mm and 10mm coated (they didn't state: "fully
coated") Kellners from the Surplus Shed (see: http://www.surplusshed.com/
---for comparison and found them to perform fairly well.
The 25mm is at least as bright, free from halation, and sharp as the Meade
26mm LP, but it does have a faint ghost on bright objects (like Jupiter,
don't see it otherwise) which moves across center in the opposite direction
of the primary image. I didn't think their 10mm Kellner was nearly as good
as the Meade 9.7mm I have (which doesn't have any halation or ghosts).
I'm tempted to order the Surplus Shed 25mm Plossl, as well as two more
25mm Kellners --which have a nice field stop landing for home-made reticules.
My ocular case is a "Biokips" brand
plastic storage container with a snap-seal top:
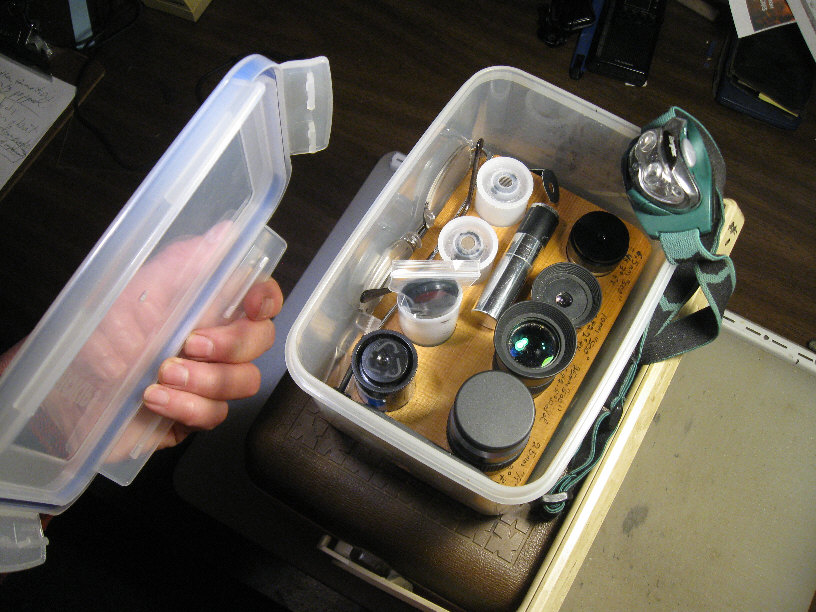 --but you want it to be dry and warm in there before sealing
it up. That's my head lamp hanging off the corner, the "lipstick" thing
is a lens brush, my "finder glasses"
are to the side, mini-bagged filters are pushed down into a 35mm film can,
and those two other film cans are actually "Ronchi eyepieces", for null
testing a mirror with star light. The separable case underneath holds a
camera and associated gear.
--but you want it to be dry and warm in there before sealing
it up. That's my head lamp hanging off the corner, the "lipstick" thing
is a lens brush, my "finder glasses"
are to the side, mini-bagged filters are pushed down into a 35mm film can,
and those two other film cans are actually "Ronchi eyepieces", for null
testing a mirror with star light. The separable case underneath holds a
camera and associated gear.
** These cases don't go outside, so missing here is some
sort of an under-your-coat "photographer's vest", "fisherman's vest" or
sling with a number of small clean pockets --for what does go outside.
You want to keep your eyepieces warm, such that your breath and hot eyeball
doesn't fog the eye lenses.
The Sky Compass:

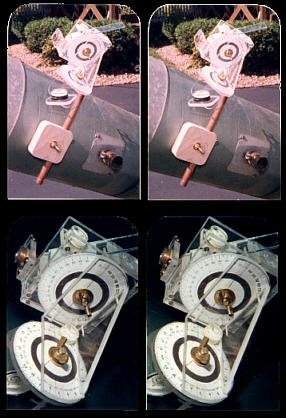
At left is a ball based equatorial "Sky
Compass", recently following the two (in the above stereo pairs)
from 30 years ago, none of which have I used in earnest
--just tested them to see if they worked (yes).
* The alt-az Sky Compass is the type which got used
(with a better compass and spirit level) and it worked fairly well --especially
for the altitude setting. It needs that 360 level for steering to high
altitudes. It (of course) also needs a sky program application and a computer
--if only as some sort of a hand-held digital device.
* The ball type steers to the local hour angle and
declination of an object, such that it might be used with a sidereal clock,
and without resort to a computer^. (Just any clock set to sidereal time
for the night will do, since it would lose only 10 seconds per sidereal
hour.) ^These equatorial sky compasses plus the 'scope amount to
a torquetum: an analog computer.
Binoculars
What alluring things, these affordable optical jewels!
(updated: 6/24/2017)
* Mel Bartels
conducted and posted an account of the recent Oregon Star Party's "Walkabout"
(Google it for now), in which we get to meet a number of amateur telescope
making/modification projects. Among them this year were the head/helmet
mounted binoculars exhibited by Rob Brown and his son Quinn --the simplicity
of which spurred me to dredge up decades of thoughts and memories of others'
projects to tame these wonderful, terrestrially oriented instruments for
astronomical use.
* My first thought: how natural it is to use a pair
of binoculars. They hang on your neck. You look at something in the distance
and raise the binoculars to your eyes (and maybe touch up the focus). Simple.
* The second thought is about craning to look at something
high in the night sky and ---*oh* but my neck is starting to hurt ---and
hey: my dang hands and arms keep shaking!
* I've long thought about what
might be the most practical way to use them --as have so many others --anyone
who's suffered that crick in the neck and tired arms. There are many fine
plans for binocular holders (counterweighted with parallel arms, even merry-go-round
rigs that carry the observer as well). The second best one I've seen is
the "StarRocker" (see below) --but it's a far cry
from simply lifting binoculars to your eyes, plus it amounts to a piece
of heavy lawn furniture!
* My friend Chuck and I looked
hard at the mirror idea, which allows one to comfortably look down at the
sky, but then your field is mirror-reversed and upside-down --although
that can be replicated with sky program print-outs.
* Well heeled folks can afford
binoculars with angled oculars, but then you're committed to moving your
binoculars in altitude --90 degrees for 90 degrees, whereas the illustrated
mirror arrangement might be modified to tilt just the
mirror --45 degrees (+/-22.5 degrees) for 90 degrees of sky.
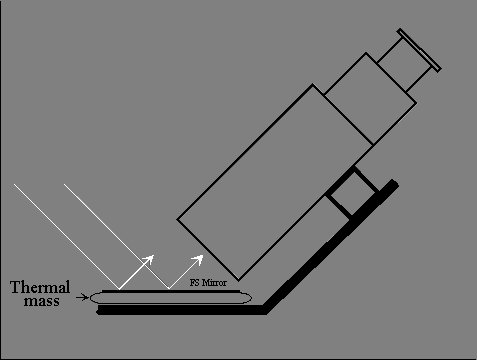
Something like this might work for VSOing
with wide field binoculars or a monocular/'scope.
* The dew problem should be beatable
by gently heating the mirror --the wave front errors being much less of
a problem at sub-telescopic 8x to 20x powers. Short of prolonged observing,
that might be accomplished with the illustrated warm thermal mass.
*Another thought: put a heating
pad (plugged into a proper, GFI'd outdoor receptacle) under the glass top
of your small, round, sturdy, 3-legged garden table, such that everything
upon it remains dew free. (It's my limited experience that this can take
a surprising amount of heat.) The sliding base of your binocular mount
would have holes, so as to duct warm convected air up onto the underside
of the big mirror.
* As pleasant a prospect as this
might seem (looking down at the stars, your clock, charts and notes all
together and near to hand on a solid, dry table top), again: the "spirit"
of binoculars is to look directly at the target and navigate intuitively
across the sky.
* However: if the mirror is large
enough, you could look over your binoculars and through it at the (mirror
reversed, upside-down^) sky --for your "intuitive navigation", mounting
a small glow finder on the binoculars to help center
your quest. Again: your printed-out charts for the night can also be mirror
reversed and inverted, but (of course) with normally reading legends, which
your sky program (like "Guide-8", say) might allow of.
^ I tried this once, and more
recently modeled it in my office area. Crazy making, it is. (Hope I've
gotten the following right:)
A mirrored view through a terrestrial
instrument (binoculars, spotting scope, rifle scope, or use of an erecting
eyepiece) leaves you reversed and upside-down. An astronomical instrument
(say: a reconstructed "straight through" binoculars or monocular sans prisms)
rights the view --but: it's still mirror reversed. With a fixed mirror,
you'd tilt the monocular downward to look more upwards, but the combined
monocular + mirror would tilt up-down right/as expected. A
fixed binocular or monocular with a tilting mirror would also swing
intuitively up-down. Of course, turning such an instrument + mirror left
and right comes out correct (albeit upside-down).
* The base mount and binoculars
attachment should be fairly heavy with glides beneath --and have the afore-mentioned
altitude adjustment via tipping the mirror, such that no neck craning is
required.
* So: just how useful are a pair
of binoculars for observing?
* Might a monocular (aka: a short
focus refractor) perform well enough? You'd still want a large mirror for
intuitive/visual navigations, of course, so the rig's foot print would
be about the same.
* The Gallows Mount:
Over the years (decades, actually)
I've struggled with photography type tripod lash-ups and 3 binocular wrangler
contraptions of my own design. The first two were pitifully inadequate.
This 3rd lash-up, dubbed "Gallows-2b":
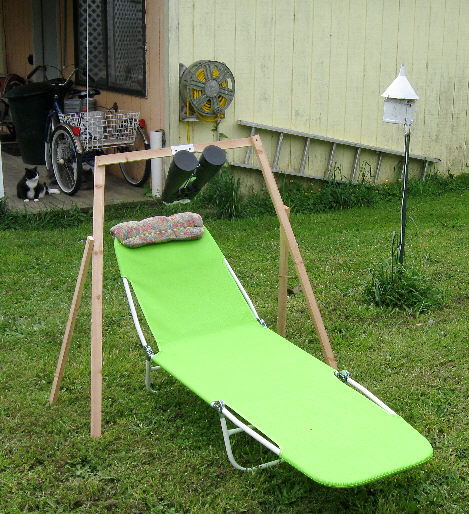
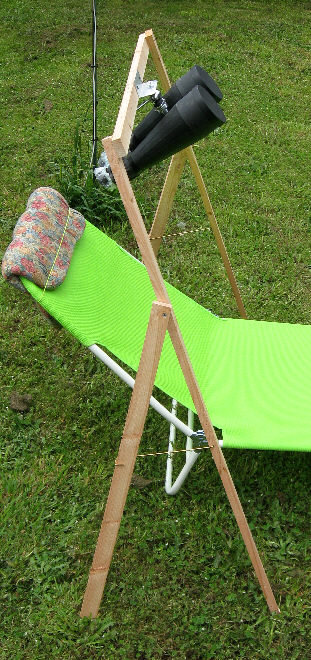
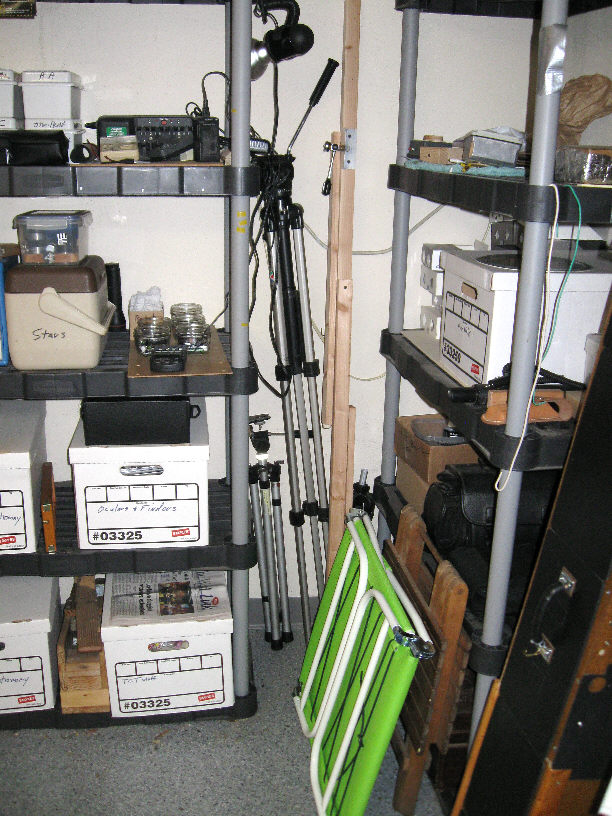
Gallows-2b (Click on these
images to enlarge them.) At right: lounge chair and binoculars mount folded
up.
Those are Konusvue brand 20x80
binoculars, which sold for about $90 from Surplus Shed in 2007.
--looks nice enough, but changing
position (by more than 15 degrees or so) makes for fumbling and stumbling
in the dark --especially for an old guy with sore joints and neck, trying
to deal with that treacherous cheap lawn chair.
The deal breakers are two rather
large, semi-feral tom cats: "Daddy-O" and "Fluffy", who are delighted to
have me come out to play at night. They crawl up onto my stomach --and
*kavetch*. (That's Daddy-O in the first photo.)
** One option:
~ Bite the
bullet of mirror reversal and build a "look down" rig.
~ Make the
mirror large enough to allow full altitude adjustment by tipping
it (maybe with a setting circle).
~ Simply
look at the night sky through the (large enough) mirror for eyeball navigation,
using a mirror
reversed and inverted chart print-out for the session --and a glow
finder on the binoculars.
~ The base
has a transparent azimuth circle with lines to match north-south lines
under the glass table top.
~ The sturdily
built table would be round, 24 to 30 inches in diameter, have 3 leveling
feet, a glass top with
an adjustable heater beneath --hot enough to keep dew off of everything
on the table. (A cheap table
might work fine --by adding a 3-point hanging concrete block weight beneath.)
~ Consider
adding a projected sky grid and an adjustable brightness artificial star
(or a "bright field" spot).
* There
use to be a commercial rig/mount for binoculars which looked down into
a tipping mirror. It was the "Sky Window", made by Trico Machine Products
and announced in 2001 by a favorable Sky and Telescope product review.
Unfortunately, I see no indication (yet) that this product is still being
sold --perhaps because most folks bought a front surface mirror and made
their own rigs at home. Here's a link to DIY plans:
> http://oneminuteastronomer.com/1170/window-sky/
--for a mount that's very similar to the Sky Window:
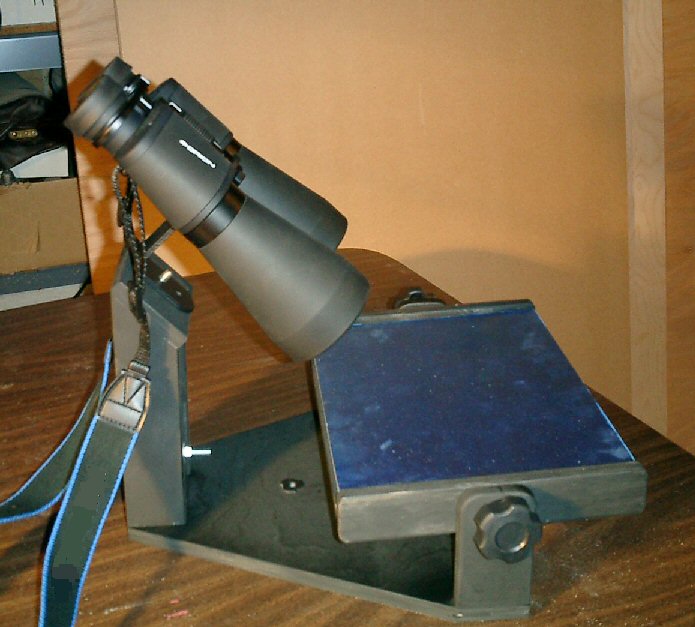
Imagine this rig with alt-az setting circles, a glow
finder, 360 degree leveling bubbles, adjustable feet,
a sturdy round garden table, a reticule plus star
projector and a mirror heater. (photo by
one
minute astronomer)
~ An average piece of 1/4" plate
glass, cut to size, chamfered and sent in for aluminization --might do
for a pair of 7x to 10x binoculars. Trico considered 20x80 binoculars to
be the limit for the glass they were using. (Be sure your aluminization
service applies a good protective overcoat.)
~ Keep your fingers off the mirror,
keep a close fitting, soft cotton cloth lined cover handy and put it on
the mirror when not being used. This will also slow down cooling and dewing.
A rubber edged, sealing cover with a desiccant packet compartment might
be better --especially near the ocean.
* I want to at least have the capability to do some
actual "astronomy", pursuing a modicum of visual astrometry and
photometry
with such a "Sky Window" type rig --then learning how to sketch what I
see --with the aid of a reticule grid. (I think marking up a grid bearing
chart print-out would be the simplest approach.)
~ I can imagine projecting an adjustable
"artificial star" point of light into my field of view, but when I last
tested myself, I was terrible at comparing and calling magnitudes visually.
I should give it another good try, but I probably need some other kind
of a gimmick --like the "bright
field" spot .
~ "Extinction" methods are pretty
rude. I tried stopping down --no good. Introducing neutral density filters
(using a pair of polaroid filters) was no better. (Of course, defocusing
or diffusing stars so that they become "spots" will severely impact star
brightness.)
~ To judge the position of a star,
I can imagine projecting a rotate-able hairline grid --into one of the
binoculars' objectives, using a small mirror and a miniature lensed flashlight-like
device.
** Howsabout: junking out a pair
of binoculars for the objectives (and maybe the oculars) and building a
purely astronomical instrument --perhaps no longer troubling with binocular
vision --ie: a small, short focus refractor with a re-inverted image (so
the view would be right-side-up, but still mirror reversed)? Eliminating
half or all the prisms would let through more light. Using conventional
oculars would permit of astrometric reticules and changes of power/field.
**Finally, there's Don M's appealing
"StarRocker" invention:
 He offered it as an easy DIY, using off-the-shelf components
(like the Walmart $29.95 "video rocker gaming Chair" that it's built around).
(One might want arm rests, for which a side-boarded lap tray could answer.
It would have bulldog clips and a reading lamp for notes and a chart.)
He offered it as an easy DIY, using off-the-shelf components
(like the Walmart $29.95 "video rocker gaming Chair" that it's built around).
(One might want arm rests, for which a side-boarded lap tray could answer.
It would have bulldog clips and a reading lamp for notes and a chart.)
* Could this also mount a small refractor telescope
--maybe a "department store telescope"?
Here are the links:
> https://www.cloudynights.com/gallery/member/56282-don-m/
> https://www.cloudynights.com/topic/235877-bino-chair-starrocker/
(for 3 pages of discussion)
I'll copy over some of text here, since it needed cleaning
up (wrong quote marks text standards and such).
The below long quote is from what was posted September
7th, 2009 to Cloudy Nights by "Don M" about his:
"The StarRocker"
Enthusiasm for binocular astronomy is generally plagued
by two things: "how do you hold 'em still", and paying the chiropractic
bills to fix your neck after an observing session!
I have grown weary of leaning against trees, adjusting
tripods and lawn chairs and lying on the hood of motor vehicles while trying
to find a workable way to view the object of interest. As I considered
constructing a viewing "aid" to ease the problems associated with binocular
astronomy I wanted to meet the following criterion.
- Provide a "stable" view.
- 90 / 360 degree proportional slewing without leaving
your seat.
- No neck or muscle strain.
- No counter weights.
- Inexpensive. (May cost less than inexpensive binoculars!)
- Easily adjustable for different size users.
- Built from "off the shelf" materials.
- Construction friendly [with] common tools.
- No batteries or external power required.
- Be able to switch binoculars easily in the dark
with no tools.
- Perform effortlessly enough that all attention may
be directed to the fun and
excitement of viewing, not the equipment.
- Must be transportable in a car without disassembly.
The StarRocker (as my wife named it) has worked very
well for me and has increased my enjoyment of binocular astronomy a great
deal! From a design standpoint I realize that perfection is a beautiful
unattainable goal. Although the StarRocker is by no means perfect, this
device works extremely well and I feel that essentially all objectives
have been met!
Oh yes, you can see your heart beat! However, as you
calm down it diminishes considerably and is just not an issue! My viewing
time is about evenly divided between my 10 x 50s and my 15 x 70s. Being
able to easily switch between them with no tools, in the dark, is very
desirable.
The ability to track essentially any object in the
sky with the StarRocker produces a very special freedom. When viewing an
object of interest, a "side trip" to view an unexpected visitor, whether
an airplane or the ISS, is easily within your grasp.
I am aware of the robotic type of binocular chairs
that have been built and marketed. These are truly awesome but perhaps
a bit cost prohibitive for many amateurs. As ATMers know, it is fun, exiting,
and rewarding to build your own equipment. The StarRocker is an easy build
project which lends itself to many variations and improvements - I am sure,
that's what ATMing is all about!
The StarRocker has dramatically increased my enjoyment
of binocular astronomy. Perhaps the main drawback is that the answer to
that old question: "How long are you going to be out there?" has to be
modified from: "Just a few minutes" to: "Less than an hour --I think"!
The StarRocker has added a degree of excitement, comfort, freedom, and
fun to binocular astronomy that I've only imagined in the past.
While discussing amateur astronomy, ATMing, binoculars,
CCD imaging, and telescopes, with a friend, he said of the hobby: "What
a beautiful addiction!" (Sleep deprivation is detrimental to your general
well being you know!) In times of high fuel costs - traveling with the
StarRocker will take you light years for pennies!
~~~~~~~~~~~~~~~end quote/edit
* For those interested in large fields of view, binoculars
call to us. Assuming a preference and/or a financial reason to use oculars
with a 50 to 60 degree apparent field of view (and let's go with 60 for
now), we're talking 10x power for a 6 degree actual field --and that sure
sounds a lot like binoculars.
Assuming dark adaptation and your eyes at 6mm, then
we can only make use of 60mm of aperture. That also sounds like binoculars
(and there's no secondary shadow hit to your best core vision).
* Aside from an unobstructed view, a natural erect
image, intuitive finding/tracking, and being able to use both eyes --there
are issues of light loss through the prisms and an "impossibly short" focal
length --for a pair of doublet refractors. Of course, we've learned to
accept/ignore image deterioration to the edges of affordable binoculars.
One simply centers up what's of interest.
Clocks
(revised: 8/16/2016)
* Previously, I used the "works"
from a quartz analogue travel-alarm clock, in which I connected the clock
drive to the alarm piezo device. It went CLICK-click-CLICK-click, by which
I could time my exposures. Of course, after going digital, neither that
nor taking notes about exposure was any longer needed. I also used an inexpensive
talking watch from Radio Shack and a pocket diary.
* After that I went to a microsette
recorder, which was Velcro'd to my clipboard, along with an illuminated
travel clock which reads out the seconds.
* Finally: I've gone to a retired
Motorola cell phone (a compact "flip" phone, but old enough to have a pull-up
antenna) which has a very nice voice memo utility, displaying it's sound
files with time-date stamps. This particular model charges through a standard
mini-USB port and shows the time through its flip cover whether on and
illuminated or not (a high contrast passive display).
Newer cell phones don't need
a contract or prepaid minutes to be very useful. They tell the exact time,
WiFi onto the net, alarm, memo, take photos --on and on, and you can pick
them up new for as little as $10. Our TracFones (LG, Huawei, and an older
Kyocera) and the (sold by Verizon) Motorola are always in synch with the
WWV short-wave time signal --as long as they can connect with a cell phone
tower --but none of them display seconds.
** I think it's worth your while
to see what your cell phone camera can do as an "afocally coupled" telescope
camera. You should be able to get the photos out of your cell with a $5
adapter cable to your graphics computer. (If you have no personal computer,
explore doing astronomy with i-Phone or Android applications like "Safari"
(something I have next to no experience with).
An ordinary wind-up clock can be adjusted to run on
sidereal time.
This nice looking Chinese made clock was purchased
new in 2016, but it needed work to get the face to fully line up with the
hour hand's pointer at 3, 6, 9 and 12 O'clock. After that, the minute hand
would periodically lead or lag by about a quarter of a minute. (I'm guessing
that the plastic gears inside aren't exactly round.) This performance is
plenty good enough for steering to the local hour angle with a 3.5 inch
skyball compass --and it might be tough to find an alternative wind-up
clock with a seconds hand (for setting the escapement rate to sidereal
time). I paid $10.99 (not on sale).
For a complete ensemble, you need a sidereal clock,
a star catalogue (Uranametra-2000, and/or sky charts, and maybe throw in
a good planisphere) --plus a current ephemeris for
planets and the Moon. (Well: that ain't likely to happen, so mount the
alt-az sky compass and run a sky program.) (Several of us often rely upon
an ancient, DOS [meaning pre-Windows] version of "Cosmos".)
* You can probably tell just by looking at the sky-ball
photo that the error box in the sky for that 3.5 inch ball would be about
2x2 degrees, or a tenth of an hour, whereas one can at least hope for plus
or minus a degree out of the alt-az sky compass (assuming a normal 1/8th
inch per foot = half degree sensitivity out of the level).
A finely engraved, close tolerances sky ball and a
magnifying glass would help. By going to a 10 or 12 inch ball (a hollow
one for sure!), and aside from the bulk of it, the results should be satisfactory.
One would probably start with an affordable commercial Earth globe, or
maybe there are educational globes with just lines of latitude and longitude.
One is also tempted to think in terms of integrating such a sphere (a custom
engraved 9 inch bowling ball?) into the bearing of a ball mounted telescope,
but I think that would be heavy and awkward.
I've also thought about making a 12 inch ball or disk
based, honest-to-gosh, desktop torquetum --for getting local, current alt-az
settings from the equatorial co-ordinates in sky charts, catalogues, and
ephemeral information. The common directional reference could be a mirror
on the wall behind it.

A 15th Century torquetum
(The optional blue section is for ecliptical co-ordinates.)
** A very nice (rough) alternative
to all of the above use to be the Swedish "Precision Planet and Star Locator"
planisphere which, besides showing tonight's sky map, would spit out the
declination and right ascension of objects, as well as your local sidereal
time (especially if you had the one made for your approximate latitude).
This is also known as the "Kennedal planisphere" --for the man who designed
and manufactured it.
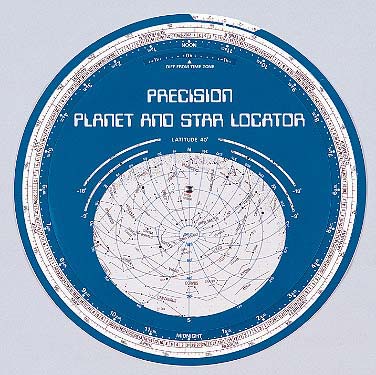
The best planisphere ever !
(This later model Kennedal has "spider web" lines
of local altitude and azimuth, absent from the earlier 1984
version, which is seen when you click for an enlarged
image. One might add such an overlay to any planisphere.)
Were one brave enough (in the face of today's mobile
phone applications) to market a new planisphere, a better idea would be
to clear that spider web and dedicate the two outer wheels to altitude
and azimuth. You'd then want to sell planispheres for at least every 5
degrees of latitude --or market one model (per hemisphere) as a set with
(your choice) of interchangeable wheels.
Here's the alt-az Sky Compass upgrade
for use on Dogson-2:
 * Start by working on a fairly leveled surface (like my cut-upon
#1 here). You'll need an ordinary drafting protractor (2) and a magnetic
hand compass (7) --in this case: a cut down $8 "Coghlan's" brand via Amazon.com.
(If the needle's sticky, tap it.) I added a laser printed second index
line (no #, slipped under the graduated ring at left) at the local magnetic
variation.
* Start by working on a fairly leveled surface (like my cut-upon
#1 here). You'll need an ordinary drafting protractor (2) and a magnetic
hand compass (7) --in this case: a cut down $8 "Coghlan's" brand via Amazon.com.
(If the needle's sticky, tap it.) I added a laser printed second index
line (no #, slipped under the graduated ring at left) at the local magnetic
variation.
* That piece of glow tape (3) is double-stick taped to
the compass and shines through the drafting compass --as the hand compass
hinges up on 3M brand "V" plastic (#8 --for stopping drafts through door
and window jambs) --and gets held at a given setting by spring tension
(#4 --made from 1/16" brazing rod).
* The small level (6) (which might have to be salvaged
from an inexpensive hand level) sets the 'scopes altitude with good accuracy,
although that small 360 degree level (5) is needed aa you approach the
zenith --and to find somewhat level ground. Both are adjusted against a
small dab of "UHU" brand office tacky clay, then secured with "Duco Household
Cement".
The Sky Compass, as mounted on
Dog-2 (with its
glow finder in the stored position,
and here shown without the initial sights):
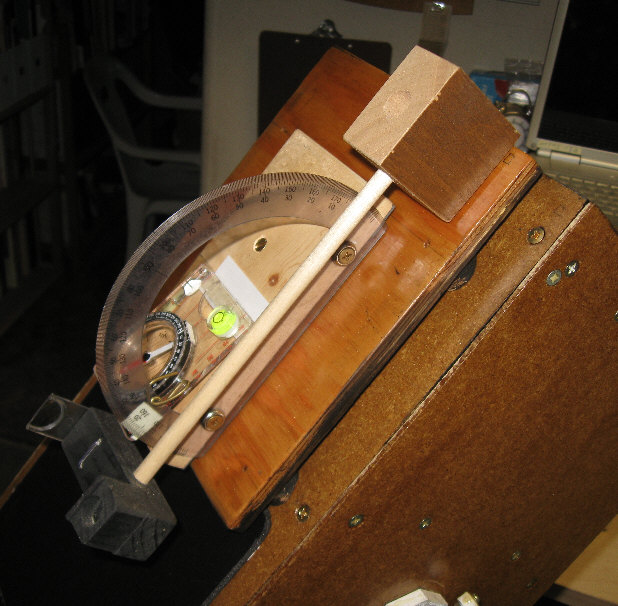
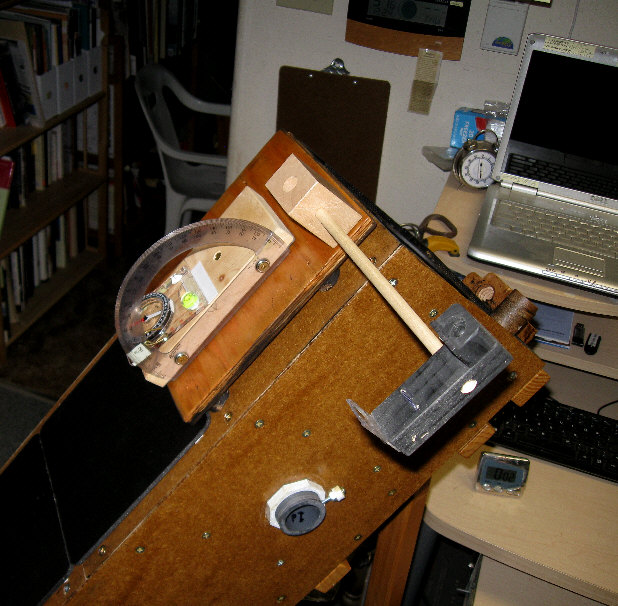
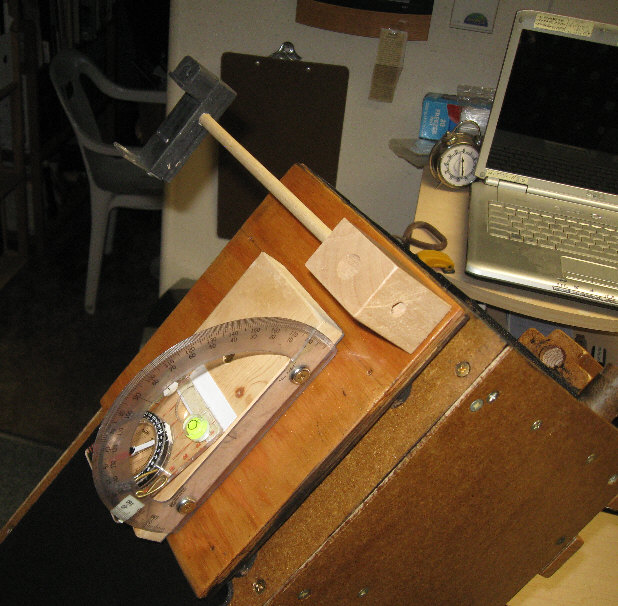

The finder is located such that I can simply turn
my head away from the eyepiece to use it --
or: it can be swung and the taper fit remounted left,
for assisting a guest at the eyepiece. Not
shown is a lightweight, cone shaped plastic dew shield
(a plastic drinking cup) which slides over
the finder (and to prevent getting poked in the eye).
Remote
Telescopy
at the Tenerife Observatories
(Last worked on August 16th, 2022)
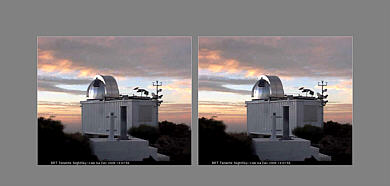 * You can still visit the http://www.telescope.org/
web site, but it's now run by "The Open University", which took over from
the old Bradford group, but is still a British thing.
The way it works now is that you sign up for a free course in astronomy,
during which you get to learn how to run their telescope and participate
in photometry on variable stars. This couse is open to everyone, world
wide (how nice!).
* You can still visit the http://www.telescope.org/
web site, but it's now run by "The Open University", which took over from
the old Bradford group, but is still a British thing.
The way it works now is that you sign up for a free course in astronomy,
during which you get to learn how to run their telescope and participate
in photometry on variable stars. This couse is open to everyone, world
wide (how nice!).
It was possible to do good work by using the old Bradford
facility, per: "Another advantage of a wide field camera is that it can
be used as a survey camera. Most of my work on variable stars was with
[the] Cluster Camera. In the process I have discovered 21 previously unknown
variables among the field stars (including 2 eclipsing binaries) which
can be followed up with the larger instrument. A really useful little camera!"
--David. (posted to the Telescope.org forum on October 17th, 2016.)
Gosh: that's what I've been trying to do for decades.
--Craig
POSS-1&2: Deleted
from this page was a lot of old stuff about accessing Palomar Observatory
Survey imaging (which use to be quite difficult, unless you had it on 100
CDs from Pacific, or used the program "Guide" which automatically retrieved
small patches of POSS-1 --if you had a good dial-up connection) --but I'm
delighted to add POSS back in, thanks to the Web presence of the Sloan
Digital Sky Survey's Sky Server. With today's high speed Internet,
it's a breeze to download a one degree (max) square patch of sky --either
from the original 1950s POSS-1 survey, the 1980s POSS-2, Hubble imaging,
the Sloan Digital Sky Survey^ and many other resources.
I compare POSS-1 to POSS-2 and to
my own humble
astrographs.
^ Imaging by the SDSS (30 arc-minutes square area maximum
download) is so sensitive that stars at 6th magnitude and brighter image
poorly. They tend to spread out in POSS-1&2 scanned film imaging as
well, which is how their magnitudes can be estimated (although these images
don't seem to be available as exposed through a traditional green Johnson
V filter, just blue and red).
The Telescopes of Tenerife:
(Again: this information is for historical reference,
since Bradford's remote observatory has been taken
over by "The Open University".)
All cameras are equipped with CCD47-10 1024 x 1024
pixel (13 micron element) top notch sensors.
Aperture Focal L F/D Scale
Size
Dark Sat Moon
Exposure Cres Half
Constel Cam: 5.7mm
16mm 2.8 2.8'/pix 40 deg
60 sec {12s} {6s}
square
Cluster Cam: {64mm}
180mm {2.8} 15.5"/pix 4.3 deg
60 sec {12s} {6s}
square (30
sec went mag 14)
Galaxy Cam: 355mm
1877mm 5.3 1.4"/pix 24
min 300 sec
to 19th mag
(equiv) (eqv)
square 180
sec max allowed
120 sec max advised
015 sec went ____ mag
{___} = estimated effective values.
Designed and organized primarily to make a well located
and equipped astronomical observatory available to British public school
classrooms, for years the Bradford group also offered similar services
to the world, as demand from educational institutions might allow --for
free. Eventually, private members had to pay a fee to participate. I believe
the following fairly characterized what facilities and services were available.
* Significant considerations about Bradford's [past]
services:
~ You requested a certain object or part of the sky to be photographed,
with what instrument/magnification, filtering, exposure (shutter times
are suggested), and whether in color or grayscale.
~ You didn't get to pick when. The exposure occured during the next available
time slot, as weather, seeing and maintenance problems allowed.
~ You got to download and post process your exposures as simple JPEGs,
or as professional 16 or 48 bit, dark field and flat field subtracted,
in optimized log, linear, or whatever FITS format images.
~ They didn't make you mess with controlling the scope in real time or
hamstring you with a list of settings restrictions.
Here's the first of a number of "job" requests that
I got returns on:
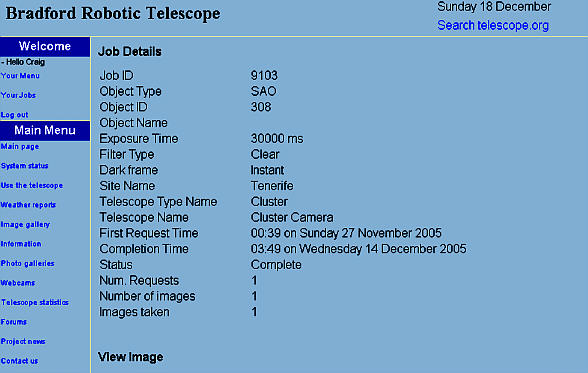
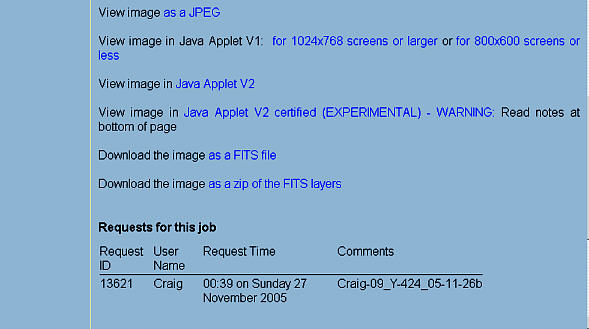
--which resulted in the image at lower left --which
is matched up with the my Guide-8 chart display (above it) and my own photography
to the right. "SAO-308" refers to Polaris, which I asked for in order to
calibrate what Tenerife's Cluster Camera would capture with a 30 second
exposure. (Polaris is below the 30 degrees of altitude that they normally
limit at, so try to choose wide field targets 2 degrees or more away from
the celestial pole.)
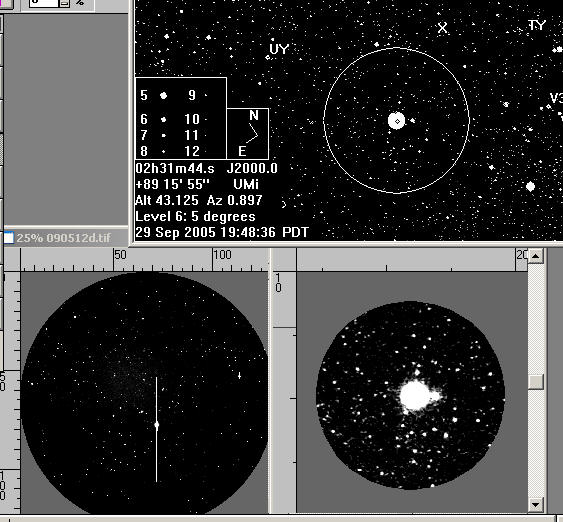
Aside from that vertical bar (Polaris overexposed),
bright stars don't spread out as much as with film photography (like in
the lower right image that I took with a 35mm camera).
I initially had a problem making a match for the returned
image, since it ended up east-west flipped, although it seems to come out
right in the FitsView and Iris programs.
Chris at BRT took the trouble to legend some of the
stars for me --per:
"I have labeled a few stars on your Polaris cluster
image. I'm no astronomy expert so no guarantees! Also I have just labeled
them all with SAO numbers."
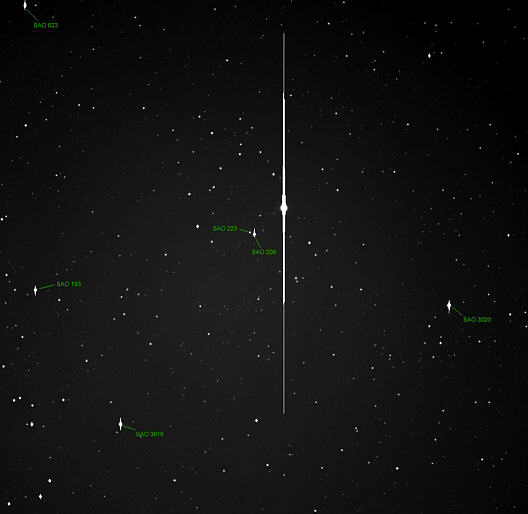
(This is half the size of the image Chris posted to
me.)
First there was:
Global Rent-A-Scope
--which became:
iTelescope
* iTelescope has a number of good instruments which
are sited at great locations around the world. For a fee (which you could
never hope to beat by buying your own gear), you schedule observation time,
log on when that date and time comes up, then steer a large quality instrument
to aim at your quarry and start recording images. These astrographs are
then to be found in your folder at their web site for you to download.
How simple --compared to loading your gear for a long tired trip in your
car, spending much precious time setting it all up and getting your telescope
well northed, then fumbling around in the damp cold and dark with your
notes, photography and whatever you're using for a sky program.
The Gallery:
The left images are NASA, but the stereo-i-zations are
copyright
The Damert Company (my agent's client, from work I did
in the 90s)
Cosmology:
Cosmology starts at the sensitive tips of your fingers.
(Am I permitted to address cosmology^ --without math?)
This is my personal inquiry into how stuff is stuck
together --heavy on questions, light on answers. (I'll try to knit the
following asterisk'd items better together in follow-on edits, but for
now, check out Wikipedia's entries for Ernst Mach, inertia, "Frame dragging"
and the "aether".
* As you consider the following terms/concepts, keep
that last one rattling around in the back of your head. Aether, from which
we get notions of "aethereal" and "quintessence" --is a die-hard
concept that reaches back to classic Grecian natural philosophy. The famous
Michelson-Moreley experiments of 1881 and 1886 (which won a Nobel in 1907)
allegedly drove a stake into aether's heart, but it took at least 30 years
for it to become unfashionable in scientific and academic circles. No less
a doyen of science than (Lucasian Professor of Mathematics at Cambridge)
Sir Joseph Larmor (FRS FRSE DCL LLD, knighted by King Edward in 1909)
authored a 6 page spread on the aether for the (legendary) 1911, 11th
edition of the Encyclopedia Britannica^^^ (Volume
#1).
But aether is sneaking back into play --now dubbed:
"quantum vacuum". See the abstract and first pages of "Hydrodynamics
of Superfluid Quantum Space: de Broglie interpretation of the quantum mechanics
- by Valeriy I. Sbitnev, re: "The ubiquitous ether coming from the ancient
times up to middle of the twenty century is replaced by a superfluid quantum
space."
"Robert B. Laughlin, Nobel Laureate in Physics, endowed
chair in physics, Stanford University, had this to say about ether in contemporary
theoretical physics: 'It is ironic that Einstein's most creative work,
the general theory of relativity, should boil down to conceptualizing space
as a medium when his original premise [in Special Relativity] was that
no such medium existed [..] The word 'ether' has extremely negative connotations
in theoretical physics because of its past association with opposition
to relativity. This is unfortunate because, stripped of these connotations,
it rather nicely captures the way most physicists actually think about
the vacuum . . . . "
* The only "stake" I have in this old controversy is
that I like the idea of there being connection/commonality across the Universe.
But mainly, I want to point out what-all is afoot. --Craig
~~~~~~~~~~
* Objects --material things, earthly and otherwise,
have mass --and they have "inertia" --that aspect of mass which
reliably resists attempts to accelerate, decelerate or redirect its velocity.
~ Unfortunately, it's difficult for the average person
to think about such matters, which I partly attribute to the propensity
of the world's science "deciders" (official scientific bodies) to clutter
up our minds with honorific and often unreasonable names/terms --for the
units we try to understand and discuss.
Witness the fine old (and intuitive) expression: "cycles
per second" (or just "cycles", "kilocycles" and "megacycles") --for which
we've instead had that mind stopping term "Hertz" foisted upon us. (That
be just "Hertz", not Hertz per anything.) (Not to cast any aspersions on
Heinrich Hertz --of course.)
Switching between temperature degrees "centigrade"
and Fahrenheit was tough enough, but at least the name "centigrade" made
its own argument, in that it reasonably divided the distance between freezing
and boiling water into 100 steps. But NO: The Deciders want us to use the
honorific term: "Celsius".
~~~~~~~~~~~~~
Anders Celsius, a Swedish astronomer and geodesist,
surely rates honor. He advocated, and then joined in with a French expedition
to survey a degree of latitude along a very northern (Lapland) segment
of a meridian, which verified Sir Isaac Newton's theory that the poles
are a tad flattened (and the equator comparatively bulged --something we'll
get back to). More famously, he first proposed a thermometer which runs
from freezing to boiling water in 100 steps --in 1742, just 2 years before
he died at the too early age of 43.
~~~~~~~~~~~~~
* So let's try to make sense and pattern out of the
many terms which describe the weightier aspects of matter, as I try to
get at the question: "do we need an independent unit for inertia?" (--if
that even makes any sense).
~ Often, we casually equate "mass" with "weight", such
as when using a look-up chart which lists the equivalent of European kilograms
in English^/American pounds. But: the true English equivalent of the "kilogram"
is the "slug" --a term which you've probably neither heard nor read of
for years (if ever).
^ In 1965, England gave up on "a pint's a pound the
world around" and adopted the IS (metric) System. The United States, however,
continued with standardized, but otherwise traditional weights and measures.
At the national level, there's an 1866 act (which changed nothing) --"allowing"
the use of the metric system, the redefining of our units as accurate fractions
of metric units, and modeld state weights and measures legislation, which
has been adopted by all of the United States.
The true European equivalent of the English and American
"pound" (a unit of force) is the "Newton" --the term behind those oddball
numbers we sometimes see cluttering up a tire pressure gauge --except that
the intuitive "Newtons per square centimeter" (which is, numerically, not
that much different from "pounds per square inch"), or even the unreasonably
minuscule "Newtons per square meter" (which would be like stating tire
pressure as so many "pounds per square yard", for crisakes) --was deemed
not bad enough. NO: they had to turn Newtons per square meter into
"Pascals". (Just "Pascals", of course --not Pascals per anything.) (We
might as well rename "wise cracks" as "Grouchos".)
~ As a life-long technician who's lived through several
such changes, I bear some degree of responsibility for these outrages.
(I should have at least organized a protest! :-) So in that
capacity: my sincere apologies.
* So okay now: we've settled on there being distinctions
--between mass and weight, weight and inertia, and inertia and mass --but
the definitions of these terms are a bit circular. One derives from the
other. Force = mass times acceleration, and in the physics book I'm looking
at just now, it's proposed that the force be measured with a spring scale
--calibrated in pounds --but hey: that poundage is in turn determined as
being a fraction of a kilogram's weight (--even though we should really
be talking English "slugs") --which amounts to the force on a kilogram
of mass in a standard Earthly gravitational field --which is indistinguishable
from being accelerated at the rate of 32 feet per second --every second.
--Hmmmnnnn: I think we need "a place to stand".
* In the "MKS system", the basics are: a meter stick,
a kilogram of mass, and a second of time.
The National Bureaus of Standards^ (in Paris, and here
in the United States) use to keep bars made of a platinum and iridium alloy,
each with a pair of grooves --one meter apart --by definition.
(^ Sorry: that's gone obsolete. Since 1988 it's been
the U.S. "National Institute of Standards and Technology".)
As to the kilogram: same story: a chunk of platinum-iridium
which weighs exactly one kilogram --by definition.
But a "second of time" was quite another (non-material)
matter:
A "solar day" is the time it takes for the Sun to come
around again, such that the shadow of the gnomon (staff) of a good sundial
once more touches the 12 o'clock mark. Unfortunately, solar days vary by
a minute or more throughout the year, so all the days were averaged together
--to get the "Mean Solar Day" (and never you mind that the term "mean"
is different than the term "average"). With lots of precision clocks ticking
away, they'd be compared to that Mean Solar Day --and the clock which tallied
86,400 ticks in such a period of time --took the title of: Our Number One
Clock.
* No: I'm not going to trouble you with the cesium-133
"atomic clock", nor that there are so many wave lengths of the Krypton-86
isotope to define a length of one meter, which is a whole 'nuther kettle
of worms. (Besides: that's now obsolete as well. A length of one meter
has been redefined as the distance light travels --in a vacuum --in 1/299,792,458th
of a second.) (Gosh: such a handy way to check it--!)
And then there's "Inertia":
--a term and concept originated by Johannes Kepler
(1571-1630).
 The "slug" --is the (neglected), British-American engineering
unit of mass. One slug weighs 32.174 pounds, which is pretty neat, since
the acceleration of gravity is 32.174 feet per second --per second. If
you (frictionlessly) tug on a slug with one pound of force, it accelerates
at the rate of 1 foot per second --per second --BY definition.
The "slug" --is the (neglected), British-American engineering
unit of mass. One slug weighs 32.174 pounds, which is pretty neat, since
the acceleration of gravity is 32.174 feet per second --per second. If
you (frictionlessly) tug on a slug with one pound of force, it accelerates
at the rate of 1 foot per second --per second --BY definition.
AND: when you accelerate a kilogram of mass (say: an
iron hockey puck on an ice rink) --such that its velocity increases by
one meter per second --every second, then the applied force to accomplish
that is "one Newton" --
--AND that such a rate of change of velocity ("acceleration")
--requires a given amount of force, that's called: "inertia".
In other words: inertia is a characteristic --a defining
characteristic, of mass. Supposedly, it's always the same (per kilogram
or per slug unit of mass), so it doesn't need to be given a unit of measure
all its own (--right?). (Or does it?)
~ How do we know if --maybe we're
being messed with? How would we know if the force required to accelerate
a kilogram of mass --starts edging up a bit --if that's how a unit of force
(the Newton or the pound) is defined^? Does the Bureau of Standards keep
an old kitchen spring scale on hand, just to make sure? :-)
After all: while folks in the science biz like to keep
up appearances, I wonder if they're all that certain as to why a slug of
mass is --so sluggish (a topic which seems to open up a can of worms).
^ Since the kilogram use to reside at the Bureau, then
it defined a Newton of force --not the other way around. (Right?)
(Is this stuff bothering you yet?)
* In static mechanics (and I'm using the engineering
or physicist's sense of the term "mechanics"), the force applied to a point
gets balanced by a countervailing force, which together make a "couple".
* Let's make that a 200 kilogram iron puck --mounted
on skate blades. You're wearing grit soled shoes for getting traction on
the ice and you're hauling on that puck via a tether and a tension scale
--hauling hard enough to make it read "200 Newtons" (= 45 pounds of force).
After pulling on it for 10 seconds, the puck is traveling
at the rate of 10 meters per second, which is about 22 MPH --as fast as
you can sprint, so best jump out of the way.
~ So how about that force couple at the point where
your tether attaches to the 200 kilo puck? What was the puck digging its
"heels" into/against, in order to be pulling back on that tether, and matching
your 45 pounds of force?
* Inertia gets more interesting when it concerns rotation
--angular momentum and gyroscopic effects, but maybe that's more distracting
than illuminating. We end up facilely assigning a torque vector to the
wheel's axle and calling it good (my impression/humble opinion).
Sir Isaac Newton (1642-1727) coached us on how the
water in a bucket climbs up the sides when the whole of it is spinning,
suggesting this was about the water "knowing" --absolutely-- when it was
spinning ( --relative to the all-pervading, intangible substance of "absolute
space").
It's my 44 year-old recollection that Frank
Oppenheimer (19121985, younger brother of J. Robert) --wondered if:
--when you give a spinning wheel's axle a twist,
do distant stars feel the torque?
Wonder and delight
--in Frank Oppenheimer's San Francisco Exploratorium
of the 1970s
(copyright: the San Francisco Chronicle)
That echoed an off-hand remark by Ernst Mach (1838-1916)
about being jerked around in the passenger car of a lurching train. Mach
somewhat vaguely maintained that an object's inertia is a result of all
the matter in the Universe --a notion which Einstein credited as a motivating
influence for his work. (Mach might have been aware of a similar suggestion
by Bishop George Berkeley (1685-1753), made in specific reference to Newton's
bucket.)
 * But: like the spinning wheel of a gyroscope, perhaps
a spinning bucket of water introduces too many distractions. On the other
hand, my example of a linearly accelerated hockey puck is probably too
simple to permit of the needed flight of imagination --and insight. So
instead: try this short video on for size:
* But: like the spinning wheel of a gyroscope, perhaps
a spinning bucket of water introduces too many distractions. On the other
hand, my example of a linearly accelerated hockey puck is probably too
simple to permit of the needed flight of imagination --and insight. So
instead: try this short video on for size:
> https://www.youtube.com/watch?v=aMxLVDuf4VY
--in which physics and astronomy professor Jim LaBelle
simply directs our attention to the --astounding--
nature of a pendulum. (After that, one might more attentively expand his/her
awareness of other inertial effects.)
* (Not to confuse gravity with inertia, but) there's
deep interest in such subjects: the Lense-Thirring
effect theory of 1918, the Gravity "Probe
B" and LIGO experiments currently underway, and observations/speculations
about the "frame dragging" of (presumably) whirling "black holes".
* This thinking and the observed facts have such fundamental
implications!
* It's easy to understand why notions of Machian inertia
go against the grain. For the collective matter in the Universe to be determining
the nature of inertia --in the here, there and now, it would (seems to
me) have to act instantaneously. Everything everywhere would then be inertially
and instantaneously connected/entangled --!
* Whether or not this would imply that gravity must
also be instantaneous --well, that question seems to have recently
been laid to rest --by LIGO's gravity wave detections --which were nearly
simultaneous with the arrival of, and co-located with the direction of
--a humungus gamma ray burst source in a far away galaxy.
Gravity --on a spinning orb (the
Earth):
* Our astronomy email group has discussed the question
of centrifugal force versus the Earth's equatorial bulge --as they affect
the force of gravity --at the poles, versus at the equator.
~ The short answer: it's been very closely measured.
Gravitational surveys and instruments have become amazingly sensitive,
meaning that many of Earth's anomalies and tidal influences contribute
to a variegated map of gravity around the globe. The results indicate that
gravity is something like 1/2 of 1% higher at the poles --the current official
explanation being that it's mainly due to the polar areas being flattened
--and closer to the center of the Earth --where the mass of the Earth can
be considered to be located (say: for orbital calculations).
~ However: my old college physics book (1955, Sears
and Zemansky) states that weight loss at the equator (relative to the poles)
is largely due to the requisite subtraction of the wee bit of centripetal
force^ required to help keep your feet on the ground --due to the turning
of the Earth.
^The authors make it a point to deny that there is
any such thing as "centrifugal force" --only the constantly redirecting
centripetal force of that string --as (say) you swing your yo-yo around.
Yet: call it "Machian inertia", or just plain old "inertia", and while
I agree that if the string snaps, the yo-yo will fly off in a tangential
direction --not outward along a radial, I still imagine an instant force
vector/couple that runs in the opposite direction of the string. (I
reserve the right to think that one over, however.)^^
Although I get the impression that the centrifugal
force effect at the equator gets somewhat balanced by the fluidity of the
Earth (bulging out, thus placing more earth/gravity beneath your feet),
again: the current official explanation seems to be that: you weigh a tad
less on the equator --mainly because you're further from the Earth's center.
Well then, let's take that thought
to an extreme. Let's say that the spin rate is very slow (so that it's
not a factor), but that we lived on a planet which somehow ended up shaped
like an old phonograph record. I think it's safe to say that a brave adventurer
who journeyed to the spindle hole at "Planet Record's" center --would be
weightless, just as would be someone who dug a tunnel through to the center
of our spherical Earth (right?). And something tells me that the guy wouldn't
be crushed by gravity as soon as he stepped out of that spindle hole and
stood up. Indeed: he shouldn't feel the full force of gravity again until
he got back out onto the "equator" --on the edge of Planet Record (right?)^.
^ Formal scientific papers would do well to end
their postulates and proofs with "(right?)" :-)
^^ "Bad Astronomy" author Phil
Plait made a stirring defense of (his) using the term "centrifugal force"
(August 30, 2006 Discover Magazine), which elicited 150 follow-on, interesting
comments. The nut of all this might be in the curious nature of inertia,
the force consequences of which are often called (dismissed as?) "fictitious".
^^^ "--AJ Jacobs, an American
journalist, read his way through the entirety of the 15th edition of the
Encyclopedia Britannica published in 2002. He wrote about his experience
in the well received book The Know-It-All: One Man's Humble Quest to Become
the Smartest Person in the World. I spoke with Jacobs about the lasting
appeal of the 11th. He said that 'compared to more modern editions, reading
the 11th is like reading a Faulkner novel instead of an instruction manual.'
" / The 11th is exceptionally well written, the first encyclopedia
where readability was courted in addition to scholarship. But its durability
goes deeper than that. / Jacobs continued, "I think Hans Koning
of the New Yorker nailed the appeal 30 years ago. He said it was the last
great work of the age of reason, the final instance when all human knowledge
could be presented with a single point of view. Four years later, the confidence
and optimism that had produced the 11th would be, as he puts it, 'a casualty
in the slaughter at Ypres and the Argonne.' "
> https://www.theguardian.com/books/booksblog/2012/apr/10/encyclopedia-britannica-11th-edition
(and see the Wikipedia
entry)
The speed of gravity:
In February of 2016 it was announced that gravity waves
have been detected, nearly simultaneous with a gamma burster source --confirming
the assumption that gravity propagates at the speed of light.
One problem with that (in some minds) is that if gravity
takes about 8 minutes to get here from the Sun, then we're always orbiting
around where the Sun _was_ --about 8 minutes ago.
---Hmmnnn: while it seems to me that would be the same
spot, given a circular orbit, our planetary orbits are elliptical --and
(one time) cometary orbits parabolic. --So - -
--Well I'm not sure what this "so" leads to.
How about to UFOs?
UFOs
It's my impression that very
few ( < 1% ) amateur astronomers see them. I attended the Oregon Star
Party some years ago, along with hundreds of good folks who spend and awful
lot of time watching and documenting the sky --and the subject never came
up. While we all see some pretty bazaar celestial events from time-to-time,
I seldom hear reportage from these people of objects which give the impression
of a directed space craft.
* Beginning as a boy in 1957,
I started keeping a camera handy for "when a UFO goes by", --but no such
luck. Through to about 2005 I tried to save the last frame on each roll
"for the UFO" :-)) (Now I have so much digital camera memory I never
get to the end of it.)
I did see a "nocturnal light"
type of "sighting": a red light in the sky, just large enough to not be
a point. There was cloud cover to limit how far off it might have been
and it made not a sound --on a very still night. At an apparent fixed rate
of slow travel along straight lines, the object first "ascended" to about
30 degrees of elevation, moved horizontally to my right, then went straight
"down" behind the hills and trees. I can think of no reasonable explanation
for it.
Yes: I filed a report to CUFOS,
but didn't think it was worth getting out a tripod for a long photographic
exposure. I did do sling psychrometry to get the humidity, from which to
estimate the overcast height.
One correspondent
of mine, a fellow astronomer and stereographer, says amateurs do see them,
but our organizations and newsletters don't support such reportage. Well,
yes: Sky and Telescope wouldn't print such an account, but I know my fellow
amateur astronomers would tell me personally --as did a (Compuserve days)
e-friend who saw something remarkable as a boy.
When I inquired of Sky Publishing
about their policies on UFOs (decades ago now), an editor directed me to
"The Skeptic" --which magazine I wasn't (then) familiar with --and
I failed to adequately check it out. I naively forwarded that advice to
my correspondent friend --who took it, and sent in his honest account of
that curious apparition he saw as a boy. The Skeptic answered this earnest
effort by printing a response which made him look ridiculous --so his witness
has now been silenced.
There's work to be done --when
spiritual numbness makes such antipathy toward people possible.
At this point, most of us have
seen and/or met at least one person who's made what he/she considered a
convincing "sighting". I've so far met 3 witnesses and corresponded with
the above mentioned 4th. Polls now have it that half the population believe
there's something of substance (not saying what) to reports of UFO observations.
* By not entertaining any such
discussion, respectable periodicals like Astronomy and Sky & Telescope
default to fringe groups for commentary and questionable information.
My best hunch as to what's behind
many sightings: maybe it's large ball lightning --perhaps modulated somehow
by rare natural phenomena. As to reports of bazaar direct, close experiences,
perhaps Rupert Sheldrake's "morphic resonance" plays a part.
* I also suspect that UFOs have
long been a game played by opposing intelligence communities --to waste
each other's time with wild goose chases, and to selectively discredit
troublesome individuals.
My apologies to the dear people
who've shared their experiences with me. I believe your reportage to be
honest and my mind remains open, but I'll have to personally witness one
of those thangs (hopefully to record and measure it somehow) in order to
think of them as piloted vehicles. I've rather parked my stereo UFO film
camera, but my digital "UFO camera" awaits --in my ever present "fanny
pack". (Let's hope I'm still fast enough on the draw.)
This leads us (of course) to: SETI
Recently (December, 2018) I read
an excellent (and privileged) overview of our prospects and motivations
for making (probably only one-way) contact with ET intelligence (assuming
that to be evolutionarily useful in the long run) --by my oft mentioned
e-friend Jerry Oltion. I can't improve on what he wrote, so will try to
locate and post access to this piece after it appears --at:
> https://www.sfsite.com/fsf/
Chief among his points (plus
my thoughts in italic):
* Obtaining simple proof that
sentient, intelligent life exists elsewhere would likely make little difference
in the trajectories of most of our lives and civilization. (Despite
it being a big deal among the relatively few thoughtful and spiritual folks.)
(Thanks to texting we can at least still read, but what is it: 5% who
usefully read news and non-fiction, more serious stuff?) (Yes: I
want to count what we read on monitor screens.)
* What we have most to fear in
making contact would be the importation of dangerous scientific and technological
knowledge (as if we don't have plenty enough of that to worry about
already).
My favorite
astronomy and ATM books/sources:
** Scientific American's "The
Amateur Astronomer/Scientist" from the Surplus Shed
The Telescope Handbook and Star
Atlas (1967) by Neale E. Howard
The Guide to Amateur Astronomy
(1988) by Jack Newton and Philip Teece
Burnham's Celestial Handbook
(1978) by Robert Burnham, JR.
How To Make a Telescope by Jean
Texereau (1957 --there are later additions)
Amateur Astronomer's Handbook
(4th Edition) by J. B. Sidgwick (revised by James Muirden)
Amateur Telescope Making (4th
Edition -1974) edited by Albert G. Ingalls
Making Your Own Telescope (1947)
by Allyn J. Thompson
Astronomy (1913) by Harold Jacoby
Astronomy by Sir Fred Hoyle
~~~~~~~~~~~~~~~~~~~~~~
HEY: You might want to do these
events!
Oregon Star Party
The Table Mountain Star Party
(Google them)
~~~~~~~~~~~~~~~~~~~~~~~~~~~~~
.
An early version of the Sky Compass
* "The Gallery"
(4 samples from the DaMert Space Odyssey set that I worked on.)
* Sky Compass
*
A Barn Door Tracker
* Finder For a
Small Digital Camera
Here's the very
latest outdated "news":
* Please see
below for a (slightly less outdated) update on NASA's Dawn Mission.
* Fast Radio Bursts (FRBs):
There's a bit of confusion about the source and nature of millisecond short
bursts of RF energy being picked up by radio telescopes --which have peculiar
frequency signatures, but it should be clear from recent papers by Swinburne
University's Emily Petroff:
> http://www.iflscience.com/categories/space
> http://www.iflscience.com/space/world-first-cosmic-radio-burst-caught-real-time
> http://arxiv.org/pdf/1504.02165v1.pdf
--that FRBs are still an intriguing
mystery, whereas it's the somewhat similar (but suspected of being terrestrial
from the start) "Peryton" signals which have been sourced to the Parkes
Dish observatory's own breakroom/kitchen's microwave ovens.
The rare Earth theory, and notes
in bottles --cast upon the sea of time:
* Radio signals broadcast into
space have vast range and speed, but deliberate efforts are usually focused
and brief. I suppose that even a year-long signal is brief by cosmic
standards, but the milliseconds long "FRB" signals hardly seem long enough
to be an ET contact attempt. I'd expect some sort of a permanent beacon
or sign: perhaps some objects in tailored orbits around and occulting a
small, durable source --lighthouse style.
* A few years ago it occurred
to me that one might "piggy-back" transmissions on natural events. Should
there be an interesting gamma ray burster, nova, FRB --or maybe some kind
of a visual thing going on, then swing our dishes and lasers around exactly
180 degrees from it and fire off our signals. Similarly: be on the lookout
for "noise" signatures, closely adjacent to any main celestial event.
* The mega-year duration of a
good physical time capsule (buried somewhere, in orbit, or outward bound
on a probe:
> http://davidszondy.com/future/timecapsule/voyager.htm
--is nearly canceled by its only
being in one place at any given time. The Voyager probes were expected
to keep sending us data well into this century, but I wonder if there are
any sort of omnidirectional beacons aboard Pioneer 10, 11 and the Voyagers
--to make that "one place" larger.
* Then there's the improbable
(far future) solution of a self-replicating space probe (sometimes called
a "von Neumann Probe"), which spreads and multiplies across the galaxy
like dog fleas. Of course, that would end up amounting to a terrible clutter,
as all the energy and substances of a galaxy gets converted into those
infernal replicating machines. (Hmmnnn: this theme seems rather familiar^
--- :-)
* The prospect of Earth being
the only planet to spawn sentient, intelligent life haunts us because there
are any number of processes and events which could doom our civilization
--ending history and our fragile culture. Materially, energy-wise and technologically,
it's a house of cards. Growth alone (most any kind --save territorial and/or
spiritual) will find a way to do us in. (Any "territorial" gains are unlikely
to be via manned travel in star ships.)
* The premise of our Time
Capsule Tiles project was that some sort of a follow-on culture (home
grown or visiting) might find and study sufficient evidence of our civilization
that we'd become a part of them. (Voila: retail salvation.) While that's
extremely unlikely to include our tiles, we felt it a civic duty to try
--and to plead our world views in the process. Even if human words end
up being indecipherable, just the obvious social purpose of sequestering
a time capsule is a gesture which might connect with, touch and affect
future others.
* But what if there aren't any
follow-on fellows --maybe just some slime covered life that manages to
survive --deep down in our scorched or frozen Earth? That's why we badly
need the comfort of turning one or more of our speculations about the existence
of "external intelligent life factors" (meant here to be an inclusive term)
and exo-biology in general --into a reasonable probability.
Of course, most religious folks
have it made --external life factor-wise, and we might look into some of
their (pretty good) arguments about (say) "irreducible complexity", evolutionary
jumps, and there not having been near enough time for today's living stuff
to have all evolved from green algae on our planet --which seems to consist
well with suggestions from elsewhere about --
^ --"panspermia": the seeding
of life across the Cosmos. These lines of inquiry might determine at least
the necessity for there being plenty of life elsewhere --and rather familiar
life at that.
* Another angle on this is to
question "how can it be?" --that sentient life is able to emerge from the
organic combination of basic material elements --unless material stuff
itself is somehow infused with the capacity to end up that way ("a thing
is what it becomes"). Whitehead and Schopenhauer felt that the material
world is, to varying degrees, sentient. In Voices of the First Day is an
account of Australian aboriginals spending time in the company of large
isolated rocks --to help dispel their cold loneliness. At the least: it's
a common inclination to project our humanity onto other creatures and things
--gracing them names and souls, and that (at least) amounts to an
ontological argument --for it actually being thus.
Best we take such (often marginalized)
ideas seriously enough to at least give them an open minded listen and
put them to constructive tests of reason, field work, research, observatory
time and experiment --simply because at bottom: we all very much need there
to be life forms in other places, hopefully trying out gainful alternative
approaches to civilization.
I've a suspicion that Earth's
life forms are the "von Neumann machines", and that our weirdly distributed
genetic material includes instructions for alternative paths of diversification
--given the right environmental/situational stimuli to make them "express".
That would be helpful for patching up the ecosystem after a catastrophe.
Goodgawd: the nucleus of every
living cell in our body has 7 feet of DNA threads, but while we have 23
chromosomes, dogs have 38 --!-- so will dogs eventually overtake us --like
32 bit computers beating 16 bitters? (Shades of a Gary Larson cartoon world!)
Consider the extraordinary diversity
of dog kind/s --all based on just the wolf gene pool.
* The Dawn Mission:NASA's
and JPL's extraordinary success with robotic, interplanetary probes is
exemplified by the Dawn Mission, as chronicled by Chief Engineer and Mission
Director Marc Rayman in his entertaining presentations at http://dawnblog.jpl.nasa.gov--where
you'll see the source images (frames from an animated GIF of the turning
minor planet Ceres) used for the following (screen captured) stereo pairs:
(*click* on these images to enlarge them for high rez
monitors.)
The above pair are from adjacent frames, cropped for
a good stereo window

I gave the right frame a lot of tonal adjustment. This
pair spans several GIF frames of rotation.
~~~~~~~~
At the link, we learn one reason why those spots appear
to be so bright: Ceres only has an average surface reflectance of 9 percent.
Over-exposure on the central bright spot might result in false perceptions
of depth/parallax, such that it appears to be on a peak.
~~~~~~~~
NASA's probe provided us with good,
viewable, left-right screen captures. This time I needed to rotate the
right image 11 degrees and bring up the contrast for both, but the pair
otherwise required little "doctoring":
Wow: be it volcano or a whammy from a space rock, it
seems to be still going on. What's the significance of those darker radiations?
They're only around the upper-right 1/3rd of the crater. Is that because
I'm looking at volcano tubes around the lower-left of the crater rim?
Here's a (clickable) image from
the Dawn Mission's photography in September of 2015:
After the Dawn probe powered down into its lowest
orbit, these were determined
to be outcroppings of salt.

"Keep Looking Up"
(Depiction of an old-time mariner finding his position
by the stars.)
* The original content on these
pages is unencumbered by copyright.
~~~~~~~~~
