Template construction
The "Template" Mounting Steps
For Open Or Closed Mounting, Using Separate 3 Inch
Or Wider Prints
(last worked on: January 9th, 2018)
** See also: /trim-01/
for the digital graphics version and Open
Mounting (a PDF).
Welcome to "solid image" photography. I hope the following steps will be clear, lead to years of enjoyment, creativity, and practical applications. It's very hard to get prints made when using old stereo cameras (Realist, Kodak, Nimslo, Image Tech, etc.), so we must use synchronized ordinary digital cameras or take two photos by shifting a single camera (the "weight shift") and order 3x5 or (the often sharper) 4x6 prints to work with. (Which ever paths you take, try to keep all subject matter 4 feet or further away for your first efforts. You can get into macro-stereo later on.)
* These steps are for making traditional 3.5" x 7" "open mounted" cards (although the "Q-VU-X" template also turns out pairs suitable for Q-Vu-x closed mounts --if you have any).
It's best to scribe the patterns (see below) onto hardware store "window plastic", using a ruler, drafting triangle, and your razor knife, then use the plastic rectangles as your cutting guide edge.
* For standard (SSA/Holmes/Bates) viewcard trim & mount work using separate prints 3 to 4 inch wide prints, use the "X" template as is (but you can equally shorten or narrow the print pair afterwards).
b) Draw a lightly penciled horizontal guideline about 1/8th inch from the bottom edge of the mounting card and mark its exact center.
c) Apply aggressively sticky plastic carpet tape to the backs of the prints before they're trimmed at all (leaving the outer peel-off paper on). Don't tension the tape as you apply it, but neither let it buckle or overlap. (Alternatively: stand by to apply a "Glue-Stick" type adhesive after trimming.)
01) Lay out the entire batch of prints, matching up pairs and lightly marking the backsides of the "lefts". Place a minuscule bit of "office tacky clay" (stationery store item) in the template's circles. (The clay rolls off the prints and dry fingerprints wipe off too, but at some points you might want to wear a cotton glove on one hand.)
02) Pick a pair of prints and lay the templates on them. Level them using any reference: the image horizon or the print edges. Keep the templates reasonably square to this reference throughout the steps with the grid side down and the legend at lower right.
03) Find any point of detail and place the same HORIZONTAL line of each template over the same detail in each print.
04) Find and check a second pair of points (well to the left or right of the first pair) that's already under or near any horizontal line. Adjust one template, if necessary, to make them agree.
05) While maintaining the correspondence of steps #03 and #04, find a detail in the part of the picture that was closest to the camera. The "stereo window" will now be located at that apparent distance --or closer. Place the same VERTICAL line of each template over this same detail in each print. (Move either of the templates an extra 1/32nd of an inch or so closer to the other for a closer window.) Press down on the tack circles (careful: don't let the templates slip) to secure their positioning. You can preview the pair if you like with stereo glasses or by "freeviewing" them.
06) Work on a sheet of plastic as your cutting table (or get a made-for-the-purpose "cut-upon" from a scrap book crafts supply shop) and trim off the excess print areas with a Hyde or similar brand "snap-away" razor knife. (Have a safe "sharps" jar to put used blades in.) Use the template edges as your guide. You can make your open mounted pairs smaller by trimming EQUALLY off the same edge of each print.
07) Lay the print pair side-by-side with some gap between them and measure the span between identical details in the distance. When that span is 3" to 3-1/4", the view will "scope" well. Now you know what gap to go for.
08) Remove the templates, clean off any tacky clay, peel off the carpet tape's protective paper (if that's how you're sticking the pair down), then lay the prints on the card with their bottom edges true to the horizontal guide line, spacing the prints to either side of the center mark to get the desired gap between the pair.
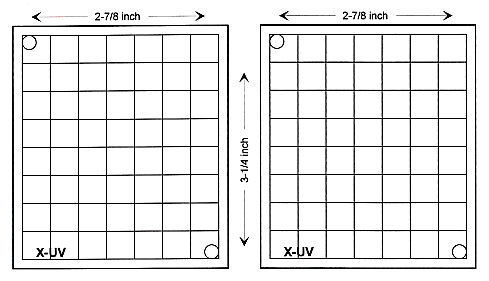
Template construction
Create a pair like this out of hardware store window plastic. Measure out and scratch in the grids with a scribe.
Happy Shooting!
![]()