So: You've got a digital
camera :-)
(last major revision: 12/19/2003,
last worked on: September 28th, 2022) (Go to
Trim-02
for working with a Fuji W3)
See
here first.
You're at: https://57296.neocities.org/trim-01.html
fastfind>>> composing
pairs, the basic image, film
scanning,
(On to Trim-2)
How to turn Fuji-W3 camera images
into stereo prints: step-by-step -
3/20/2022: The short version of these digital graphics
pages: give it up --unsustainable! The digital world never rests. Your
computer, your applications and your precious skill sets will soon be obsoleted
and unsupported. Read on at your peril. See also Microsoft forums for installing
and running legacy applications on Windows-10. You have to start by stopping
the setup.exe autoplay and option Properties\Compatibility for the install
file --then maybe again for the application itself.

(6/28/2020): There use to be several web sites where
you could download PPub in the last version #10. Possibly this is a limited
"CE" (or some such) version, but it allegedly installed and ran well on
Vista and Windows-7. (Be sure to enable Windows XP legacy mode/s.) (Update:
These old programs won't install correctly on a 64 bit operating system
without taking the right "Properties" options before running the install
["setup.exe"] file.)
* The full Pro version was once available through Amazon.com
(you might wish to read the customer reviews) and it still might be available
used. (Last seen at:
http://www.amazon.com/Corel-PP1L10ENG-PICTURE-PUBLISHER-PRO/dp/B00005Q5IM
* I use the ancient PPub-3.1 and PPub-8 versions, which
both ran at least until the XP-3 operating system.
* A good general purpose graphics program has been
a free download: "Paint.net", but the web site looks a little fishy to
me lately.
http://www.getpaint.net/
* Another option is "Gimp". This is written for Linux
operating systems and the authors/home site appears to take no responsibility
for how others might port it to Windows and MacIntosh. I've got good reports
about its performance under Windows-7 (and presumably on earlier Windows
systems) in version number 2.6.8. (You don't want 2.6.9) --but: when I
tried to use Gimp it gummed up the works in my PC.
The following image is what version #2.8.0 will (optionally)
look like.

Get it via: http://www.gimp.org/downloads/
See the "Working With Digital
Images" page for programs which are made for working with stereo images.
File Management (for
paired digital cameras):
1) Label one of your cameras "Left" or "Right" and
use it in that position.
2) Typical digital cameras (say: a pair of Sony DSC-P71s)
has an internal clock and conveniently assigns each image file the time
of day --to the second. Don't expect your cameras to keep the same time,
simply reset the faster one (occasionally) behind the slower one. After
each shoot, when you "debrief" your cameras --transferring their memories
to your hard drive, note the current time difference. Create a simple text
file (say: with Microsoft's "Notepad" or "Wordpad" programs) which bears
the name "Rt-__sec-faster.txt" --or some such, then save it to the directory
(or: "folder") for the right camera's images. (See the example highlighted
file in the lower right of the following image.)
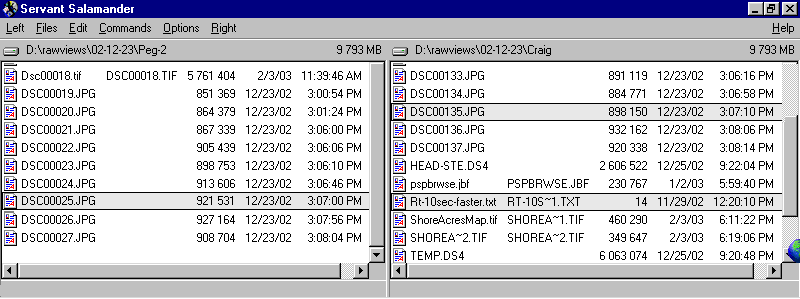
This is a screen-capture of the file manager program "Servant
Salamander" (which was still a free download, last I checked). It's the
nearest approximation I can find of the terribly missed and long lamented
"Windows File Manager" program --which we enjoyed using under the old Windows-3.1
operating system. (It appeared to be identical with the even older DOS/GUI
"Central Point File Manager" program --presumably bought out, then shit-canned
in favor of "Windows Explorer".
[We've since set our cameras such that the their clocks
are well synched, but their frame numbers are way different and continue
to diverge. Then we put the frame files together in the same folder/directory,
bringing the pairs together via a "by time" sort.]
My wife Peg runs the left camera, I (Craig) run the
right camera --unless just one of us is tripping both cameras (when they're
mounted on the short bar).
Note the two highlighted image files. They're obviously
a pair.
** Alternatively: If your cameras permit of the frames
being serially numbered --spanning chip erasures (as do Sony cameras),
then let the more heavily used camera get well ahead of the other --such
that there's no danger of one camera's output over-writing the others in
the same folder (directory). If you keep your camera's clocks well synched,
the left and right frames will line up together (when sorted by time).
(For cameras that assign time based file names to frames
--or for cameras which number each series of exposures from "#1", then
(obviously) you must use a side-by-side directory display --per the above
example.)
* That "DS4" file is from my Micrografx "Designer"
program (version 4.1 here) which I use to composite all of my printer-ready
pairs onto virtual card mounts. You might wish to get a similar "Designer"
type program in order to make "monolithic" (one piece) view card printouts.
I have despaired of creating a tutorial because it will be obsolete (with
respect to the devil's dance of revisions in graphics programs) by the
time you happen across it. Instead, I'm offering old fashioned "trim and
mount" steps:
t-plate-steps.htm
--done with an exacto knife, mat board mounts, and
some kind of adhesive (say: double stick tape).
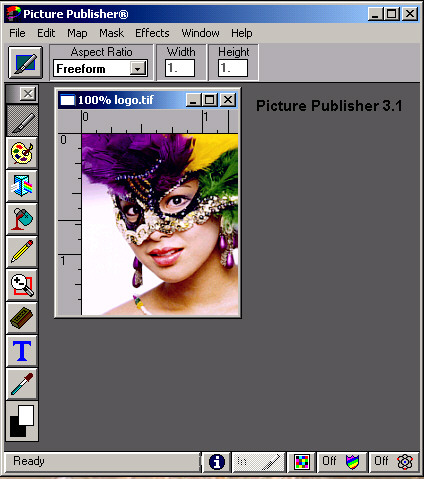
* To prepare the pairs, I use Micrografx "Picture Publisher"
in two versions: 3.1 and 8.0.1. Version 8 seems to still be good enough
to keep up with the graphics world's new formats, but it has crummy auto-masking,
will annoy you with it's non-alphabetical file formats list, will try your
soul by suggesting that you've modified an image file when you haven't,
and then there's the need to constantly deal with combining "floating objects"
--so: my heavy lifting, first run graphics program (working 24 bit RGB
TIFFs) remains version 3.1, which I bought new in 1993.
** Version 3.1 is the best thing Micrografx ever put
out. It cost me nearly $500 in 1993, and that was a big reduction from
its 1992 price of $800. It beat the pants off of Adobe Photoshop, it melds
perfectly with Micrografx's Designer-4.1 (another big chunk of cash at
the time) and remains tops for graphics scut work to this day. It won't
handle the newer JPEGs (which I convert to TIFFs anyway) and some of its
advanced features (like algebraic photo pastes, which I used for making
anaglyphs) are lamed when run under in today's operating systems (at least
up to XP-3 --and Vista on up seem to be a no-go for this old 16 bit program).
PPub-3.1 treats masking differently in that you work
with outlines ("arcades") which describe objects that you can subsequently
move copies or cuts of in a very controlled, even calibrated way.
* I tried to determine if this work can be done with
"Paint Shop Pro-7", but by the time I was working on an approach, out came
the much changed version #8 (then 9, then the 48 bit 10, then all of it
apparently abandoned by Corel) --so my tutorial screen captures and techniques
would have been obsolete from the get-go. I've also tried editions of Adobe
Photoshop (which product seems to have taken a hit in its "elements" version),
the excellent, well designed (and affordable) 48 bit capable program "Picture
Window Pro 3.5", and even the Russian "Picture Man 5".
Earlier I tried Corel's "Paint" (sunk months into that
one) and half-a-dozen lightweight graphics programs.
Sometimes I think about having a now ancient 486-DX
based computer specially built for me that will run under Windows-3.x (which
I tried doing once, but the old computer tech's wife died and he went to
pieces).
The
basic image:
Set your camera to save images
with minimum JPEG compression ("Fine") and 1200 pixels on the vertical
--by whatever minimum horizontal resolution is available (often 1600).
If you camera can be set to save without compression --and you've purchased
lots of memory, then go that way.
* Once you transfer your images
onto your computer's hard drive and start working them, always resave
them as TIFFs, BMPs, or some other "non-lossy" 24 bit color file format.
If you keep resaving to JPEGs, your images will suffer serious degradation.
(Exception: you of course make a separate JPEG copy for use as e-mail attachments
and web page postings.)
* The first step in working a
digital pair is to open first the right, then the left frames, copying
each and placing them together into your (say) Holmes/Bates format 3.5"
x 7" card size image space (a "TIFF" image AT 300 DPI).
* When you place the right image
you'll have to reduce its size --per the displayed ruler above the card
image --and you want about 2-7/8". A good graphics program tells
you what finished percentage and/or pixel size that is --so note
that number. (That number will likely vanish when you "set" the image --write
it down.)
* When you place the left image,
first size it to the same reduction you used for the right image, then
move it over the right image in order to match it for vertical registration
(possibly selecting 50% transparency mode), THEN move it (straight!) back
over to the left and set it.
*** NOTE: If you have any intention
of outputting your stereo pair to a printed view card, be very sure to
work your pair as a TIFF image at 300 DPI and to scale (ie: sized for a
traditional Holmes/Bates 3.5" x 7" card). In that case, the header on your
graphics program's image pair window is going to indicate "1:4" (25% display
size) as you work on an 800x600 monitor, or maybe "1:2" (50%) if you're
working on a higher resolution monitor. I suggest that you work all view
pairs for a 7" card and reduce the finished pair to 71% for 5 inch wide
cards.
Also:
* If you create your pair on
a 41% gray ground, it stands a good chance of matching Crescent brand "Photo
Gray" mat board --assuming that you physically cut out and mount the pair
as chips.
Scanning In Your Old Stereo
Film
{5/14/05 update: I now use the affordable "Canoscan-8400F"
--cheaper and better than my old Olympus ES-10S --which no longer works
in an XP environment.]
It's important to get that old color print film digitized
before it fades --but it's tough to get good commercial scanning service
for 5 and 4 perforation stereo frames. Consider purchasing a film scanner
and doing it yourself.
Here follows 3 self-legended, gray scale, ES-10S test
frames for your consideration. (I removed a lot of scratches so these frames
would compress nicely.)
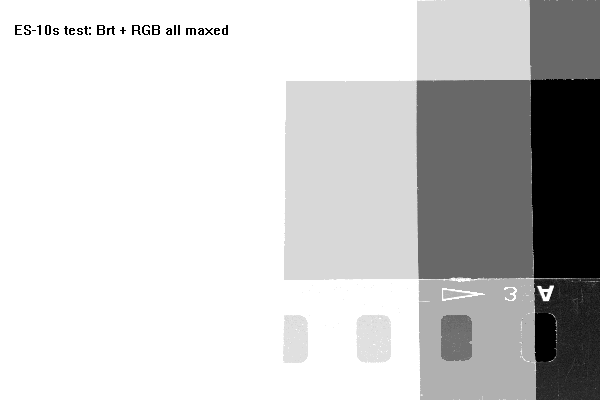
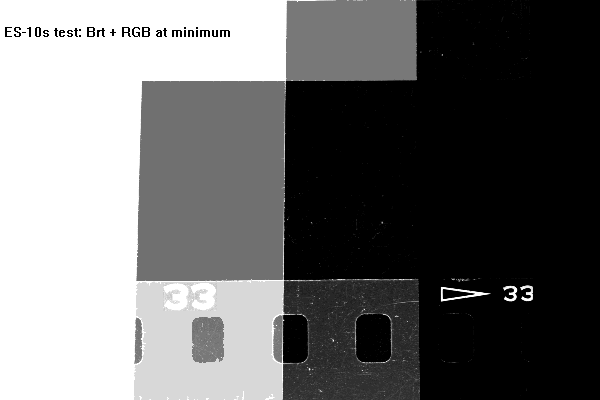
Like most digital imaging, the ES-10S outputs 24 bit
color --which is just enough to allow a bit of image correction and still
be able to turn out a nice print. Unlike most film scanners, its "D-range"
is vaguely described and often assumed to be only "24 bits". According
to the manual, the ES-10S uses up to 30 bits internally --but that still
doesn't address a scanner's grasp of density range --from which one may
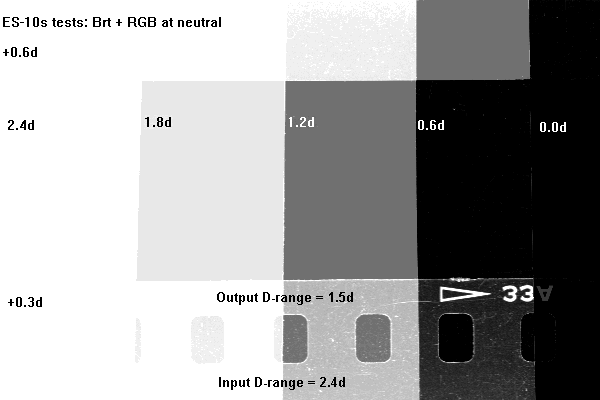
choose about 1.5d for a 24 bit color output.
Context:
* Don't be confused by "32 bit" color imaging --which
often refers to "CMYK" printer ready images --and includes the otherwise
redundant 8 bit "K" channel.
* A D-range of 1.5d (beyond the .3d or so film base/mask)
is about it for most photographic color prints. (I've measured a 1.8 Dmax
on force-dried gloss imaging.)
* It's also about the range of color negative film
emulsions --which (accordingly) run at a gamma (or: "contrast index") of
about .5 --instead of the .7 or so for black and white emulsions.
In other words, the reach of even a humble scanner
like the ES-10S exceeds the reach of most color negative emulsions, answers
the tonal range you'd want to make a print, and can drag about the same
image out of a negative that you'd be able to produce in your darkroom.
* Black and white negative films and color reversal
films run a much deeper Dmax of up to 3d (1000-to-1) --maybe beyond for
astronomical emulsions; so the limits of the ES-10S can be important. But
again: to turn transparencies into prints, some of a slide's tonal range
often has to be compressed or thrown into black anyway.
'Bye for now,
Craig
(On to
Trim-2)