Working With Available Cameras
--to get good stereo print pair views
last worked on: September 28th, 2022, but see
here first. (Much of my old film based copy
remains below.)
~~~~~~~~~~~~~~~~~~~~~~~~~~~~~~~~
-
Fastfind>>
Loreo pairs, Digital
camera pairs,
Stereo format film pairs,
Standard
and 6x13 format,
Template method, Glossary,
Understanding
trim & mount, Graphics basics,
Home
page, Freeviewing,
Scans,
Affordable
stereoscopes,
Scans-2, Print
pair stereographs, T-5 format, Camera
formats, resolution, f/stops & diffraction,
 **
Aside from all the digital graphics distractions --here and elsewhere --about
how to make stereo image and print pairs, if you can simply figure out
how to get a balanced stereo pair of prints, then --with a razor knife
in hand, trim and mount them. *Click here*
for more about trim-and-mount steps. Click *here*
for getting print pairs out of your W3 camera.
**
Aside from all the digital graphics distractions --here and elsewhere --about
how to make stereo image and print pairs, if you can simply figure out
how to get a balanced stereo pair of prints, then --with a razor knife
in hand, trim and mount them. *Click here*
for more about trim-and-mount steps. Click *here*
for getting print pairs out of your W3 camera.
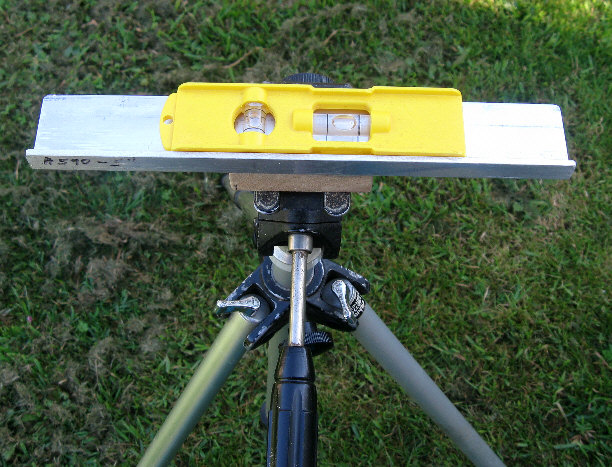
* Or: you can pick up a decent
used "hand camera" (like one of the Canon "Power Shot" series --an A590,
say) from your local Goodwill and make "shift sequential" stereo pairs
--either hand-held (being careful to keep the camera level), or using a
slide bar (per the image at left^). This precludes action stereography,
of course, but just snap the whip and order your subjects to "freeze --hold
that pose!".
^That slide bar could be made entirely from a piece
of seasoned hardwood (plus a recessed 1/4-20 "T-nut"), but I had a short
piece of 1.5 inch aluminum angle stock handy. (For 10 years it mounted
a pair of Sony DSC-P71 hand cameras.) I cut the near side low enough to
see my hand camera's display. My Canon A590 has a nicely squared off back
and bottom (with steady rest dimples). I place it to the left, shoot, "half-depress"
the shutter release (to lock in an identical exposure), then slide it to
the right for the second exposure. If you do use aluminum angle, be very
careful if you cut it with a table saw: use a push stick, a hold stick,
and a face shield. Shards of aluminum come at you like little daggers.
* Many stereographers have rigged a pair of synchronized
cameras (perhaps just 2-fingered manually "synched") on such a bar, but
then you have a file management problem: matching pairs of frames from
two cameras. (Try it for a while. You'll see my point soon enough.)
~~~~~~~~~~~~~~~~
* The Fujfilm
FinePix 3D W3 originally sold for $499.95, but the
2013 price was only $229.99 (with free shipping from Amazon.com). In 2017,
just the used price was up in the hundreds. I vote this the best stereo
camera ever made. Unfortunately, Fuji left it to volunteer 3rd parties
to deal with its JPEG pairs, which are co-joined as "MPO" format --since
you were supposed to either order expensive lenticular prints, buy an expensive
lenticular digital display device, or display them via a computer screen
or a 3D ready TV. The 3rd party solution ("Stereo Photo Maker") worked
wonderfully --for those who who were aware of and had the initiative to
use it.
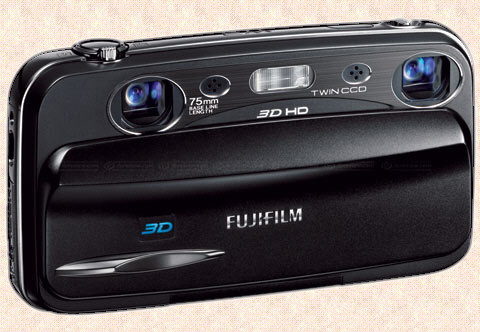
* The features this camera has
work perfectly and (when set to automatic) painlessly. A critical feature
it doesn't have is either an optical or an "eye-peeper" electronic viewfinder
--which (for me) prevents the W3 from becoming my "vade mecum"/always with
me camera. (I always pack a Canon A590 hand camera.) Another drawback is
its small size and fingers-in-the-way lens placements. To make this camera
more useful, I mounted it on a handle bracket. (more)
--see:
http://www.pcmag.com/article2/0,2817,2367883,00.asp
http://www.shopfujifilm.com/
http://www.shopfujifilm.com/detail/FUJ+16082969
.
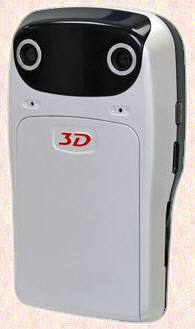 *
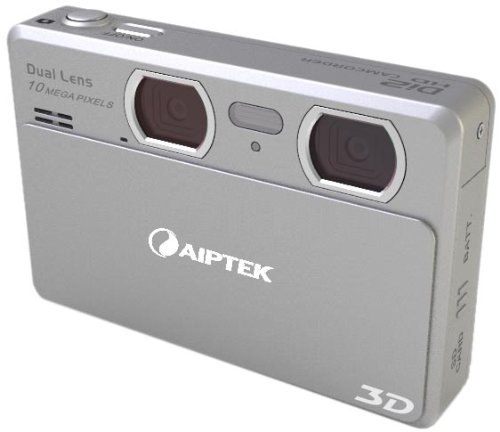
Here's a very affordable stereo camera (under $60 in 2013 from Amazon --with
free shipping!) --that was originally named the Aiptek "i2" camcorder (which
might still be the name in Europe). It takes side-by-side, high resolution
JPEG stereo still images as well. Apparently, the name was changed (just
in the U.S.?) to "DDD11K 3D-HD", and then again to simply the "Aiptek
3D Camera". I've found some good samples of what the Aiptek 3D Camera can
do --per:
*
Here's a very affordable stereo camera (under $60 in 2013 from Amazon --with
free shipping!) --that was originally named the Aiptek "i2" camcorder (which
might still be the name in Europe). It takes side-by-side, high resolution
JPEG stereo still images as well. Apparently, the name was changed (just
in the U.S.?) to "DDD11K 3D-HD", and then again to simply the "Aiptek
3D Camera". I've found some good samples of what the Aiptek 3D Camera can
do --per:
http://www.flickr.com/groups/aiptek3d/
and:
http://www.flickr.com/photos/46103183@N05/4941047668/sizes/o/in/pool-1467143@N24/
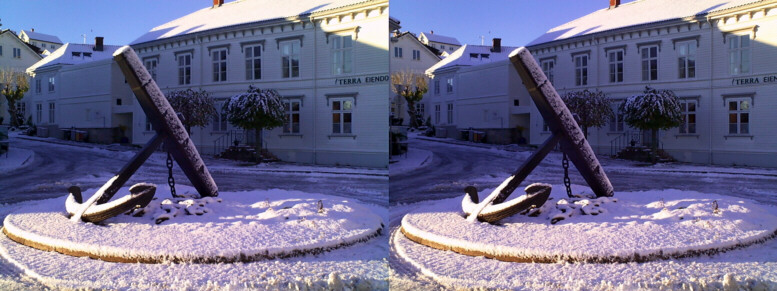
--where we see a full sized, raw, Aiptek pair. It needs
to be stretched 2x horizontally, at which point the camera's built-in sharpening
becomes apparent at full size. So I'd instead reduce these images 50% vertically,
then gently resharpen, ending up with a pretty nice pair, each frame of
which measures 972 x 1296 pixels --fine for printing a standard pair for
a traditional stereoscope (IMO).
Note that some graphics programs won't allow of "smart"
or "high quality" re-sizing (pixel averaging) when you choose to re-size
only in the vertical or the horizontal, so you end up with edgy artifacts.
If so, you might be able to mask the whole pair, then re-size in (something
like) "high quality" mode. Directly after pixel averaging, the softness
which results yields readily to mild image sharpening.
* Unfortunately, owners of these cameras are getting
paired images, including the above full rez view posted by Mr. Rekonius,
and including in the parallel pair versions of the "official" videos linked
to at:
http://3dvision-blog.com/aiptek-ddd11k-3d-hd-camcorder-now-shipping-for-199-usd/
-- which show slight color balance mismatches
(but see for yourself). Perhaps Aiptek will fix this --and the video frame
rate. I hope so, since the Aiptek could be a photographic history making
"people's 3D camera"!
See more on Aiptek here and here.
9/12/2010: * None of those
contributing opinions to Amazon (so far) have taken note of any left-right
color balance problems in the
Aiptek camera,
probably because none of them has spent time looking at these stereo images
as side-by-side displays. (Many of us in the SSA make side-by-side print
pair stereographs). However, they've surely used their cameras in the 2D
mode, which tells me that, even for people with good color vision, few
people will notice color casts in Aiptek's image pairs (I'm not talking
anaglyphs), unless two images with different color balances are placed
side-by-side.
In the past, I've also noticed
that, even when such differences in stereo pairs obviously exist, they
go without notice as long as the image is being viewed/fused as a 3D image
--which is always the case when viewing via a 3D TV set. Possibly, and
for 99% of consumers, Aiptek would never need to address this issue.
I expect that they will, however (on the assumption this camera will stay
in production), since it will cost little or nothing more to manufacture
them with balanced image pairs --once the costs of correcting this problem
are out of the way.
~~~~~~~~~~~~~~~~
* As of January 2018, a number of "3D" and "VR" cameras
are appearing at Amazon.com, mostly in the $200 and up range, but I saw
at least one entry under $100. These are mainly marketed as WiFi equipped,
streaming cameras for giving your social media followers real-time, virtual
reality glimpses of your fabulous life --but it seems that most are also
capable of out-putting a left-right pair of high resolution, still photos.
~~~~~~~~~~~~~~~~~~~~~~~~~Older camera
"news":
* China has weighed in with a really nice looking digital
stereo camera, the HDC-810 by Inlife-Handnet Co., Ltd. It has the cine
and stereophonic sound capabilities that people have come to expect, but
with a "barrier" type display, like the Aiptek's description, and I'm not
sure what that means (a fine, vertical grid overlay, perhaps). See it at:
http://www.made-in-china.com/showroom/nini7332/product
~~.html
http://alloffer.com/tradeleads.php?number=93784&category=
* ViewSonic will be showing their new 720p 3D camcorder
at IFA 2010, held in Berlin. Anticipated price: $300. (It resembles Aiptek's
camera.)
http://www.vizworld.com/2010/09/viewsonic-demos-3d-video-camera-display-frame/
* The Inova 3D Camera takes the cake --for looks, specifications,
and imaging. With some additional investment into processing equipment,
you end up with a head and shoulders, physical, color, 3D model of a person
inside a cube of plastic. (The SSA would have to create a new circuit for
such imagery.) Do see it at:
http://www.hans3dlaser.com/topic.php?channelID=15&topicID=79&productID=96&action=product
* The DXG-5D7V pocket camcorder --with very close lenses
(good for macro?) $600 at:
http://www.zdnet.com/blog/digitalcameras/dxg-5d7v-debuts-as-worlds-first-3d-pocket-camcorder/3481
* Let us not forget the fine line of Holga cameras
:-) See them at:
http://www.holgacamera.net/servlet/the-1895/Holga-120PC-dsh-3D-120mm-Pinhole/Detail
http://www.holgacamera.net/servlet/the-1896/Holga-lomo-120-120gcfn/Detail
* The "3DInlife Digital Video/Still Camera/Player"
at $795 and climbing (as the HD version is being brought out). See it at:
http://www.3dstereo.com/viewmaster/cam-3dil.html
.
* Takara
Tomy's $70 "toy" camera weighs in with its 1/3rd megapixel sensors.
~~~~~~~~~~~~~
For information about how to work with these digital
stereo cameras to create print pair stereographs, *click
here*
Diffraction:
For the Fuji W1 and W3 the range of shutter speeds is 1/2 to 1/1000 second
(I see no mention of "bulb"). Apertures run f/3.7, f/5, f/8 at widest angle
and f/4.2, f/5.6, f/9 at max optical telephoto. Be my guess that you'd
not want to use the f/8 > f/9 settings for highest-sharpest rez results
because lens diffraction at f/8 seriously limits resolution. I have a Canon
A590 with a similarly proportioned sensor and have seen this fall-off,
which is not due to any defect in the lenses (which resolve far better
than the lenses of film cameras), but to the physical nature of light.
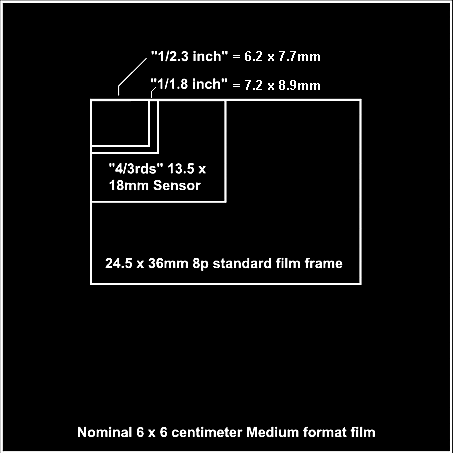 Sensors usually have a native aspect ratio in the classic/academy
ratio of 4:3 (4 to 3). The usable area of the W3's (trade size) "1/2.3
inch" sensor is about 6.2 x 7.7 millimeters. To support a horizontal resolution
of 3,648 pixels (at the 4:3 10mp setting), the sensor's pixels are spaced
an astounding (astounding to old me, but fairly normal, by today's standards)
2.1 microns (83 millionths of an inch!) apart; whereas the "circle of confusion"
Sensors usually have a native aspect ratio in the classic/academy
ratio of 4:3 (4 to 3). The usable area of the W3's (trade size) "1/2.3
inch" sensor is about 6.2 x 7.7 millimeters. To support a horizontal resolution
of 3,648 pixels (at the 4:3 10mp setting), the sensor's pixels are spaced
an astounding (astounding to old me, but fairly normal, by today's standards)
2.1 microns (83 millionths of an inch!) apart; whereas the "circle of confusion"
(see: http://en.wikipedia.org/wiki/Circle_of_confusion)
(also see the "Circle of Confusion" entry in Glossary.)
--in a classic 35mm film camera with a 50mm lens is
taken to be about 30 microns (based on the film format diagonal divided
by 1500). With quality optics used at a sensible f/stop, however, that
much of a CofC is more about being able to work within a practical "depth
of field" ("DOF"), since to realize (say) a diagonal/3000 CofC, your depth
of field would be halved --or your "hyperfocal distance" (the focusing
distance at which everything from half as far to infinity is CofC sharp
or better) --doubled.
(see: http://en.wikipedia.org/wiki/Hyperfocal_distance
* In reality, a good camera lens might have a much
smaller CofC. I checked Nimslo lenses at an impressive 1/4000 of an inch
(wide open at f/5.6), which is 3 times better than its (18 x 22.5mm) film
format's diagonal divided by 1500. That's a CofC of only 6.4 microns (half
again larger than the theoretical limit) --which is still 3 times (or so)
worse than the working resolution of most modern digital cameras --!!
As a consequence, digital cameras are up against the
limitations of light itself. When the W3's lenses are set to minimum zoom,
their focal length is 6.3mm. At f/8, their apertures are only about 0.8mm
in diameter. According to theory, the resolution limit of such a little
lens is about 2.6 arc-minutes --which amounts to the near-merging of two
10 micron diameter "CofC discs, at a focal length of 6.3mm. (Any f/8 lens
has a theoretical resolution limit or circle of confusion on the order
of 10 microns wide, by the way. At f/4 it's more like 5 microns (yes: about
twice the pixel spacing).
* It's important to note that nearly all of today's
compact cameras live with this contradiction. While one does enjoy a finer
grain/image structure at the top megapixel setting, and while the old fashioned
rule of thumb is that to actually realize the resolution of a great lens,
the film (or sensor) resolution should me 3 times better (almost exactly
the case here), that works both ways. In order to realize the sensor's
full resolution, the lens should be 3 times better.
* The short version of this story: we only start to
get close to actual 10 megapixel resolution wide open (f/4) --according
to theory --but I know for sure that f/8 seriously compromises that resolution.
** For stereography, this becomes (or should become)
a serious handicap. Bob Pfeiff reports having to fight the W3's automatic
settings in order to work at the apertures and shutter speeds he prefers
--and I bet that's f/8, maybe f/11 if he had that option. However, he also
reports "super depth of field" at any setting, "as all these small sensor
cameras do". It's true: rarely are there DOF problems with affordable digital
hand cameras.
The great DOF of very short, wide angle lenses is due
to the "bug's eye effect" in which items even a few feet away might as
well be a hundred feet off in the distance. We have to look at the ratio
of the camera's focal length to the subject distance. At half the focal
length, you get twice the DOF at the same f/stop.
* I liked f/11 best when I shot stereo with a 40+ year-old
Kodak Stereo-35 --which also had great lenses. The CofC at f/11 might top
out at 15 microns, but I used a DOF for 2 times that size, since film halation
usually spreads bright details to 20 microns or more and my ability to
print the negs (with a Rodenstock lens in a Beseler dichroic color head
enlarger) implied an effective film resolution of 18 to 30 microns.
To scan those frames at 18 microns resolution, nominally
that only requires the 1600 dpi setting, but I use 2400 dpi (recall the
"rule of thumb") to nail it in --and my affordable Canon 8400F does give
better results at the higher setting. (8400F is an old model number now,
but the new model is even better. Moreover: these excellent flat bed scanners
can be set up to accommodate our oddball stereo formats.)
* Note that 18 micron resolution on film is darn good
imaging, but on our (nearly) inch high film formats (4p, 5p, and 8 perforation/1.4"
width of "full frame"), we're "only" talking 1600 x 2400 pixel resolution
--commonly considered good for 8x10 inch print enlargements --or perhaps
11x14, but very adequate for stereo slides and our 3 to 4 inch high print
pair stereographs.
For years I've been shooting a pair of old Sony DSC-P71
cameras on a bar (which retailed at $400 each in 2002!). They have "1/1.8
inch" sensors, which I use at the full 3.2 megapixel setting --for 2048
pixels spread across about 8.9mm of sensor width. That's a pixel spacing
of about 4.3 microns, which should be pretty good for down to f/5.6 --which
is as small as the f/stop gets when I aim my cameras into a light bulb.
(Actual resolution tests by Digital Photography Review in 2002 with the
camera only reported as being set to "auto exposure" reached "1400 lines",
which I think should be corrected to about 1800 lines --or 900 line pairs,
after studying their resolution chart image.)
**In a (revised in 2008) Photo.net commentary centered
on the Olympus line of DSLRs
http://photo.net/equipment/olympus/
--which are based on a "4/3rds inch" sensor (17 x 13
to 18 x 13.5 millimeters of available area), it was noted that lenses for
digital DSLRs often cost much more than for older film type lenses. Also
noted was the recommendation from Olympus that their old "OM" series 85mm
x f/2 film lens, when adapted for use with a DSLR, only be used over an
aperture range of f/5.6 to f/8. This is very telling. The sensor in a 10mp
Olympus E-450 (successor or steps up from the E-410 and 420) records 3648
horizontal pixels at the top rez setting. Divide that into 18mm and you
get a pixel spacing of 5 microns --half the theoretical diffraction disk
of an f/8 lens. I've read elsewhere that, at least until lately, CCD sensors
(perhaps CMOS as well, I don't know) don't accept light very well from
low focal ratio lenses, due to much of it hitting the sensor elements at
too acute an angle. (Perhaps special treatment of the rear lens elements
in new camera lenses has gotten effective apertures down to f/2.8 from
the f/4 of earlier digital lenses.)
** If we're willing to accept the resolution which
could be practically realized from film formats (1600 x 2400 pixels for
full frame 35mm cameras), then by using the lowly "4 megapixel" setting
--or something in that range, the effective pixel count across an 8mp or
10mp sensor is reduced and the f/8 setting (if available) doesn't look
so bad.
Conclusion: Hmmnnn - -
- -
I no longer have a color darkroom. Even when I did,
developing color film and printing it was no fun: long hours, discipline
about dust/handling (cotton gloves, the darkroom maintained at a positive
plenum pressure with a triple filtered air supply), temperature to a fraction
of a degree, operating voltage to 1 percent, color corrections to within
a few "CCs" (filter speak). Nowadays, assuming that your photo finisher
hasn't funked up your uncut film roll, cutting film into strips for sleeving
into negative pages, then handling it for scanning (trying to outsmart
the frigging dust) --that's slow work which isn't a lot of fun either.
In order to return to my film cameras, I'd need a processor
who'd develop and give me good scans while the film is still virginally
clean. I'd probably want to digitally "trim and mount" them myself (for
over-the-counter printing of the composited image files from my CD), but
I could get lazy if it were possible to get back fair monolithic pairs
again (as we once did from Janet and Mark McCoy's Grand Photo in St. Paul,
Minnesota).
~~~~~~~~~~~~~~~~
More on the Aiptek 3D camera
March 1, 2011 update:
I've finally heard back from Aiptek Customer Support,
concerning the advisability of applying firmware updates to your Aiptek
3D camera on your own --as follows:
~~~~~~~~~~~~~~~~~~~~~
Hello and apologies for the late response. It is understood
that there are concerns about the Aiptek 3D cam being up to date. Currently
available at Aiptek.com the 3D cams being sold are up to date. If you consider
purchasing from other resellers and discover that the unit could be having
an issue please contact tech@goaiptek.com so that we can provide what is
needed. Firmware updates can be tricky for some customers and if performed
incorrectly can render the unit non-operable. It is for the reason each
case is treated one by one by Aiptek USA.
Have a Good day.
Aiptek Customer Support.
~~~~~~~~~~~~~~~~~~~~~
I think I'll wait a while on making that purchase.

 August 13, 2011 update: By golly, a new Aiptek camera,
the DDD21X, is now for sale through Amazon.com for the oddball price of
$146.17 (with free shipping). This successor model is still priced at $121
to $153 from 3rd party sellers in March of 2013. It's said to be a significantly
better camera, that it uses 2 sensors, compared to the "i2's" single sensor.
Near as I can tell, they otherwise have the same specs, but the i2 has
stereo sound and the new one is monophonic. But hey: the new one looks
more like a camera and we can at least be assured of getting the newest
firmware.
August 13, 2011 update: By golly, a new Aiptek camera,
the DDD21X, is now for sale through Amazon.com for the oddball price of
$146.17 (with free shipping). This successor model is still priced at $121
to $153 from 3rd party sellers in March of 2013. It's said to be a significantly
better camera, that it uses 2 sensors, compared to the "i2's" single sensor.
Near as I can tell, they otherwise have the same specs, but the i2 has
stereo sound and the new one is monophonic. But hey: the new one looks
more like a camera and we can at least be assured of getting the newest
firmware.
~~~~~~~~~~~~~~~~~~
I found a number of sample Aiptek-i2
camera images at Frank
Eivind's web site:
 --which are given to us under Creative Commons license
(simply acknowledge Frank as the photog). You be the judge (of this vertically
adjusted and downsized sample), but I think there's still a slight color
difference, left to right
April 4, 2011 update: I wrote to Aiptek, asking what the
lens spacing is on their new (silver) "DDD21X" camera (as we see it at
Amazon.com,
but not yet at the Aiptek USA web
site). They answered:
--which are given to us under Creative Commons license
(simply acknowledge Frank as the photog). You be the judge (of this vertically
adjusted and downsized sample), but I think there's still a slight color
difference, left to right
April 4, 2011 update: I wrote to Aiptek, asking what the
lens spacing is on their new (silver) "DDD21X" camera (as we see it at
Amazon.com,
but not yet at the Aiptek USA web
site). They answered:
~~~~~~~~~~~~~~~~~~~~~~~~~~~
Hello and Thank you for the e-mail inquiry today.
Hope you a great weekend!
The 3D cam sold by Aiptek USA has a distance of 2 and
half inches between
each lens center to center.
Have a Good day.
Regards,
Aiptek Customer Support
~~~~~~~~~~~~~~~~~~~~~~~~~~~
How interesting, but if those lenses are 2.5 inches
apart, the camera in Amazon's photo scales to over 6" wide, which is hefty,
but not as hefty as in Amazon's specs: "7.5 x 5.5 x 3 inches; 1.5 pounds"!
** I see an April 4th 2011 buyer review at Amazon.com
which states that his new Aiptek i2 arrived in dire need of a firmware
update. He confirms that you can not download updates from our USA web
site --have to go to Europe, but be very careful. Read and heed
the "ReadMe" text which comes with each (Zipped) update --as to whether
it will fix or trash your camera. Don't go by anyone else's experience,
since it seems to be that Aiptek keeps updating their firmware updates.
Again: the original Aiptek (variously named the "i2",
the "DDD11K", or just the "Aiptek 3D Camcorder") --has a lens separation
of 40mm (measuring off of a dimensioned photo here), and Fuji cameras have
75mm
(as proudly stated on the front of the camera).
* Since our bodies and heads keep moving around, we
unconsciously integrate some added "dynamic" perspective to the parallax
difference between our eyes. David Burder once did an informal study using
an audience of average folks --not jaundiced, prejudiced stereo buffs.
His determination was that stereo didn't look optimum to his crowd until
it was somewhat hyped.
* My measurements of traditional and modern (50s -
60s) stereo systems (cameras, enlargements, viewer focal lengths) suggested
an average hypering of about 1.4x or so.
* My own experience with stereography is that, while
up to 2x hypering is usually welcomed and favorably commented upon, most
of us are very flexible about the actual parallax content in a view (or
"deviation"), as long as there's enough to get our "eye teeth" into --and/or
if the pair is at least set off with a reasonably trimmed stereo window.
* Should I buy the Fuji or the Aiptek?
Given the problems with Aiptek, I think that a Fuji
W3 is the only safe purchase.
* That said: even with its color balance and frame
rate problems, the Aiptek i2 is a darn good value --and color is not a
problem for anyone who can casually correct it with a digital graphics
program --but: I suspect you'll always have to do the vertical "stomping"
(and maybe the color balancing) yourself to get good print pair stereo.
* Then there's the killer issue of lens separation:
only 40mm in the Aiptek, versus 75mm in the Fuji. That's no contest for
scenic stereo views --although the Aiptek might be best for interiors,
portraiture, and adequate for urban scale views.
* The downside of Fuji is that you probably want to
know how to run its lights, beeps, zoom, parallax, etc. --while the Aiptek
is truly "point click".
* The W3 does have an "Automatic" mode, and that "parallax"
adjustment can be set to automatic. (I'm not sure what it actually does,
but it certainly affects the camera display. I think you get the same left
and right frames at any setting, but there's encoded information which
tells the camera display, the official Fuji "V-1" viewer and their lenticular
printing service how to set the stereo window. --That's just a guess, since
you can adjust the parallax afterwards as well, when viewing your shots,
or composing them with Stereo Photo Maker.)
* Elsewhere I've been bemoaning the wide format of
this camera, but that's selectable. You can choose (and display) a 4:3
aspect ratio (yay!). You might get dropped from 700+ shots to "only" 500+
per SD card, but you capture nearly the same width as in the field of view
with the "wide" setting --so why not?
** I've mixed feelings about getting into the menu
in order to force W3 to use lower ISO values, but I'd set the automatic
exposure mode for a range of 100 to 400. Remember to also set it for automatic
parallax, "L" for large image files, "Fine" for least image file compression,
"Multi" for automatic-exposure ("Photometry"), "Multi" again for the auto-focus,
and you should find that "Auto White Balance" is the default.
Earlier writ:
See favorable reviews at:
http://news.cnet.com/8301-17938_105-20006613-1.html
--and especially: http://www.trustedreviews.com/camcorders/review/2010/08/23/Aiptek-3D-i2/p1
--by James Morris (who's still calling it the "i2".)
To which I'll add some more comments:
~~~~~~~~~~~~~~~~~~~~~~~~~~~~~~
Morris doesn't have much to say about this camera's
still capabilities, but he never-the-less covers that aspect quite well
--since there's little to say. This camera is mostly "point click", with
few user adjustments. His review includes an excellent video with quite
a bit of Aiptek 3D footage (in the video and posted to YouTube), but the
anaglyphic rendering he shows us isn't the best (which might be due to
whatever editing suite Morris uses).
Main points to emphasize:
~ The camera's native 3D format is JPEG, side-by-side
anamorphic (horizontally squeezed). One must 2x stretch (and resharpen)
the pair, or squeeze down the vertical 2x (my choice) --before going
on to normal trim & mount/composition for a side-by-side print stereograph,
or maybe manually combining the pair into an anaglyph.
~ The sensors are a pair of 5 MP CMOS chips, which
Morris describes as being a "healthy" 1/3.2 in size. Perhaps he's unaware
that as that lower number goes up, the chip gets smaller. These chips appear
to be midway between the size used in a typical compact digital camera
and what you get in a cheapo security camera. The available imaging area
is probably about 5.7mm x 4.5mm (compare to a Canon A-590's "1/2.5" sensor's
7.2mm x 5.8mm area). However, at 5 megapixels, the Aiptek's sensor's pixel
spacing actually is "healthier" (more conservatively rated and theoretically
less likely to be troubled by image noise) than Canon's. At Aiptek's still
resolution of 2,592 x 1,944 pixels, the spacing is probably about 2.2 microns
(compare to the Fuji W3's 1.7 micron spacing).
~ The lens separation ('base" or "inter-axial" in movie
talk) is 40mm, so its parallax/deviation should be acceptable down to the
suggested nearest focus distance of 1 meter or 3 feet. While I prefer the
70mm spaced lenses of classic 5p 35mm cameras (Realist, Kodak Stereo 35,
etc) for general stereography, and maybe twice that for architectural and
scenic work (done with a ladder), quite often one is trying to capture
close subjects in confined quarters, where closer set lenses are desired.
The Aiptek's lens base of 40mm is very appropriate for a "party camera"
and most interiors, or for such as product and project presentations involving
models and prototypes.
~~~~~~~~~~~~~~~~~~~~~~~~~~~~~~
* The Aiptek camera is for sale through Amazon.com:
"ships from and sold by Amazon.com. Gift-wrap available" --and the shipping
is free --per:
http://www.amazon.com/Aiptek-DDD11K-3D-HD-Definition-
[url is too long]
(Same goes for the Fuji W3:
> http://www.amazon.com/Fujifilm-FinePix-Real-3D-W3/dp/B003ZHV70M
)
** If you can afford it, the W3 is clearly the way
to go, and it is possible to convert this camera's oddball "MPO" stereo
format into a pair of JPEGs by using the camera's comes-with software.
Aiptek and Fuji are rather different in that the W3
is more of a real camera with some degree of manual control, but the Aiptek
(at less than half the price) is much more user friendly as to operation
and letting you get at, display, edit, and share your images. Aiptek uses
familiar MP4 and JPEG formats. In addition to having a "3D ready TV" HDMI
jack, there's direct anaglyphic output for stills and video via USB, for
those of us with a computer and monitor in the house. (The ad copy's mention
of polarized glasses seems to be in error, although there might be "3D
ready" TV sets which use field rate changing polarization --that I'm not
aware of.)
~~~~~~~~~~~~
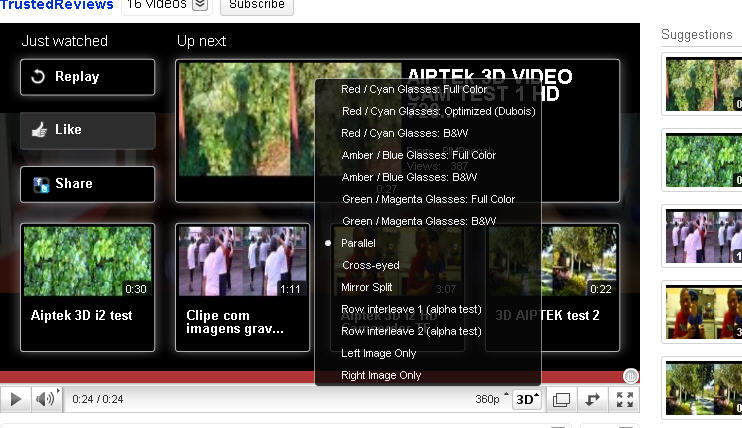
YouTube and Aiptek:
* Please note that YouTube, which is really on top
of 3D display, takes in Aiptek video format directly and provides a "3D"
button for many viewing options --as shown:
~~~~~~~~~~~~~~~~~~~~~~~~~~~~
While my wife and i have done a lot of work with film
and digital cameras via desktop digital processing (and see our treatments
of that elsewhere), no way is the average person going to do print pair
stereography without:
* An actual stereo camera.
* Processing which returns a
side-by-side pair of prints, adequate to be viewed as is.
* Very affordable stereoscopes.
~~~~~~~~~~~~~~~~~~~~~~~~~~~~
~ An adequate film camera, the improved ("Mark-2")
Loreo (below) --allows of standard, over-the-counter
processing to 4x6 prints (2 images each), and you might still be able to
find them. As of November 12th, 2007, the exporter listed Loreo Mark-II
Cameras as being "out of stock". Per my modifications
below,
the Mark-2 was not a trouble free camera. Also, I've experienced weak take-up
spindle tension (solved by Scotch taping the film's leader to the take-up
spindle).
You're probably better off ordering
the motorized Vivitar 3D Cam:
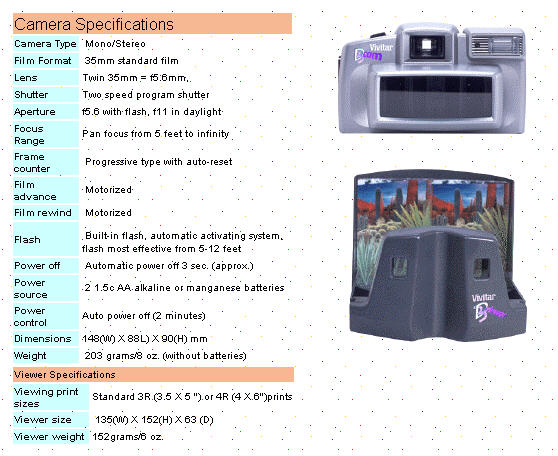
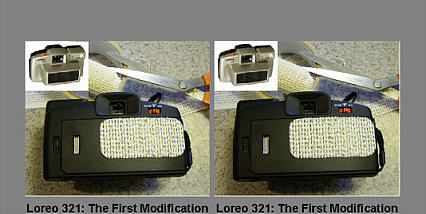
--although these cameras, often with the nameplate:
Loreo-321, require that the image pair be cut apart and exchanged ("transposed")
for normal parallel viewing. They're affordably sold by Berezin (visit
his web site at http://www.berezin.com).
They
can be set to take single full frames or stereo pairs, which come out as
standard one-hour processing compatible, split frames).
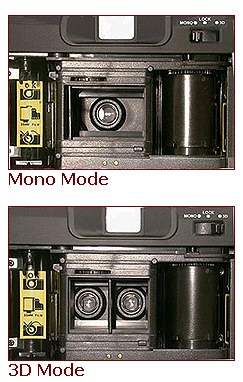
This camera also uses mirrors to provide an adequate
camera "base", or effective distance between the taking lenses (looks to
be about 55mm).
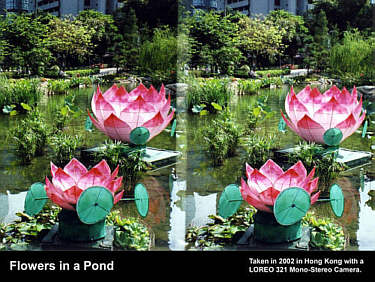
Here's a sample (cross-eye) view from Loreo's web site:
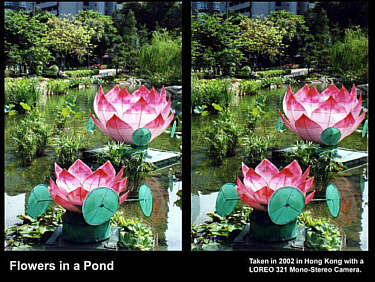
The same view, but trimmed and transposed for parallel
(standard) viewing:
For $55 (+ shipping/handling) you also get a cross-vision
viewer. (Again, and unlike the recently discontinued Mark-II, this
Loreo doesn't transpose.)
Since the 321/Vivitar is intended as a dual purpose
camera, its focal length, at 35mm, is a bit short (ie: wider angled) than
a "normal" camera lens, and a bit longer than what we'd expect in a 4p
camera (compare to 28mm for the Mark-II and 30mm for Nimslo's 4 lenses.
Despite such lens shift tricks, my samples of the 321 produced prints which
look just as sharp as those made by a Loreo Mark-II (which is plenty sharp).
Unlike the Mark-II's f/18 and f/11 stops, the 321's
day/flash settings are set to f/11 and f/5.6. Assuming that prime
focus for both cameras is set to 10 feet or 3 meters, if you force-flash
the 321 for filling a backlit subject (by placing a bit of black tape over
the sensor eye), I'd expect distant details to focus a bit soft.
With a fixed shutter speed of 1/90th second, color
neg film at ASA/ANSI-100 would be best in sunlight, but you'll want to
load 200 or 400 speed for to catch shots in the shade and extend your flash
range.
An advantage of the 321 is that it doesn't vignette
to the edges and corners like my samples of the Mark-IIs did.
If you don't like the narrower field of view for a
particular shot, try shifting to mono and weight-shifting a pair --portrait
or landscape. With motor drive, it's a breeze.
So far it appears that the long lens assembly housing
and its dark/baffled interior makes it unnecessary to add a sunshade, as
I had to do for our Loreos Mark-I and Mark-II. Hurray!
With its motor drive and somewhat longer lenses, this
seems to be a good camera for capturing action in sports, on stage, and
for bagging strange fleeting stuff (UFO apparitions?), provided you can
work in a bit of foreground for distance reference.
The 321's pairs have a slightly wider septum that almost
says: "cut here for mounting". Note that the 321's "septum" becomes
the outside edges of the transposed pair --which you'll often want to trim
even more.
This new Loreo has one fault that's easily fixed: it's
too slippery to hang onto with one hand. The solution--
--is to glue on a patch of non-slip rubber mat (often
sold in the automotive section). I used 20 dots of Duco Cement (after
first trying double-stick tape --which let go).
Again: the downside of all film cameras in recent years
is that unless you pay a high price per frame, all the affordable scan-to-disk
services I've tried are low quality to only adequate. Kodak's excellent
"Photo-CD" service is no longer available --pushed out by Kodak's low rez
"Picture CD" and similar offerings. Take good care of your negs!
Maybe you want to get an affordable Canon "Canoscan-8400F" (or the even
better new model 8800F), which has become a legendary film carrier adapted
flatbed scanner. My 8400F is good to 1600 x 2000 pixels on a full
frame. (Check availability. These models are now a few years old.)
I've read that optical [non-drum] scanners seldom exceed
an inherent limit around 2000 pixels/dots per inch. My last dedicated film
scanner, the well regarded Olympus ES-10s, was only rated to 1770dpi and
I felt its top end was more like 1200 (1200 x 1600 on a 35mm frame).
Affordable 'scopes have
to be used with 5 inch wide view cards, instead of the traditional 7 inchers,
which a 4x6 ("4R") printed pair like the above would be trimmed and mounted
on.
As my stereo friend Ernie pointed out to me early in
2006, commercial print processing is now cheaper and better than most of
us can manage with our own printers (or in the two color darkrooms I built
in the 80s and 90s) --so much so that I'm attempting to wean myself off
of the convenience of desktop printing in favor of high quality commercial
digital process direct printing from digital camera and custom composed
image files.
Although the affordable scan-to-CD service offered
with film processing is often crummy, over-the-counter digital processing
of film to prints is now of a high enough quality to support the smaller
"6x13" or 5" card format, which is viewed with (higher magnifying) 6 to
7 inch focusing lenses.
The 5 inch card format is about
71% the Holmes/Bates size we've traditionally circulated in Stereoscopic
Society print folios. Each frame of the pair measures up to 2-1/4" (57mm)
wide. Using 5" (127mm) wide cards, this might be called "6x13" format in
centimeters, even though European, medium format film based 6x13 is a tad
smaller. Such cards are best viewed with 6 inch focal length lenses, which
yield nearly the same perspective as viewing 7 inch wide cards with a traditional
(8" focal length) stereoscope.
* See below about processing digital
3x5 print files as a 4x6 print order.
* The Loreo Mark-II Camera.
This camera was considerably improved over the earlier
version and featured aspherical lenses plus glass mirroring with blackened
non-optical surfaces. The samples I've checked out have a sunshine aperture
of f/18 (1/60th shutter) which provides the advertised 2.5 ft to infinity
depth of field. Prime focus is set at 10 feet/3 meters and everything from
5 feet to infinity is sharper than my ability to scan the film.
* Again: you'll probably do better to order the non-transposing
Vivitar
motorized stereo camera from Berezin.
You'll still get a stereo pair on a normally processed 4x6 print, but you'll
have to cut the pair apart and switch them for use in a standard viewer
--either by taping them together or mounting the pair onto a common card.
Like the first version, the Mark-II transposes its
image pair internally (an essential print/mount step), so that its standard
8 perforation 35mm film format can be processed to 4x6 or 3x5 prints --like
any other camera. The Mark-II can still pick up ghost images from nearby
bright objects just outside the camera's field of view, but to a much lesser
degree. I suspect it's because the protective front plate (don't remove
it) is made of plain glass.
The supplied "nose piece" lens shade (and you want
to paint it flat black) helps prevent ghosting/reflections, but I've also
added a traditional surround or "super shade" to my camera --as illustrated:
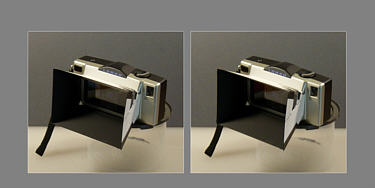
--Note the little door so that the viewfinder can see
through the shade. This shade can be made out of light gauge metal or poster
board (which has held up fine for me --even after dropping it in the ocean).
With this arrangement I seldom saw ghosts/reflections
in my outdoor Loreo pairs.
* Take off the shade when you use the strobe (of course).
You may have noticed that serious photographers and
cinematographers use such shades with any camera. I even made a "super
shade" for my old Kodak Stereo 35 cameras, which have excellent anti-reflection
lens coatings.
Until World War Two, and except for the natural "coatings"
which would slowly spread across the glass of really old camera lenses,
all photographers, famous, professional and amateur, worked without the
benefit of any anti-reflection coatings. So can you.
* Don't worry about the Loreo's effective stereo base
of about 60mm --very close to the 62.5mm average IPD of our eyes. It's
short of the 70mm in standard (1950s) 5p cameras (Realist, Kodak, Wollensak),
wider than the 56mm of Nimslo cameras, and just fine for general shooting.
If you need more base, then "side step" or synch a pair of cameras on a
bar --like we've always done.
Stereo straight up: The
easiest way to go with film from a Loreo is to simply get 4x6 prints --borderless
and glossy, from a processor whose using good equipment (like a Fuji Frontier
printer). You can use them as-is in a standard stereoscope, the Loreo folder,
the folding Loreo plastic viewer, or with a freehand lorgnette type viewer.
You can also cut them apart for traditional trimming and mounting in order
to get a septum and a clean stereo window. (Click *here*
for standard trim and mount steps).
You want to have at least one actual stereoscope (a
viewer which holds the card level with respect to the eye lenses) so that
newbies have no trouble viewing your stereo cards. However, for catering
to several visitors, you'd want several scopes --at about $100 each for
nice ones, $30 or so for Loreo plastic folders (if still available --and
you might want to use reading glasses with the Loreo folder, since the
lenses seem to be set a bit close to the print pair). So let's say that
you can easily afford that, plus buying the occasional gift scope for dear
friends, weddings, and such. Well: you'll soon notice that friends have
friends and relatives have relatives :-) --as I did. How much more affordable
to go with 5" wide view cards and give them all a $6 (or so) paperboard
stereoscope.
Archiving: Whether or not
you only intend to use the returned prints, keep your negatives neatly
filed with the processor's index photo (thumbnails of your whole roll of
photos).
Digital: It should also be
good idea to have your Loreo/Vivitar frames scanned to a CD by your processor
--if you can get good scans (I can't). That way you can always get dust
and scratch-free reprints made from your digital files. Again: you can
also scan them in yourself (I use a Canon CanoScan-8400F --which seems
to beat anyone's "Picture-CD" quality), but it's hard to beat the price,
convenience and the film cleanliness of ordering a CD at the time you turn
in your exposed film.
The Dale Labs' "Picture CD"
(see: http://en.wikipedia.org/wiki/Picture_CD
http://www.kodak.com/eknec/PageQuerier.jhtml?pq-path=511&pq-locale=en_US
--scan of my first roll was quite adequate, but not
top notch --despite the (inflated?) 2000x3000 pixel resolution and gentle
JPEGing.

At left is my CanoScan-8400F scan (inflated to match).
At right is the Dale Labs Picture CD scan.
Dale Labs offers individual "Pro Scans" and "Archiving"
scans at 10 times the cost of with-order Picture CD scans. There may still
be photo finishers who offer Kodak Photo-CD scans, which were usually of
high quality and cost about $1/frame, less when ordered along with initial
film processing.
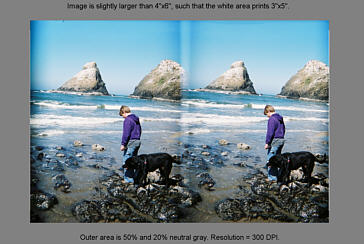
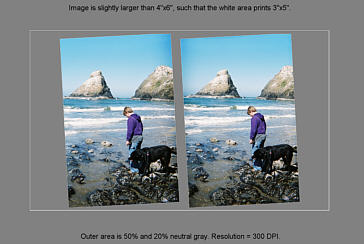
To use local 4x6 (only) print processors
--to end up with 3x5 prints, you can use a computer graphics program and
place these scanned files within a 3x5 area in a digital image file intended
for printing to 4x6. (Click *here*
to download such an image file, then follow these
directions.) Note the advantage in being able to have high quality monolithic
views (complete with windowing, gray surround, and legend) affordably printed
this way. To do this in standard format requires paying premium processing
charges to get 5x7 prints (except via affordable local [only] processing
to 4x7 at a "Hy-Vee" store in Cedar Rapids Iowa).
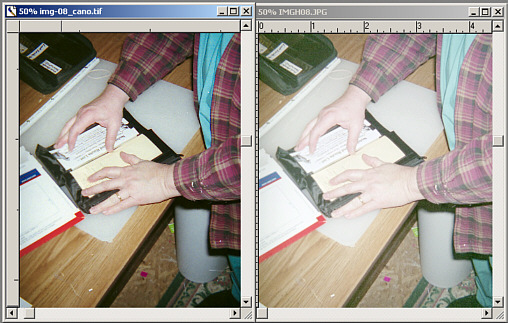
Here's an example (a Loreo shot) of what you'd get
back (the problems of which I'll address
below):
* Instant Digital Prints: Specifically: Fujifilm Instant
Digital Prints --which are printed on-the-spot via an interface station
on the photo-sound counter at your favorite department store: Bi-Mart's,
in my case. It cost me 25 cents and I got good, sharp results (3x5s in
a 4x6 frame, like the above image). There was no "image structure" or "printer
grain" in the solid areas and maybe just a tiny bit of edge artifact here
and there --barely visible --or maybe it was just my imagination.
* General image quality: My experience is that Dale
Labs and any processing service using Fuji equipment, whether in-store
or out, returns great to excellent prints.
* March 22nd, 2020 update. The only photo services
left that still use Fuji Frontier systems are Costco Photo Centers (far
as I know). My recent experience has been that other photo print service
systems (like Walgreen's and Fred Meyer's) benefit from being given 600dpi
image files (ie: your nominal 4x6 field is 3600 or a tad more pixels wide).
Their prints still fall short of the mark Fuji set --20 years ago-- but
at least you're getting damage resistant laser prints.
Film Scans,
however, are another matter. Dale Labs use to be second best only to my
own (cheap) Cano-Scan-8400F desktop scanner.
The 1440 pixel high CanoScan image at left was reduced
to match the (unmolested)
1024 pixel high "Fujicolor digital Album" scan (with
washed out highlights) at right.
Kodak Photo-CD is the best I've
ever used:
--Oh dang! Photo CD:
>http://www.kodak.com/global/en/service/professional/products/ekn017045.jhtml?CID=go&idhbx=photocd
>http://www.kodak.com/global/en/service/professional/tib/tib4164.jhtml?id=0.1.14.34.5.80&lc=en
--is an officially a discontinued product/system!
See: http://en.wikipedia.org/wiki/Photo_CD
--for what you use to get via PCD.
According to Kodak, Picture CD is only designed for
1024 (vertical) pixel resolution --way low by current standards and expectations.
Presumably, Dale Labs is somehow ginning that up to 2049 x 3072.
Should it be that you still have access to a PCD service
and are having trouble getting good highlights, download and purchase the
excellent graphics program: "Picture Window Pro", which has a lock on the
right "look up" table for reading and properly rendering Kodak PCD image
files.
Evergreen Film Service: --had
a well deserved reputation for quality. EFS was not cheap, but not prohibitively
expensive either. I use to rely on them years ago for my commercial printing
(they had the first Fuji Frontier processor in Oregon) and other special
services. For $22.70 plus shipping (2007), you could get your 36 exposure
roll developed and scanned at 2048 x 3072 pixel resolution onto standard
CDs. You can afford that --because you can't afford not to get good scans
while your film is fresh and unblemished. I'll give them another try --and
give you a report. [Okay, here's your report already: they went out of
business.]
Fixing Image Pairs: I
deliberately picked a bad example (below). Sweetie pulled on her leash,
tilting the photographer's camera. The camera's vertical septum/dissolve
between the frame pair is very prominent against the sky and a degree of
what appears to be vignetting at the outer left and right edges is also
prominent.
The answer is to trim out the septum dissolve, level
the ocean, and properly "window" this view.
Consider either manually trimming and mounting such
a view, or doing the same via a simple digital graphics program. In the
following example I cleaned up this view --plus I leveled the ocean (before
sending the finished view file to a digital print processing shop). I left
the original frames intact/as turned to make for an interesting stereo
window.
(Frame de-rotation like this does have stereo limits
--perhaps 10 degrees.)
In both examples, you would cut out and use the inner
3x5 inch area --as your viewcard.
"6x13" affordable stereoscopes:
For 3x5 cards there were several options:
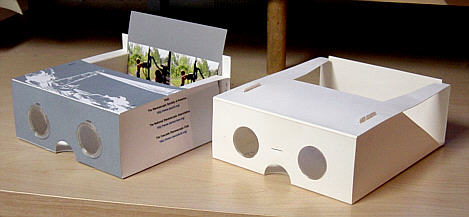
These were just $5.00, but I was only able to sell
a few.
Above at left is a rigid stereoscope that I made (by
hand) for 5 inch wide viewcards (and see our former commercial
view sets). It has the same excellent 6 inch focal length lenses used
in the Taylor-Merchant "TM-707" viewer. This 'scope, the model 5h-V2, was
good for up-to 3 inch high pairs. [As of 2019, and given the difficulty
of getting excellent commercial laser prints, I'm only making viewers with
the 7 inch lenses.]
* I consider 2-1/2" tall view cards
to be "normal", since that's a 71% reduction from standard 3.5 x
7 inch Holmes-Bates/SSA view cards to the 5" format.
* At right (above image) is a 7
inch focal length folder and optics that I designed for The Added Dimension
in 1994, which will view a card with 3-1/2 inch high images. It weighs
only 1 ounce but is surprisingly stiff when assembled. I've turned my remaining
stock into rigid scopes by gluing the tabs. I'm currently (2016) trying
to locate a supply of 2 inch diameter by 8 inch focal length (5 diopters)
plastic lenses for a 7 inch card version of the V2.
Another foldable/mailable viewer was being sold by
Berezin --see:
http://www.berezin.com/3d/flatcardviewer.htm
--for about $5.00 plus shipping --less in small quantities.
Our old sets
of 5 inch wide stereographs --last made
in this "T-5" format:
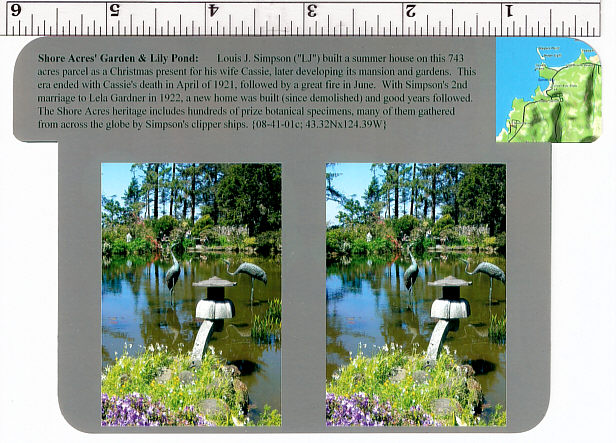
These were only $1.00 each. Altogether I sold about
2 dozen. (Click to enlarge)
The advantages of 5 inch formats: 1) You can affordably
print complete ("monolithic"), quality, formatted/windowed views through
better (Fuji Frontier) digitally based 4x6 processing services.
2) The viewers were very affordable, work well. The
folders were cheap to mail out in promotional packages.
The Experience: While looking
at stereo views is often a fine, social, here-and-now activity (serious
or casual), the personal experience of "falling into" your collection of
view cards is precious and well worth optimizing.
* For any stereoscope, it's important
to take the trouble to place your light source in an agreeable position.
With a traditional Holmes-Bates skeletal stereoscope, you want your floor
or reading lamp to be well above, behind your head, and to the right or
left (opposite the hand you use to change view cards). With Model 5H-V2
and other "Brewster" type "box" scopes, your lamp should be well above,
centered and somewhat behind your head.
* Avoid any light sources in front
of you.
* Unless a window is high on the
wall with a northern exposure --such that you can sit with your back turned
to it, pull the curtains and/or install proper opaque window shades.
* Avoid shadowing the view card
with your head or elements of the viewer/stereoscope.
* Avoid "specular reflections":
shine that bounces off the card's print pair from room lights and such.
* Make your environment agreeable
and buoyantly neutral: an over-stuffed arm chair, a quiet room, perhaps
soft instrumental music, and your open basket of loose view cards beside
you --such that your awareness can dissolve into the time and place of
each stereoscopic view. That's "virtual reality", ala the 19th Century.