Formatting the Digital Stereo
Pair
(Last worked on: September 28th,
2022) (but see here fiirst.)
(Back to
Trim-1)
You're at: https://57296.neocities.org/trim-02.html
folder format>
composing
pairs, the basic image,
film
scanning, mounting jig, working
with MPOs, best results from a W3,
MPOs to viewcard
prints: step by step, print pair standards, 5
inch views, current practices,
(Some of this will seem repetitive,
since I've combined earlier pages.)
 * 6/30/2020 update: To
get best results from your W3:
* 6/30/2020 update: To
get best results from your W3:
* If you just use the camera set to "AUTO", the default
of up to ISO 800 might look rather grainy due to pixel noise --and soft,
due to the camera resorting to an aperture of f/8^ in bright light. The
"Auto" defaults also give you a lower image "quality" setting (meaning:
more JPEG compression).
* Instead, select the "P" (program) setting, then in
the MENU: choose either ISO 100 (and try to shoot with lots of light, perhaps
supplemented by "Auto" strobe "fill" lighting) or "Auto-400" (which I'm
trying first). For straight ISO-100 shooting at low light levels, use a
tripod or rest the camera on a railing.
* The implicit Fuji philosophy (and a good one) is:
"get the picture", thus the auto exposure default of up to ISO-800. Purists
might quail at the sight of noise in the dark areas, but that's better
than all dark. Never-the-less, I'll be watching what apertures and ISOs
are being auto selected. I want to keep the f/stop widest (at about f/4^).
* The "P" mode lets you upgrade the IMAGE QUALITY to
"FINE".
* For making print pair views, set the image size to
4:3 --which is the native aspect ratio of the camera's two CCD sensors.
* You might prefer setting the color option to "CHROME"
(C), but I'm not sure of that yet. I tend to like less color saturation.
^ Getting down to brass tacks: the widest this camera's
lenses go is about f/4. It's the physical nature of light that the minimum
resolvable "dot" that an f/4 lens can resolve (regardless of focal length)
is 5.4 microns across (1 micron = 1/1000th of a millimeter). However, this
camera uses a pair of "1/2.3 inch" sensors, each arrayed with 3648 pixels
across their 6.16mm width (and 2736p across their 4.62mm height). That
pencils out to a pixel spacing of 1.7 microns. Clearly: we need only save
images at the "M"/medium setting of 2592x1844 pixels (= 2.4 micron/recorded
pixel) --which is twice the count seemingly required by the theoretical
resolution of the lenses --but about right for realizing as much detail
as an f/4 lens can resolve. (There's a "rule of thumb" that to get all
the resolution a lens is rated for, the sensor or film needs to be twice
as good --and vice-versa.) Should the W3 be allowed to aperture at f/8,
the minimum dot size becomes 10.8 microns --!
3/13/2019: My vaunted copy of
PPub-3.1 is now 27 years old --! Surely, almost any general purpose graphics
program, commercial or freeware, can do the masking and moving described
below. Avoid anything that uses "layers" --unless it's very stable or you
can turn that feature off --since it might make you combine layers after
every move --in order to lock in object positions.
* PPub-3.1 might not run under
operating systems later than XP-3, so go for a graphics program that's
current for your computer.
3/4/2011: There's a new, free,
general purpose graphics program: "Paint.net", which you can download for
free at:
http://www.getpaint.net/
www.pokescope.com
is interesting software that's dedicated to editing digital stereo pairs.
I purchased a copy, it works fine, it's reasonably priced, but (of course)
I'm use to doing it the old fashioned general graphics way --to which I've
returned. Newbies, however, might want to patronize and support this company
and its worthy ventures.
* Another option is "Stereo
Photo Maker", which is a free download, works well, can use Fuji MPO
format directly (unlike Pokescope), and is a bit more complex. It easily
converts stereo pairs from MPO to side-by-side pairs or anaglyphs and re-saves
to your choice of TIF, PNG, GIF, and JPS or JPG with your choice of compression.
You can print your pairs to arch-top stereo card format directly, adding
a left-right legend beneath them. SPM appears to be the answer to the virgin's
prayer --and capable of becoming the core of a serious stereographic enterprise.
http://stereo.jpn.org/stphmkr/
Fuji's W1 & W3 Cameras --and
digital age cameras in general
In the Volume 35-#4 issue of Stereo World, Bob Pfeiff,
a seasoned stereographer, wrote a long and thorough review based on his
experience with the Fuji W1 --for those of you who are subscribing members
of the NSA. (Sorry: Stereo World isn't on-line, but see the above PC Magazine
review link as well --even though it isn't as well informed as Pfeiff's.)
Except for its redesigned case/grip, bigger, brighter hi-rez display, and
the ability to record 3D video in high definition (720p x 24 fps), the
innards and menus of Fuji's new W3 stereo camera are said to be the same,
so much of Pfeiff's review applies.
I'm better at supplementing reviews than doing the
whole job on my own :-) --but here are some comments. I was recently given
a W3 (thanks Nancy!) plus I've studied the manuals and have worked with
MPO format image files. The manuals for the W1 and the W3 are downloadable
from the Fuji web site, per:
www.fujifilm.com/support/3d/manuals/.../finepix_real3dw1_manual_01.pdf
http://us.fujifilm.com/support/ServiceSupportProductContent.do?dbid=880144&prodcat=878955&sscucatid=664271
** * The features this camera
has work perfectly and (when set to automatic) painlessly. A critical feature
it doesn't have is either an optical or an "eye-peeper" electronic viewfinder
--which (for me) prevents the W3 from becoming my "vade mecum"/always with
me camera. (I've long packed a Canon A590 hand camera.) Another drawback
is its small size and fingers-in-the-way lens placements. To make this
camera more useful, I mounted it on a handle bracket.
Working with the MPO format:
8/7/2022 comments: * My out-links get dated, so Google
"Stereo Photo Maker" to find downloads, tutorials and manuals.
* After a month of go-arounds to recover from the death
of my 18 year-old XP tower computer, to stay alive here I've ended up with
a low mileage used W-10 tower, an old Vista tower (after losing a 2nd XP),
and a Chromebook --the only thing I risk on-line --except when I rarely
put the W-10 on-line to get an application that I can't live without --like
SPM, so I can use my W3 camera again.
* I'll tell you what. First I had to determine if my
W-10 is a 32 or a 64 bit critter (ask the Internet for how), then do my
best to get on and off line before the operating system, anti-virus and
a half dozen applications start calling home to update. I managed that,
but the SPM application came as a Zip --which I found at
(something/something/users/craig/downloads/SPMzip/)
--which I clicked on to extract the SPM EXE --which I
in turn double clicked on to install --in case it had to get something
on-line to go with it.
* Well it did not install. Instead I got a MS screen,
saying that Windows had saved me from opening a questionable program of
unknown origin --with no option to "run it anyway" --so I got off-line.
* Later, I ran down its location again by way of planting
a shortcut on my desktop, double clicked on it and got:
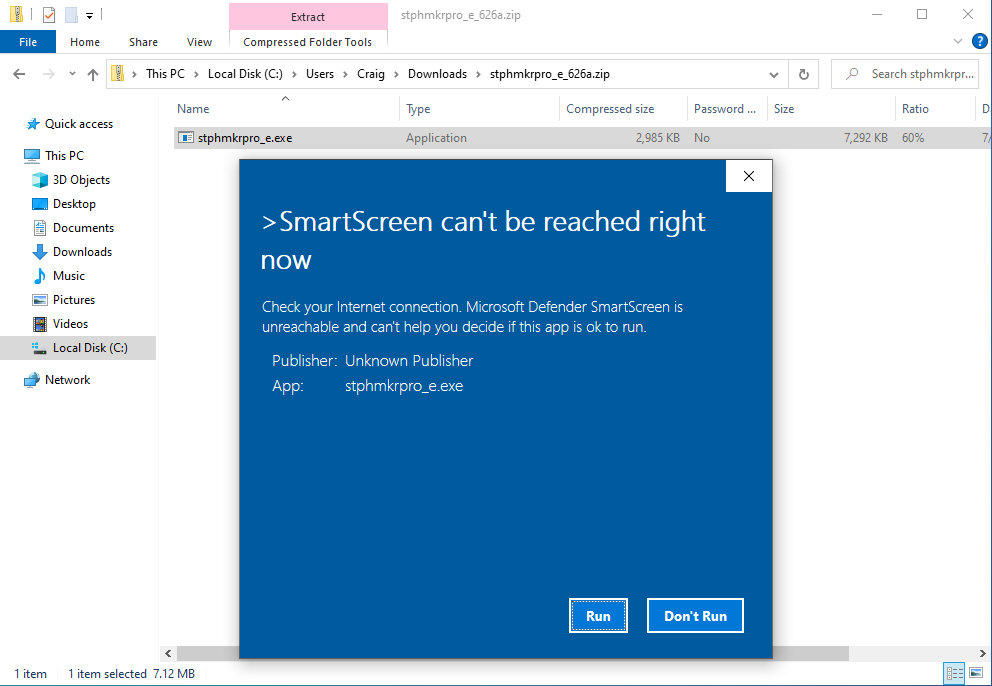
(click to enlarge)
--and by golly, after clicking on "Run", SPM executed!
* So I don't think it "installed" via the registry
and all that, but I'm going to leave gud-e-nuf alone.
* I'm not sure what Bob Pfeiffer is in reference to
in his review, but from other sources I'm given to understand that the
left and right images are separable as JPEGs via either the software which
comes with the the camera, or software which comes with the (spendy) "V1"
viewer. Fortunately, there's a freeware (ie: no cost or obligations)
program named "Stereophoto Maker" which speaks "MPO" and allows you to
work with its containerized JPEG pair, or to simply save out the camera's
MPOs as left and right JPEGs (the option I take) --to work them in a general
graphics program.
SPM is GREAT thanks to the hard work and generosity
of Masuji Suto San, translation by David Sykes, and tutorials by David
Starkman.
Download it at: http://stereo.jpn.org/eng/stphmkr/
Bob Pfeiffer experienced slow processing with Stereophoto
Maker, but he was using a damnable (IMO) Vista operated computer. Our "Are
You Sure?" Vista operated laptop is a lead sled clunker. (It helps
to put in more RAM, externally or internally, but file transfers can still
be agonizingly slow. We much prefer our XP-3 PC towers.)
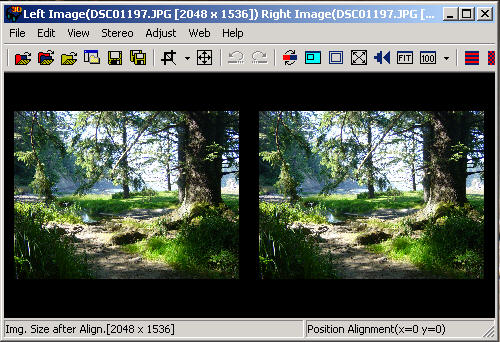
* I've used SPM to pull up pairs from our twinned digital
cameras, plus I've worked our own and others' MPOs. You can get sample
MPOs from:
http://www.cmsoft.com.br/index.php?option=com_content&view=category&layout=blog&id=131&Itemid=189.
If the directions for working with separate left-right
images aren't working for you, start with "File/Open" and choose "Open
Left/Right Images". Be sure not to maximize the window that SPM
is running in, since you have to grab a corner and resize it (along with
the displayed pair) in order to fuse the view you're working with (by freeviewing
or wearing prism power stereo glasses).
Previously, there were no graphics programs that I
could suggest to people getting into working with digital pairs. Aside
from Picture Window Pro (which I use mostly for running my film scanner),
the programs I use are over 20 years old (Micrografx Picture Publisher
versions 3.1, 6 and 8; Mgfx Designer 4.1 and 6; Paint Shop Pro-7). I've
tried other brands and newer programs, but they didn't measure up --especially
to my ancient PPub anchor program.
For more about currently available graphics programs,
see page "Trim-01".
Returning to PokeScope:
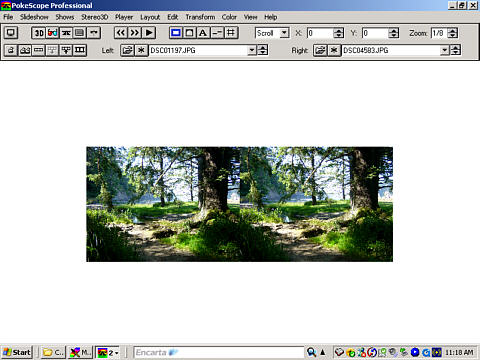
I found it to be quite intuitive. It runs well under my
XP-3 Windows operating system and earlier systems. It's available from
Berezin --at: http://www.berezin.com.
More programs for dealing with MPOs and stereo in general
(some for Mac computers) are at:
http://www.stereoscopy.com/downloads/
(Thanks, program authors --and Alexander Klein!)
* I barely know what I'm talking about with respect
to computer operating systems, but I gather that there have been 64 bit
versions available for some time now. For those of us who have old programs
that we love and rely upon, I've been told to opt for the 32 bit version.
See:
http://en.wikipedia.org/wiki/Microsoft_Windows
* Micrografx created Picture Publisher-3.1
back in 1992/93. Originally it sold for $500(!) and until PokeScope, nothing
came close to its intuitive convenience for doing basic digital stereo-graphics
scut work. Try and find a copy --which often shipped as a freebie with
old scanners like the Mustek brand. Although it works fairly well in a
Pentium/W-98 or XP3 environment (or a later operating system dialed back),
some of it's best features (like for creating anaglyphs ["algebraic pasting"])
are lamed, so you need a recent graphics program as well (PPub or Paint
Shop Pro, though PokeScope will at least do anaglyphy for you, and Stereo
Photo Maker does it all).
* I've looked at Microsoft's
(comes with your operating system) "Paint", and it won't display large
images (beyond screen-size in pixel count) to a reduced scale.
* I looked at the 48 bit Picture
Window Pro-3.5. It's excellent, affordable --plus it doesn't annoy you
with endless generations of "layers" (you get an annoying series of edit
versions instead), but: it still doesn't let you round up and do controlled
moves of pixel groups like PPub-3.1 does. I tried the shareware version
#3 of Paint Shop Pro (a nice 2 MB download from sites like:
http://aliens.humlak.cz/aliens/Aliens_papirove_modely/papercraft/archive/paintshop3.12.exe
--but decided that its tools
are too primitive --even for laying down a side-by-side pair (as you see
having been done at the start of my digital steps below). However: PSP-3
still makes a good general purpose graphics program for sizing, histograming,
and printing out pairs for manual trimming.
* I've also looked at Jasc's
Paint Shop Pro versions #7, 8 and 9 (went to 48 bits in version #10). This
is a wonderful, complex graphics application which, when mastered, should
do anything you want --except move pixel groups like PPub-3.1 does. It
use to be very affordable (about $40 with rebates from Amazon.com and well
under $100 elsewhere) --until Corel got ahold of it and milked it (to death).
I started making a tutorial with
version #7, but by the time I got an approach to working with just one
"Layer" (PPub-3.1 used elegant masking control in advance of layers), Jasc
was shipping version #8 --which was such a departure from the appearance
of version #7 that my efforts were for naught.
** So either move to PokeScope,
Stereo Photo Maker, or just use any program/s which
will allow you to print out 300 DPI color prints to a specified size, then
go to:
t-plate-steps.htm
--and learn how to trim them
out --the old fashioned way with a razor knife.
* General note: Don't try to
open or create JPEGs (or other compressions) with Picture Publisher 3.1
or other older graphics programs. You need something up to date.
My current (5/3/2020)
practices --
--have changed, in that I mainly make 5 and 7 inch
wide bi-folder views, and often without the fold, such that they look like
the (6 inch) tall view card you see in that V6b viewer (just below). This
is sometimes called "study card format" --recalling a series of anatomical
views from Edinburgh, Scotland used by medical students a hundred years
ago. It's nice to simply look over the top of your stereoscope in order
to read information (the "extended legend") about the view, especially
if a 'scope is being passed around socially.
* My old stereo film cameras have gone to their rest,
I put off buying a Fuji W3 stereo digital camera --for way too long, my
twin digital camera rig doesn't work anymore (a pair of Sony DSC-P71s),
so now my careful shooting is done with a single digital hand camera (an
old Canon A590) on a tripod mounted slide-over bar ("shift sequential"
image pairs). Otherwise, I work image pairs pretty much as
described below.
(click to enlarge)
Here follows my earlier writ:
The following steps are based
on the use of Micrografx's Picture Publisher
version 3.1
There is no substitute. Corel
has the brand now and won't sell this old version. Find a copy if you can.
It runs well enough under Windows-98 and XP/2 or XP/3 when you take its
option to emulate XP --just for PPub-3.1 (It's a right click on the start
icon or the EXE itself to access that feature).
You can, of course, make other
modern graphics programs (like Photo Shop Pro) do this work, but you have
to fight modern-times "bells and whistles" to get through these simple
tasks. (The software future belongs to publishers who will provide a
"console switch" --to emulate earlier versions of their applications.)
Two common problems we deal with
when composing a view based on a "weight shift" pair. (See
Glossary
for any unfamiliar terms.)
(Later installments will address
problems with differential rotation and image scale problems, so for now:
keep your camera level, leave your lenses at full wide or full zoom, and
lock the focus if it's jittering.)
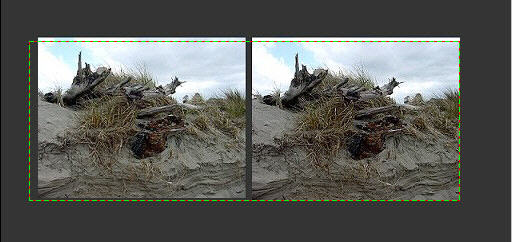
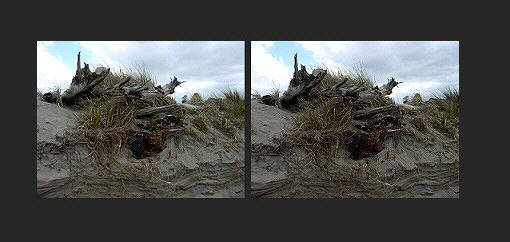
Here's what I did to fix this
Beach Driftwood pair (stereographed by Peggy Daniels).

This pair is a nice view but
it presents a little extra work for our eyes to do :-)
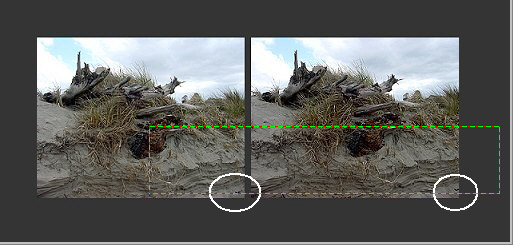
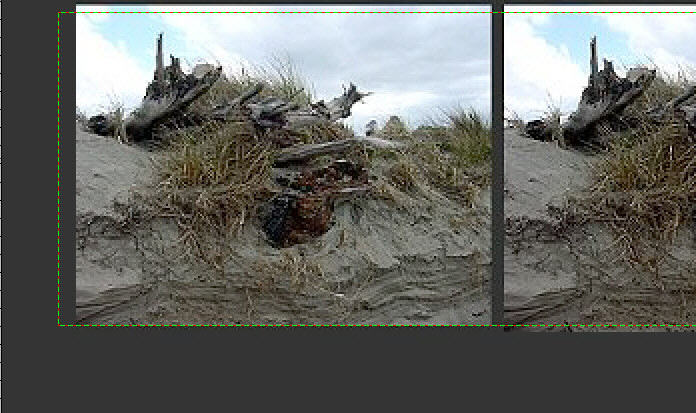
The first problem is obvious
--by drawing a mask to check and see if details are level (ie: in vertical
registration). If not, you can move the mask with your up-down arrow keys
(with Micrografx Picture Publisher version 3.1*) at 100% size or 200% size
to find out how many pixels one of the frames has to be moved. In this
case, the right frame should be dropped 3 pixels.
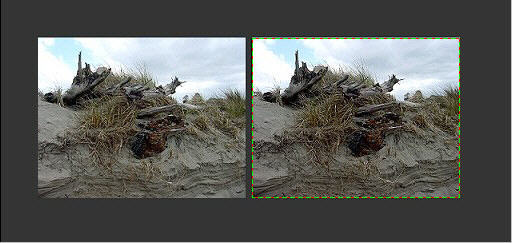
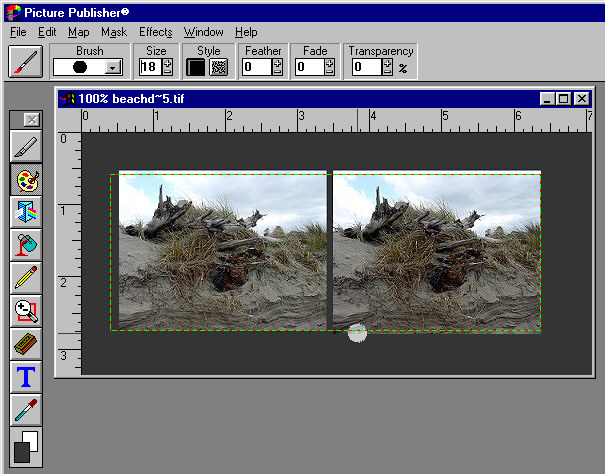
After making that determination,
put a mask just inside the image area of the right frame (so you don't
get any "card" color) --
--select it, and choose "cut
out image" (PPub-3.1 vernacular) or "move image" and then drop the image
down exactly 3 pixels (3 pokes at the down arrow --using PPub-3.1). In
PPub-3.1 you then double click outside the image area to settle the moved
area. (In other programs you next have to mess around with combining this
moved image from being a "floating object".) That leaves a 3p high white
space above the frame/image.
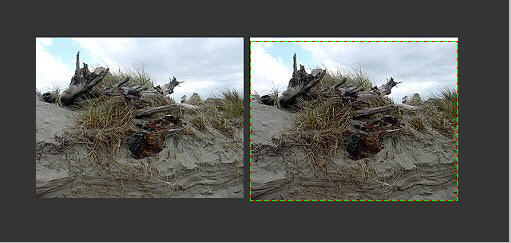
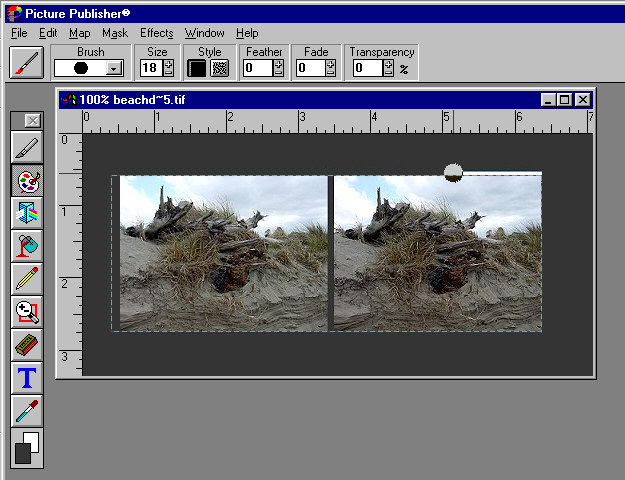
Now reselect "Mask Only" and
drag the left edge out across the left frame (and settle the mask).
I'm using 2x ("200%") magnification
here to move the bottom edge of the mask up just into the left frame image
area. (Be careful to move the bottom mask edge --not the whole mask.)
Having used that medicine dropper
"color picker" to place the "card" color into the active painting frame
(bottom left most area of this image), I next set the mask select to "outside"
(using PPub-3.1) and began painting over those frame/image areas that are
outside of the mask.
And here I've just about finished
up with this step.

But there's another problem
--which should be apparent to an experienced stereographer's eyes --simply
by trying to view this stereo pair. Even without viewing them --as is plain
from the last detail we examined and the one circled here, there's more
near image area at the left edge of the left frame --than at the left edge
of the right frame. Also: there's more near image area at the right edge
of the right frame than at the right edge of the left frame.
What that means is that the frame
lines --which define how far away the "stereo window" appears, need to
be adjusted. (see "A Stereo Glossary" for this term and anything else which
is unfamiliar at: Glossary ). The "window"
in this view is further away than and "cuts into" the nearer image details.

An easy way to fix this problem
is to place a mask over the pair --such that it cuts off the outside edges
equally --and just as much as you need in order to "nick" into nearby image
details --more of which can be seen in the other frame.
Then you use the color picker
to make the active color patch (lower left of this image in the program
PPub-3.1) the color of your "card" --and paint out the image areas which
are outside of the mask (as we did before).
Here's the result:
Outputting your view as a traditional
("Holmes/Bates") stereograph
Well --duh: just print
it, right?
Most standard stereoscopes (including
the "CedarEdge") have "base-out"
prismatic lenses with optical centers separated by about 3-1/2 inches (89mm
--and the antique ones had to be built that way). With a view card placed
on the stage at full focal length, that much distance between similar details
(left to right frames) on a card are fusible, since your 2-1/2 inch (64mm)
eyes can look at it with no more than parallel vision.
(The technical term for similar
details is: "homologous points".)
HOWEVER: folks like to "crowd
in" on a good view (to get closer and "see more") --thus defeating the
prism power of a stereoscope. Good practice is to "trim and mount" (virtually
on a computer graphics program) such that the furthest image detail spans
(those items furthest from the camera) are no more than about 3-1/4 inches
apart (83mm) --and many members of the Stereoscopic Society of America
mount even closer together. Almost no one notices if the maximum card spans
are on the order of 3 inches (say), but many people object if you go over
3-3/8 inches. (Some plastic lorgnettes, like the AO and the "RCI", can
span up to 4 inches to accommodate "super views".)
Now factor in a bit of "gap"
(technical term: "septum") between the image pair --which is an excellent
idea (to prevent "retinal edge rivalry") --say: 1/8 inch.
* In a "normal" view (4 feet
to infinity, taken with a Realist or similar stereo camera), the range
of depth within the view (technical term: "deviation") runs from the span
between the window's edges (which are also the print pair frame edges)
to a tad more separation between similar points at infinity: about 1/4
inch --if most of the 5 perforation frames are enlarged about 3.5x for
the print pair.
** So: if we make our print pair
2-7/8 inch wide (each frame --any height), if we allow for up to 1/4 inch
more for the deviation content, if we allow for a 1/8 inch gap --our stereograph
is full-up.
Even though we might not be using
anything remotely like a Realist stereo camera, even if you're making appropriately
spaced hypers and hypostereo pairs --if you make your print pair with 2-7/8
inch wide frames AND trim/window properly (per the directions on these
web pages), you'll be turning out "standard 'scope OK" views nearly all
of the time.
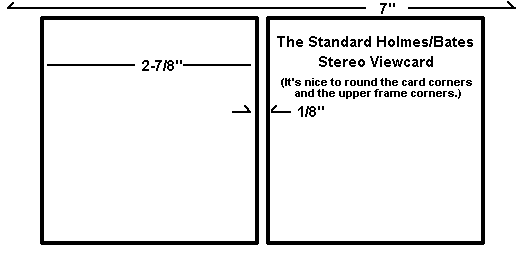
* Your mounting cards, of course,
should be 7 inches wide and normally about 3-1/2 inches high --but up to
4 inches high works well too and fits most Society traveling folio boxes.
Sometimes circuit members make extra tall views and hinge them at the septum
--to fit into a folio box or maybe to carry them around in a shirt pocket.
* For actually
and accurately placing a ready to stick down (glue or carpet tape on their
backs) --trimmed print pair onto a 3.5 x 7 inch card, you might want to
make a mounting jig --like this one.
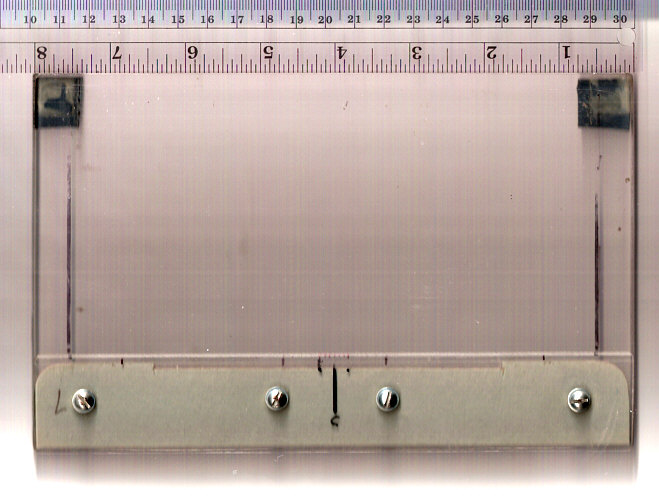
Mounting jig
(That ruler isn't a part of it, and sorry for the uneven
lighting.)
* The OTHER format is "American
6x13" --which mounts up (typically) on 5" wide cards (just heavy photo
paper is often rigid enough) and is over-all about a 71% reduction of a
standard stereograph (or: "viewcard").
You can easily turn out both
formats on the same "view" (taking that to mean the entire card or folder
artifact) by simply reducing a copy of the Holmes-Bates original and placing
it on the 3rd panel of a "folder" (see below) as a viewing option.
Here's
how to do it almost totally with your computer:
 What
you're looking at is a sheet of 24 pound wt. standard ink jet stationery
(Hammermill 97% reflectance), now trimmed off to a 7 inch width and a length
suitable for placing the tri-folded panels into a standard stereoscope
--as if it was a Holmes-Bates (Society standard) card-mounted stereo view.
What
you're looking at is a sheet of 24 pound wt. standard ink jet stationery
(Hammermill 97% reflectance), now trimmed off to a 7 inch width and a length
suitable for placing the tri-folded panels into a standard stereoscope
--as if it was a Holmes-Bates (Society standard) card-mounted stereo view.
To get images placed just where you want them on the
page, you need a "designer" type program --like Micrografx's "Designer"
(and I still use their 16 bit version 4.1 here). The images are worked
in a "bit map" graphics program (like Micrografx's "Picture Publisher"
or "Paint Shop Pro", then imported, placed, and (if need be) sized.
Text is typed in with the designer program and the whole is saved as a
designer file for future use (and maybe as a template for your next view
project).
The main view image is sized to 3-1/2" of height, but
the middle panel is as much as 1/8" shorter --such that the gray ground
"bleeds" a bit into the adjacent panels. That saves you the stress
of getting both image edges and fold lines exactly the same.
The sheet can be used as is by folding the panels as
needed. Alternately, the top panel can be folded back and permanently
bonded to the view panel (using indoor non-reinforced plastic carpet tape)
--such that it becomes much more rigid.
Obviously, the panels are "corner rounded" (see glossary)
when folded together. They match along their edges almost perfectly,
since they were also trimmed to size when folded together.
Note that the 71% "freeview/6x13" version allowed for
placing a small map image alongside --which also includes an arrow designating
the scene's location --along with its latitude and longitude (thanks to
DeLorme's "Topo USA" program and resource disks). If you have a program
like Micrografx Designer, a 71% version of that 7 inch view is a breeze.
Just select the standard view image, duplicate it, resize it to 71%, and
place the small view where you want it.
** To make a 71% view without a
"Designer" type graphics program or a good printer, perhaps
your "bit map" graphics program is up to creating a nominal 4x6 inch TIFF,
PNG or a BMP image at 50% neutral gray and 600 DPI (ie: 2400x3600 pixels).
Save that image file and then create a standard stereo image pair (like
you normally would), but at 426^ DPI. When you paste that image into a
copy of your 600dpi gray 4x6 file, it comes out 5 inches wide^ --when you
have the 4x6 file printed.
^ Well no it doesn't :-) --because your
printing service enlarges your nominal 4x6 inch image file just a tad --maybe
2.5% --SO: try creating your stereograph at 415 DPI --or whatever compensatory
reduction is needed for your local photo service.
* Another helpful touch is to draw a fine line (2 pixels
wide) box around your (will become a) 5 inch wide stereograph as part of
the image --which you paste into the 4x6 gray file. When printed, that
gives you a nice "cut here" reference.
'Bye for now,
Craig :-)
(Back
to Trim-1)
(~~~~older writ~~~~)
Here are the steps for getting
print pairs out of your Fuji-W3 stereo camera
Considerations: A year
ago I was able to take a Stereo Photo Maker (SPM)
generated
batch of side-by-side JPEGs to a local over-the-counter processing service
and fit the pairs inside the 6 inch width of a standard 4x6 print (which
left some blank space above and below the pair to trim away) --but no more.
The counter-top processor interface insists on filling out the 4 inch height.
Consequently, you'll have to use SPM (as intended) to output a complete,
high resolution view, which is imaged within the space of a 4x6 inch "card"/print
(ie: a "monolithic view"). For you old-timers, the result is a Grand
Photo style "ready to view" pair.
* Don't worry: it's easy. If you want, you can still
trim out the pair, adjust the window, and mount to a traditional mat board
card.
* Another option is to simply run the SPM generated
pair to your desktop printer. SPM shows the pair's placement on a standard
8.5 x 11 inch sheet, should that be your medium/format of choice, or
if you're making a "folder" type view (like those used in the SSA's "Letterbox"
circuit).
The steps here are the same for folders. Just fold
the paper, instead of trimming out your printed view. (You might want to
print some extended legend text on the page before folding.)
1) Download and install "Stereo Photo Maker"
from:
http://stereo.jpn.org/stphmkr/
2) Make sure that you've read the Fuji manual's
"Camera Q&A" plus pages 1 through 4. Set the camera's date and time,
learn how to prolong the camera's display time (page #), do an initial
run-through of what the icons mean (book mark that page), and make sure
you've read the section on batteries, so that you start fullycharged(page
#15) --especially before you do your setups or format a memory card.
3) A charger came with your camera. Make sure it's
not been tossed out with the packaging. Use it now.
4) Read Page #9-10 and install a memory card of
the recommended type and quality. (You'll need a good one --an SDHC, if
you decide to shoot video later on.)
5) Read page #11 and carefully format the card
before you use it.
* Format it again after you've stuck it into an
SDHC capable card reader/adapter --which USB connects to your computer.
That's the cleanest/bestest way to erase the card and start fresh (after
you've archived your shots).
* Note that your camera's default settings number
each new photo to sequentially ("continuously") higher number, independently
of changing out or reformatting memory cards. Don't change that setting.
6) The camera default settings
work great
for general shooting, but you'll want to change a three of them (now)
--in the "P" auto mode.
* On page #64 are shown your photo size and
format options.
The one you want is "L4:3". Go to page #60 and
learn how to change to that size from the "L16:9" default.
* On page #65 are shown the "Image Quality"
options. The one you want is "Fine". Go to page #60 again, see how
to navigate to that camera setting, and change it from the default "Normal".
* One of the Menu setup options is titled: "MPO
3DREC". Change the default "MPO+JPEG" to just "MPO".
Read page #15 ("Taking 3D Pictures in Auto Mode").
7) Read page #17 on holding the camera --learning
how to hold it steady while keeping your fingers and the strap out of
the field of view.
8) Read page #19, so you know what the colored
lights and messages mean.
** Skip any "advanced" information or settings
for now. Master the details and features of "Auto Mode" first. Run
through several "rolls" of digital "film", until the camera's functions
and handling become second nature.
9) Take a bunch of stereo photos.
10) Read page #12 and #20 --so you know how to
review your shots --and delete the ones you don't want.
11) Skip installing the Fuji comes-with software
onto your computer.
12) Turn on your computer. Let it boot up and finish
doing all its frigging updating and such --which might take 10 minutes,
so get a cup of coffee. (It can be extremely confusing to learn
a new program when your computer's operational capacities are being pre-empted
by such nuisance "house keeping" operations. The computer's user-owner
is given lowest priority.
13) Create or find a suitable folder (or "directory")
on your computer's "Desktop" display --for receiving your camera's "MPO"
files. Make another directory for your finished, ready-to-print, ready-to-view
stereographs.
14) When you're done shooting, reviewing and deleting,
turn the camera off and remove the memory card. Place it into your card
reader (which might just be a little "thumb" adapter) --that connects to
your computer via USB.
* The first time you plug a camera memory card
into your computer, your computer should say/state something like: "I found
some new hardware"
--and you just keep sitting there -keeping your hand
off the mouse and the keyboard (no *clicking* ! ).
Time passes.
Your computer might then say something like "I'm working
on it".
Finally, your computer (perhaps ever-so-briefly) states
that your "new hardware" (meaning the camera memory card) "is ready" --but
you just keep serenely sitting there --smooth of brow.
* Your security system might ask if it should first
scan the memory card. Either a "Yes" or a "no" is fine--
--and you keep on just sitting there.
* Your computer will probably next display a menu
of options about what you want to do next --and you then choose to display
the contents of your camera's memory card. (*click* or *click*click*? Microsoft
can't seem to make up its mind about how to launch a command. I always
try a single click first.)
* Inside will be a "DCIM" folder --which you'll
*click*click* on to open it.
* Inside that will be another folder labeled: "101
Fuji" (or some such). Go *click*click* on it.
* Now a damnable thing about Microsoft computers is
that they often ship with the file tags (types) display turned off, so
you might not see a bunch of image files with number names like: "000-0134.mpo".
Instead you'll see just the "000-0134" first part of the names.
* The potential problem is: if you've taken any
videos, they're identified with a different tag: "000-0135.avi". (Hopefully,
the AVIs will be in a separate "MOV" folder, or some such.) (Again: I don't
own a Fuji W3, just a camera manual, so I might be remiss in a detail or
two here.)
* If the tags (file types) don't show, and if that's
a problem, have someone who knows computers change the "Windows Explorer"
settings to display them.
15) So okay: there, probably on your "desk top" screen
display of the memory card's folder, are all your image files --and there
also is your intended MPO receiving folder --both being displayed on your
monitor. You know how to round up and "Copy" (NOT "Move") the image files
from the one to the other --right? Then do so.
* Do not reformat the memory card just yet. The
images recorded on it are your insurance, should there be some misfortune
when dealing with the copies you've placed on your computer's hard drive.
16) Next: open the program: Stereo Photo Maker. You're
going to use it for just a few steps.
17) Click on File/Open Stereo Image, then navigate
within SPM to your MPO folder in the usual way.
18) Select "Side-by-Side" for the format, check "Show
Preview", highlight your first MPO selection, and "Open".
19) Now you're looking at the stereo pair in a
program window which can be sized, such that the left-right pair can be
made to agree with whatever glasses or free-vision you're using to (optionally)
fuse it. Most likely, the fused view looks good enough --just the way it
comes up. If not, feel free to play with the adjustment options (learn
by doing).
20) Now select File/Print Stereo Card, Then "Holmes
Card (6x4 In)" at the default 600 DPI --which will produce dandy results
when you either print out the view to gloss paper on your desktop printer
--or go the over-the-counter photo processing route at a department store.
21) You want to either personalize or delete the
legending content.
22) Next: decide whether to print it here and now (simply
doing so in the normal way, hopefully onto some quality paper and with
an appropriate printer setting) --or: Select "Save as" --then select a
90 percent quality JPEG format and navigate to that folder you created
for ready-to-print image files.
23) Now transfer a copy of the folder with the
created JPGs to an empty flash memory --or a CD or DVD --along with the
original, virgin MPO camera image files --and their folder.
* This is insurance: an approach to both backup and
organization.
* Your computer at least has a CD drive that can also
record --right? Open up the program which does that and save the two batches
of files to a blank CD-r or (better) a DVD-r disk. (The program you
need may have come with your computer --and might be named "Nero" or "Roxio".
It's intuitively easy to use. Just wait for it to catch up with your requests.)
* Once you've got a CD or DVD of your original
and processed image files (in separate folders), label it with dates, places,
names, etc --using a "Sharpie CD/DVD Marker" (only: no paper labels
or other types of markers). Put the disk into a special disk album
or file it in a protective sleeve --no finger prints.
24) Should you decide to trim out and mount the image
pair onto a traditional 3.5 x 7 inch mat board card, then the next steps
are *here*.